How to Backup Sticky Notes Windows 11 [Step-by-Step Guide]
Sticky Notes users can easily save essential data on the app, but the lack of backup and restore features makes it tricky to store or transfer notes to another device. To address this, we'll explore different ways to back up Sticky Notes on Windows 11, making it easier to transfer notes to another device. Let's dive in!

What Is Microsoft Sticky Notes
Microsoft Sticky Notes is a digital application in Windows computer systems that allows users to create and pin reminders and jot down instant ideas. However, earlier versions of the app did not support pen input methods.
The latest Windows 11 sticky notes have advanced intelligence features that allow for handwritten text recognition with pen inputs, automatically saving important data such as passwords, document numbers, and birthdays.
Why Do We Back Up Sticky Notes
Sticky notes in Windows 11 automatically save your work, but this convenience comes with some drawbacks, including the lack of backup and restore functionality in case of data loss. Unlike text files, sticky notes cannot be saved or modified like other digital files, making it difficult to access and use them if they are lost. Therefore, backing up sticky notes is a good idea for several reasons.
- Use the same Sticky Notes on other devices
- Find earlier notes and revert to them
- Transfer Sticky Notes from Windows 11 to Windows 10 computers.
How to Backup Sticky Notes in Windows11?
Here are the different ways to backup Sticky Notes on Windows 11:
Method 1. Backup Sticky Notes with Qiling Backup
Method 2. Backup Sticky Notes with Built-in Tools
Method 1. Backup Sticky Notes with Qiling Backup
You may think it's hard and time-consuming to create a backup of Sticky Notes Windows 11, but it's actually a quick and easy process with Qiling Backup Home. This simple and compatible solution allows you to backup Sticky Notes Windows 11 in just a few minutes, with advanced backup options and multiple backup modes available.
Using this reliable backup software, you can securely backup your Sticky Notes and other data, ensuring your files are safe now and in the future. It allows you to backup and restore different versions of files, keeping your Sticky Notes safe without losing a single file. With advanced features available for free, you can enjoy real-time and faster backup with numerous scheduling options, making it easy to access your backed-up data anytime and anywhere.
Here are the steps you have to follow:
Step 1. Click the "File backup" button to start backup.

Step 2. Both local and network files will be listed on the left, allowing you to expand the directory and select the files to be backed up.

Step 3. Select the destination where you want to save the backup, following the on-screen guide.

Step 4. The user can click "Options" to encrypt the backup with a password in "Backup Options". This allows them to customize the backup task according to their needs, and explore other available options.

To set up a backup schedule, you can choose to start backing up at a specific event in the "Backup Scheme" section. This allows you to automate your backups and ensure that your important files and data are protected at regular intervals.

Step 5. You can store your backup to a local drive, Qiling's cloud service, or a Network-Attached Storage (NAS) device.

Step 6. Qiling Backup allows users to back up their data to both external cloud drives, such as Google Drive, and its own cloud storage.
To back up data to a third-party cloud drive, select Local Drive, scroll down to add a Cloud Device, add and log in to your account.
Step 7. Click "Proceed" to start the backup process, and once it's completed, the task will be displayed as a card on the left side of the panel. You can then right-click on the task to further manage it.

Method 2. Backup Sticky Notes with Built-in Tools
To manually backup Sticky Notes Windows 11, open the Run dialog box by pressing the Windows key + R, type "%AppData%\Microsoft\StickyNotes\NoteRef.db" and press Enter. Then, copy the NoteRef.db file to the desired location.
- Note:
- This method allows you to back up the existing data of Sticky Notes, but any changes made after backing up will be lost. It's recommended to use the first method for automatic backup instead.
Step 1: To open the Run dialogue, go to the search bar and type "Run" and open the app, or press the keys "Window + R" to directly open the Run dialogue.

Step 2: You can't perform that action on this page. You can still use the browser to open the link.
%LocalAppData%\Packages\Microsoft.MicrosoftStickyNotes_8wekyb3d8bbwe\LocalState
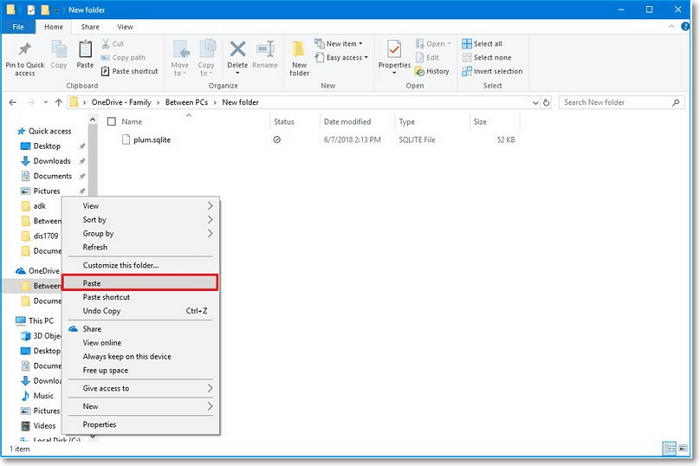
Step 3: Right-click the "plum.sqlite" file and copy it to your desired location on any USB, hard drive, or cloud drive.

Step 4: Go to File Explorer, navigate to the desired location, right-click on the folder and select Paste to export the backup.
If you want to know more about Sticky Notes and know how to deal with the errors, please read the following articles:
Final Verdict
Windows Sticky Notes often contain important data like passwords, dates, and other written records. To avoid data loss or transfer the information to another computer, it's essential to back up Sticky Notes in a reliable way.
You can either manually copy and paste or use Qiling Backup to quickly and easily back up sticky notes and other files with high-level data protection, allowing you to restore your files and prevent losing important data.
Backup Sticky Notes FAQs
To backup sticky notes in Windows 11, follow these steps: open the Sticky Notes app, click on the three dots at the top right corner, and select "Export" to save your notes as a .txt or .json file.
1. Can I export my Sticky Notes?
You can export Sticky Notes by manually copying and pasting them from the root folder in the C drive, but a quicker and more convenient option is to use Qiling Backup to export your notes.
2. How do I recover Sticky Notes in Windows 11?
To recover deleted Sticky Notes, you can try using Qiling Backup, which allows you to keep multiple versions of your notes and easily restore any one of them. Alternatively, you can try searching for them in File Explorer, but this may require finding the location in your computer's primary driver. This method can be more time-consuming and may not be as effective as using Qiling Backup.
3. Can I transfer Sticky Notes to another computer?
There are two methods to access the Task Manager in Windows 10: Press Windows + R and paste the path "taskmgr" in the Run dialog box, or press Ctrl + Shift + Esc. Both methods will open the Task Manager.
%LocalAppData%\Packages\Microsoft.MicrosoftStickyNotes_8wekyb3d8bbwe\LocalState
Then copy the file to your desired storage device like a USB or external hard drive.
(2) Download the Qiling Backup tool to easily backup or transfer your sticky notes to another computer in just a few clicks.
Related Articles
- Upgrade Windows 10 from Home to Pro Edition for Free
- How to Cancel Windows 10 Updates Once Started
- How to Fix Windows Update Freezes Computer with 7 Solutions
- How to Solve File Stops Copying Halfway (5 Ways)