DFU Mode Mac: What Is and How to Use It?
Macs are prone to technical issues, with some models getting stuck in a restart loop. If your Mac encounters problems like this, you can try the following guide to get it up and running again.
If you're experiencing issues with your Mac, you can try resetting or restoring it for a quick fix. However, if these methods don't work, you may need to explore other troubleshooting options to get your device functioning normally again.
Macs can enter DFU mode to revive or restore a Mac. This process involves holding down the power button while also holding down the Command (⌘) + Option (⌥) + P keys, and then immediately pressing the Power button again.
What Is DFU Mode Mac?
DFU mode, which stands for Device Firmware Update mode, is a deeper restore mode than Recovery Mode on a Mac. Its primary purpose is to restore or make small changes to the operating system, making it a useful tool for system updates or fixes.
Entering DFU mode on a Mac allows you to access various recovery tools from standard Mac Recovery Mode, while still keeping the device on and the operating system unloaded, giving you the opportunity to make changes before macOS loads.
Here are some situations where DFU mode can come in handy:
- When Mac Recovery Mode is not working
- When your device failed to reinstall macOS
- When your MacBook won't turn on
- When your device failed to finish macOS updates
- When you are unable to boot into the current OS Internet Recovery
What Is the Difference Between DFU Mode and Recovery Mode?
The differences between DFU Mode and Recovery Mode are worth exploring. Understanding these distinctions will help you determine when to use each mode and why. By examining these modes, you'll gain a deeper appreciation for their respective purposes and how they can be utilized to troubleshoot and resolve various issues with your device.
While both Recovery and Safe Mode are used to recover a non-bootable Mac without loading the operating system, they don't work similarly.
macOS Recovery is a built-in feature that provides tools to diagnose and repair issues with your Mac, restore files from a Time Machine backup, and reinstall macOS. It can be accessed by restarting your Mac and holding down the 'R' key, or by booting from a separate startup disk.
In DFU Mode, users can bypass the operating system and directly interact with the device, allowing for troubleshooting and maintenance without the need for macOS to be running. This enables users to fix bugs and even perform backups and restores, effectively putting the Mac into a workable state.
How to Use DFU Mode Mac?
Lastly, we will look at the steps to enter the DFU Mode on Mac and the setup requirements for the same. To enter DFU Mode on Mac, you will need to ensure your Mac is running macOS High Sierra or later, and your iPhone or iPad is running iOS 12.
How to Enter DFU Mode on Mac?
To enter DFU mode on your macOS device, follow these steps. Note that there will be no screen activity during this process. Your device will enter DFU mode, and you can proceed with the necessary steps.
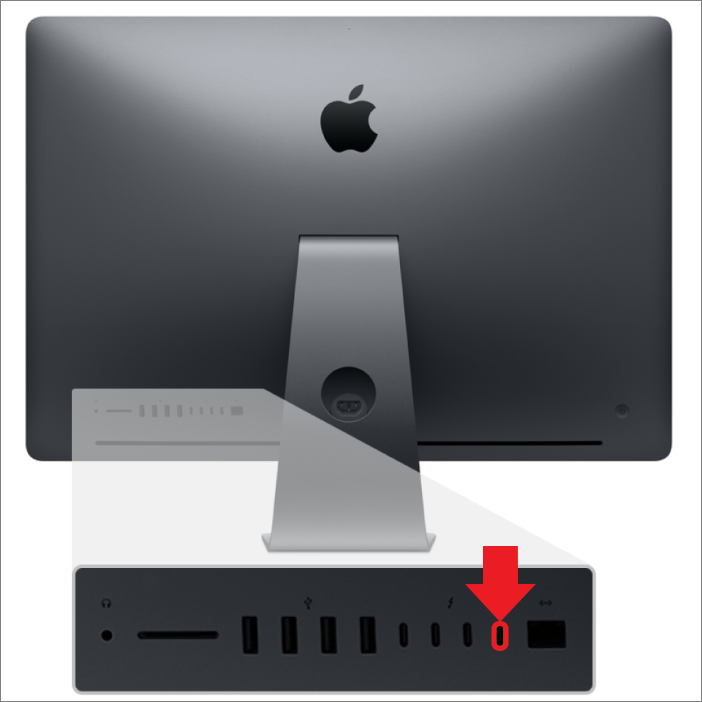
DFU Mode on iMac/iMac Pro
Step 1. The 2020 version requires disconnecting the device from power and connecting a cable to the Thunderbolt port next to the Ethernet port.

Step 2. Press the power button on your iMac for three seconds while simultaneously reconnecting it to power. This will put your iMac into DFU mode, where it will appear unresponsive.
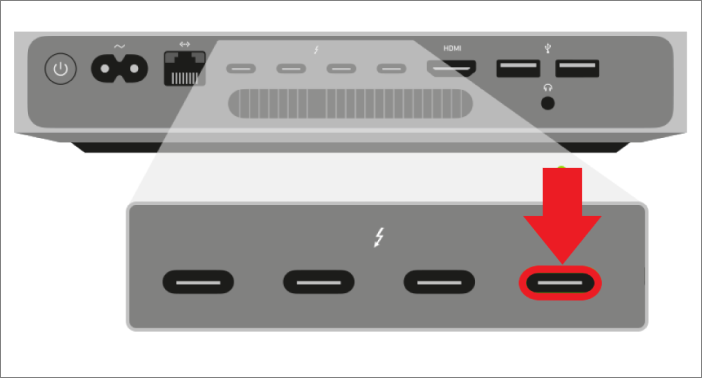
DFU Mode on Mac Mini
Step 1. To connect your device to a monitor and disconnect it from power, first, unplug the power cord from the device. Then, connect the device to a monitor via a cable, preferably a Thunderbolt cable, which can provide both data and power. This will allow you to access your device's contents on the external monitor. Next, connect the other end of the Thunderbolt cable to the Thunderbolt port on the device.

Step 2. Press the power button and reconnect your device back to power, then press the power button again and hold it for three seconds to enter DFU mode.
DFU Mode on Mac Pro
Step 1. To properly set up your Mac Pro, it's recommended to connect it to a monitor, similar to how you would set up a Mac mini. First, disconnect the Mac Pro from its power source. Then, connect a cable to the Thunderbolt port, which will allow you to set up your Mac Pro and use it with a monitor.

Note: If you have a desktop Mac Pro, connect the Thunderbolt port far away from the power button. If you have a rackmount Mac Pro, connect it close to the power button.
Step 2. Reconnect your device and press the power button while waiting for three seconds.
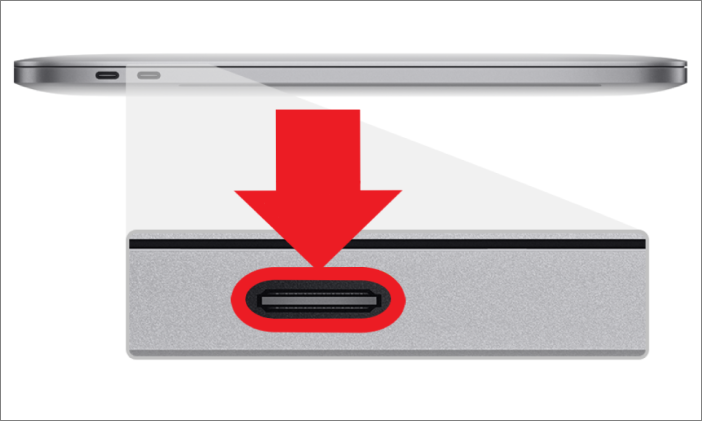
DFU Mode on Apple MacBook Pro and Air laptops
Step 1. Shut down your computer, then connect a cable to the left Thunderbolt port.

Step 2. Press "right shift + left option + left control" while pressing the power button and hold for three seconds.
To enter DFU mode, your iPhone must meet certain requirements. Firstly, the device must be connected to a computer using a USB cable.
Setup Requirements for DFU Mode on Mac
To successfully boot your device through the DFU mode, you will need to have a computer, a USB cable, and the latest version of iTunes installed on your computer. Additionally, you should have a device that is compatible with DFU mode, such as an iPhone or iPad.
- A Mac device with issues (Target Mac) and a Mac device without any problems (Host Mac) are being compared. The Target Mac is having trouble, while the Host Mac is functioning normally.
- Both devices should have the same OS version, ideally 10.15.6 or later.
- Both devices should have USB-To connect your AirPods to your iPhone, you can simply put them in your ears and they will automatically connect. However, if you're using a different Apple device, such as a Mac or an iPad, you may need to manually connect your AirPods by going to the Bluetooth settings. It's also recommended to use the original Apple white charge cable to connect your AirPods to their charging case.
- 1. Ensure the host device has internet access.
- Always connect the USB-Connect the C cable to the appropriate USB-C port on your Target Mac, which is the front port closest to the trackpad for Intel MacBooks, and the back port farthest from the trackpad for M1 and M2 MacBooks.
Final Verdict
Using DFU mode on Mac may seem confusing at first, but it's actually a straightforward process when done correctly. The Recovery Mode and DFU Mode help restore your device from software issues, preventing further damage.
To resolve technical issues, follow the steps outlined in the article, and always back up your data before updating your device to be on the safe side.
FAQs
What questions would you like to clarify regarding DFU mode?
1. How Do I Restore My iPhone In DFU Mode?
To put an iPhone in DFU mode, follow these steps: Connect the iPhone to a computer and open iTunes. Press and hold the Sleep/Wake button for 3 seconds. While still holding the Sleep/Wake button, press and hold the Home button for 10 seconds.
Step 1. To sync your iPhone with your computer, connect your iPhone to your computer using a USB cable and launch iTunes. Then, turn off your iPhone.
Step 2. To put your iPhone in DFU mode, press and hold the power button for 3 seconds, then without releasing it, press and hold the home button (or Volume Down button for iPhone 8 and later) for exactly 10 seconds. Release the power button but keep holding the home button until your iPhone's screen remains black, indicating you've successfully entered DFU mode. Note that this process will erase all data on the device, so make sure to back up your iPhone before attempting this. If you encounter issues, try restarting your iPhone and retrying the process.
2. Will DFU Mode Erase Data?
When exiting DFU mode, your device will reset and all data will be erased, so backing up your data regularly is crucial.
3. What Happens When You Put Your Phone In DFU Mode?
DFU mode is helpful when there's a technical or software issue that Recovery mode can't resolve. When you put your phone in DFU mode, it resets the device and solves the problem, but this process will erase all data, so it's essential to back up your data before attempting DFU mode.
Related Articles
- What Is The Difference between Windows 10 Pro and Windows 10 Pro N
- What Is RAM? Random Access Memory [Full Explanation]
- What Is Win32 Disk Imager?A Complete Guide on It
- What Is DRM? Introduction to Digital Rights Management [2022 Updated]