The Ways to Enable/Disable SIP Mac (System Integrity Protection Mac)
System Integrity Protection (SIP) is a security component in macOS that protects the system from malicious apps and code execution. Introduced in 2015, SIP was designed to strengthen the operating system's security, but it can be a hurdle for developers who need to test code. To avoid problems during the testing phase, developers often need to disable SIP, which can be frustrating. If you're experiencing similar issues testing code on your Mac, disabling SIP might be a viable solution. In this article, we'll provide the steps to enable and disable SIP on your Mac.
What Is SIP Mac (System Integrity Protection Mac)?
System Integrity Protection (SIP) is a security feature in macOS that safeguards the system from malicious apps and unauthorized code execution. It ensures that apps downloaded from the App Store are malware-free and safe, while also validating the safety and security of apps distributed directly to users by their developers.
Apple added SIP to macOS to protect the system from unauthorized changes, as a single user account with admin credentials is often the only account on a Mac, making it vulnerable to malware and data compromise.
Prior to System Integrity Protection (SIP), users had unrestricted access to modify system-protected files and folders, making it easier for apps to gain root-level system access by requesting admin credentials. However, with SIP, the rules have changed, and the root user is now restricted from performing certain actions on protected parts of the Mac system.
By default, System Integrity Protection (SIP) protects the below-mentioned parts of our Mac:
- /System
- /usr
- /bin
- /sbin
- /var
- Pre-installed apps with the macOS, such as Pages, Safari, etc.
In addition, it also protects the mentioned paths and folders:
- /Applications
- /Library
- /usr/local
SIP (System Integrity Protection) allows only a few Apple processes and services to modify and overwrite integral system files and folders, with software updates and installers being the primary exceptions. This means that most apps downloaded from the App Store are designed to work within these restrictions.
SIP comes pre-The Mac has a feature called Gatekeeper, which is enabled by default, protecting users' data from the start. However, this feature can hinder developers from testing and installing code to ensure app compatibility with the Mac, requiring them to frequently disable it for testing purposes.
How to Enable System Integrity Protection Mac?
To enable System Integrity Protection (SIP) on your Mac, go to System Preferences, click on Security & Privacy, then select the "Privacy" tab, and finally toggle the switch to the "on" position. This ensures that SIP is enabled, protecting your system from unauthorized changes.
Step 1. To restart your Mac, first, shut it down completely. Once the Mac starts to restart, press the Command + R key combination and enter the Recovery Mode. This will allow you to access the built-in recovery tools and perform various tasks, including reinstalling the operating system.
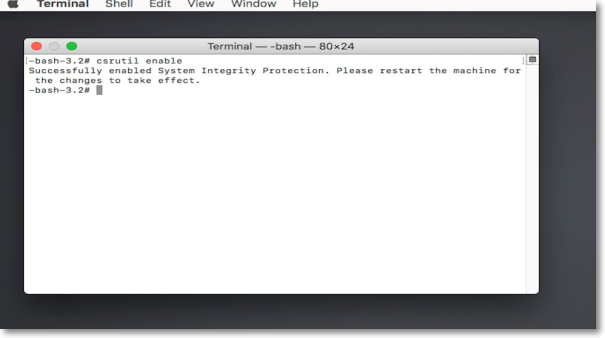
Step 2. To enable System Integrity Protection (SIP) on a Mac, enter the Mac into Recovery Mode and open the Terminal app. From there, execute the command "csrutil enable" to enable SIP. This will help protect the system and prevent unauthorized changes.

Step 3. csrutil enable && reboot -r
csrutil enable
That's it!
How to Disable System Integrity Protection Mac?
To disable System Integrity Protection (SIP) on a Mac, go to System Preferences, then Security & Privacy, and click on the lock icon to unlock the settings. Select the "Enable the feature 'Allow installed kernel extensions to load' at boot" option, then click on the lock icon again to lock the changes. This will disable SIP.
Step 1. To restart your Mac system and boot into Recovery Mode, start by restarting the system. As soon as the reboot process begins, press the Command + R key combination. This will initiate the boot process into the Recovery Mode, allowing you to troubleshoot and resolve issues.
Step 2. To open the Terminal app on your Mac, first, open the Launchpad app. Then, search for the Terminal app in the Launchpad app.
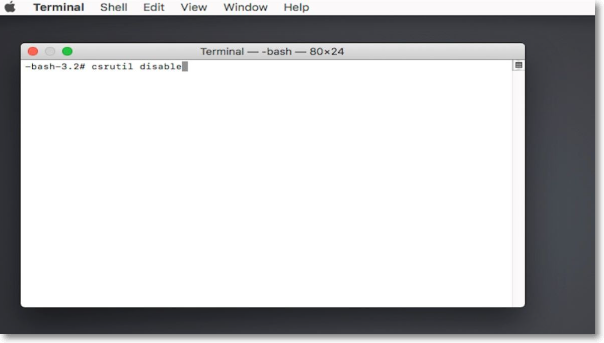
Step 3. Once the Terminal app is opened, copy-paste the below-mentioned in the Terminal app and press Enter to disable the System Integrity Protection:
csrutil disable
- Notice:
- We suggest re-To ensure the security of your system, you should disable SIP before attempting to install or update software that requires it to be disabled. This includes tasks such as installing a new operating system, updating the operating system, or installing software that requires SIP to be disabled. Once the task is complete, you should re-enable SIP to maintain the security of your system.
Conclusion
SIP, or System Integrity Protection, is a crucial security feature on macOS. While it's enabled by default, some users, particularly developers, might choose to disable it to avoid potential issues during code testing. However, disabling SIP can compromise your system's security, and we generally advise against it. If you still want to disable SIP, we have shared the necessary steps in a previous article, which also covers how to enable it.
FAQs
In this section, we've briefly answered some commonly asked questions by users about this topic on the web. You can read all these questions and learn more about today's topic in detail.
1. How Do I Know If My SIP Is Disabled Mac?
You can check the status of SIP by following the below-mentioned steps:
Step 1. To start, open the Terminal app on your system.
Step 2. Once the console is opened, execute the following command in the console and press Enter: `git clone https://github.com/your-username/your-repo-name.
csrutil status
Step 3. The SIP is currently disabled.
2. Is SIP Enabled by Default?
SIP comes enabled by default in all Macs, but it can be disabled following the steps in this tutorial.
3. Is It OK To Disable SIP on Mac?
We advise against disabling the System Integrity Protection (SIP) as it prevents unauthorized changes to system files, which can help prevent malware and other security threats.
Related Articles
- What Is DISM Command? How to Repair Windows Image with It?
- What Is Malware & Tips to Avoid Malware on Your Computer
- What Is Firewire? [Definition & Working Principle & Differences Between USB]
- Types of Hard Drives 2022 | Which One to Choose - Qiling