All Information About the Disk Utility on Mac [Updated 2023]
The Disk Utility on Mac is a built-in tool that allows users to manage and maintain their Mac's storage devices, including hard drives, solid-state drives, and external storage devices. It provides various features to help users troubleshoot and resolve issues related to disk management, such as verifying and repairing disk permissions, erasing and formatting disks, and recovering lost data from corrupted or damaged disks. The Disk Utility is an essential tool for Mac users to maintain the health and performance of their computer's storage system.
We're introducing the Disk Utility, a built-in tool on Mac that helps you manage and maintain your computer's storage. We'll cover its definition and key functions, providing a concise overview of what you need to know about the Disk Utility on Mac.
Disk Utility on Mac
The disk utility on Mac is a built-in software that allows users to perform various actions on their computer, but it may be overwhelming for new users.
The disk utility on a Mac is not easily accessible, but it can be found within the Applications folder. It can be opened using Spotlight or by navigating to the Applications folder.
The disk utility also exists in the Windows system. Here is an article about the 5 best Windows disk utilities. Click the link and read the post:

For Windows 11 users, there are several top-notch disk utilities available for free download in 2022, including EaseUS Partition Master, MiniTool Partition Wizard, AOMEI Partition Assistant, Acronis Disk Director, and DiskGenius, offering a range of features such as disk partitioning, formatting, cloning, and recovery, as well as some paid options like Paragon Partition Manager and Disk Director, to help users manage and maintain their computer's storage devices.
This page provides a list of the 5 best free and paid Windows disk utilities for managing hard drive partitions and optimizing disk performance, compatible with Windows 11/10/8/7.

Why Use Disk Utility on Mac
On a Mac, Disk Utility is a crucial tool that serves several purposes. Users often rely on it to check if their system needs its services, and here are some reasons why: to check for errors, repair disk permissions, erase or reformat a disk, partition a drive, and even recover data from a failing drive. Whether you're experiencing issues or just want to maintain your Mac's health, Disk Utility is an essential utility to have.
The disk utility is a helpful tool for Mac users, offering a range of functions to manage and maintain their disks. With it, users can perform various tasks, including [insert tasks, e.g.
- Manage, erase or format both internal and external storage devices
- Disk problems can be caused by various factors such as software issues, hardware malfunctions, or human errors. To diagnose the problems, you can run a disk check using built-in tools like Check Disk (chkdsk) on Windows or Disk Utility on macOS.
- Format, erase, eject or partition a drive
- Encrypt the storage devices
- Protect a disk by adding a password
- Create a disk image of files
- Change the file system
How to Open the Disk Utility on Mac
For Mac novices, accessing the Disk Utility can be a challenge. Fortunately, there are two easy ways to get to it: either by searching for it in Spotlight, or by navigating to Applications > Utilities, where it's located. Whichever method you choose, you'll be able to access the Disk Utility and manage your Mac's storage needs with ease.
- Method 1. Open the Disk Utility on Mac from Spotlight
- Method 2. Open the Disk Utility on Mac from Applications
Method 1. Open the Disk Utility on Mac from Spotlight
Step 1. To spotlight an item, click on the Spotlight icon from the top of your screen, which is represented by a magnifying glass icon.
Step 2. To access the Disk Utility on a Mac, type 'Disk Utility' in the search bar and double-click the resulting icon to open it.
Method 2. Open the Disk Utility on Mac from Applications
Step 1. Launch the Finder on your computer.
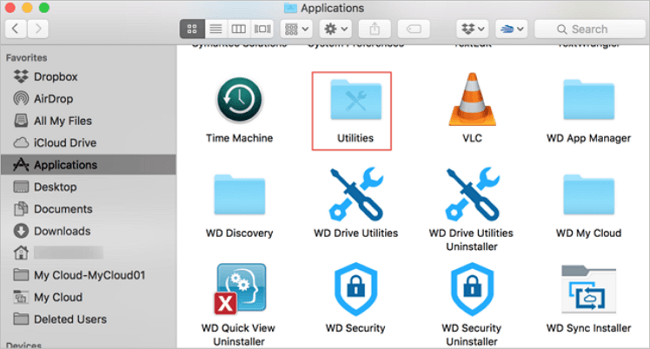
Step 2. In the Finder window, click on "Applications" on the left side to open it.
Step 3. Scroll to the bottom of the Applications, where you'll find a folder named "Utilities."

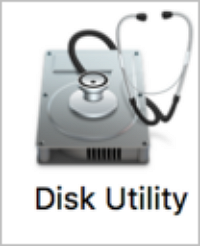
Step 4. Open "Utilities," and you will find the disk utility on Mac.

- Tip:
- To quickly launch the Utilities folder from Finder, press Command + Shift + U together.
Conclusion
We've introduced you to the disk utility on Mac, and now you're familiar with it. You can easily access the disk utility on Mac with the guide we provided, making it a convenient tool for your Mac needs.
For experienced users, the Disk Utility can be a convenient tool. However, if you're new to macOS, it's generally recommended to avoid using the Disk Utility to ensure a smoother experience.
FAQs about Disk Utility on Mac
Here are some hot topics about the disk utility on Mac. You can check the questions below and see if there is more information you'd like to know.
1. How to determine if your disk is faulty using disk utility?
Users often search for methods to check if their Mac's disk is failing, and the disk utility is a common tool they use to do so. To check, users can follow a guide that outlines the steps to take.
- Step 1. Open the Disk Utility on Mac, which can be found by searching for it in Spotlight, clicking the "Applications" folder in the Finder, or using the Launchpad.
- Step 2. If you're experiencing issues with a specific disk, identify it and click on "Show All Devices" if you're unable to locate it.
- Step 3. To fix disk errors and issues, click on "First Aid" in the Disk Utility. This will initiate a scan for errors and provide solutions when needed.
- Step 4. You can't use your Mac during the check time, as it will be running the test. Clicking "Run" will initiate the process, and your computer will be occupied until the check is complete.

If Disk Utility finds a problem with the disk you choose, it will attempt to repair it.
2. Why can't I find disk utility on Mac?
The disk utility is located inside the Applications folder, but it may not be visible at first sight. To find it, users can follow the steps outlined in the article "How to Open the Disk Utility on Mac".
3. Does the disk utility on Mac erase everything?
When using the Disk Utility on a Mac, it's essential to be cautious as it can erase all data on the drive if you accidentally select the wrong option. To avoid losing important files, it's recommended to carefully operate the utility or copy the desired files to a safe location before proceeding with the erase operation.
Related Articles
- Hot Backup vs Cold Backup: Definition, Pros & Cons
- Windows Command Line Cheat Sheet (Online Table and PDF)
- Hyper-V vs. VMware: Which Is the Better Choice for You?
- What Are the System Recovery Options on Windows? [Detailed Description]