How to Empty Trash on Mac [macOS Ventura Applicable]
The Trash folder on a Mac stores deleted files, which can be moved there using shortcuts. When you delete a file, it's not permanently removed but saved in the Trash, taking up space on your computer. To free up space, you should regularly empty your Trash, which will permanently delete the files.
This article will teach you different methods on how to empty Trash on Mac, which are easy to learn and apply to macOS Ventura. We'll also discuss how to force empty Trash Mac if other methods fail to delete all the files.
How to Empty Trash on Mac Manually or Automatically
To clear files in your Trash folder and free up space on your MacBook, you can empty the Trash. This will permanently delete all the files stored in it. There are three basic methods to do this: [insert methods here].
- Empty Trash manually
- Empty Mac Trash automatically
- Force emptying the Trash
We'll delve into the specifics of each method, providing detailed step-by-step explanations to help you understand how they work.
Method 1. Empty the Trash Manually
To empty your Trash on a Mac, you can do it manually by selecting the files you want to delete or deleting all files at once. You can follow these steps: select the files you want to delete, right-click on them, and choose "Delete" or "Empty Trash" to delete all files at once. This method allows you to have control over which files are deleted and provides an opportunity to review the files before deleting them.
Step 1. Open the Trash folder.
Step 2. Once the folder opens, navigate to the upper-right section and click on the Settings icon, then select "Empty Trash".
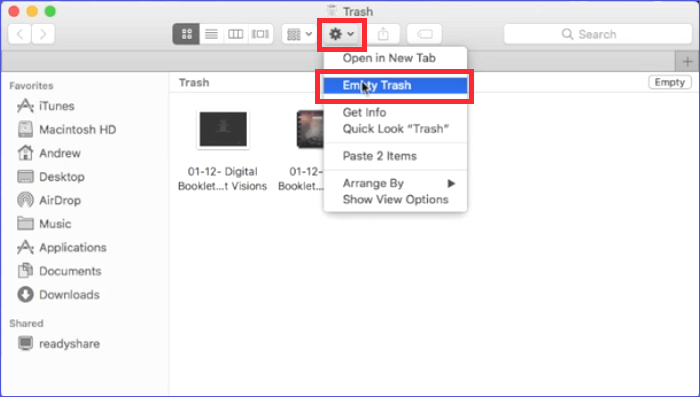
Step 3. Click the "Empty Trash" button on the message popup and confirm the deletion of the Trash items.
Step 4. To delete a chosen item from the Trash folder, click on it and then select "Empty Trash".
Tip: To delete items from your Trash without the confirmation message displaying, hit Option+Shift+Command+Delete.
Method 2. Empty the Trash Automatically
If you don't want to spend time manually deleting items from your Trash folder, you can choose to do it automatically, freeing you up to focus on more important tasks without worrying about your Trash folder getting cluttered.
On all Mac devices, including those running macOS Ventura, you can set your computer to automatically empty the Trash folder every 30 days. To make this setting, follow these steps: [insert steps here].
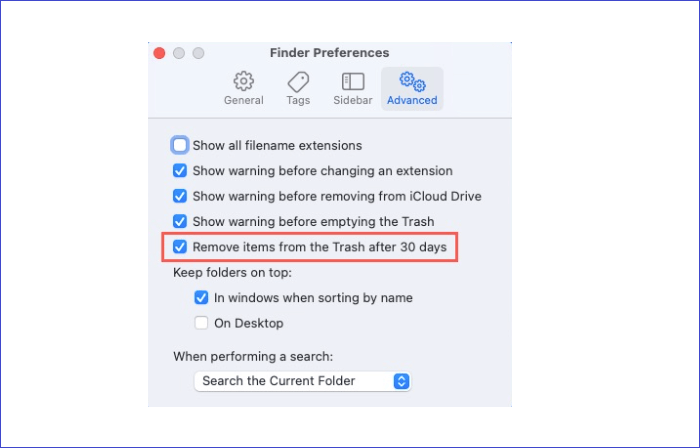
Step 1. Open Finder.
Step 2. Go to "Finder" then "Preferences".
Step 3. Next, click on the "Advanced" tab.
Step 4. Ensure the option "Remove items from Trash after 30 days" is checked, and your Mac will automatically empty your Trash every 30 days.
Method 3. Force Empty Trash on a Mac
If you're unable to empty Trash using the normal methods, you can try force-emptying it, which deletes files even when they're still in use or locked. The easiest way to do this on a Mac is via the Terminal, where you can follow specific steps to accomplish the task.
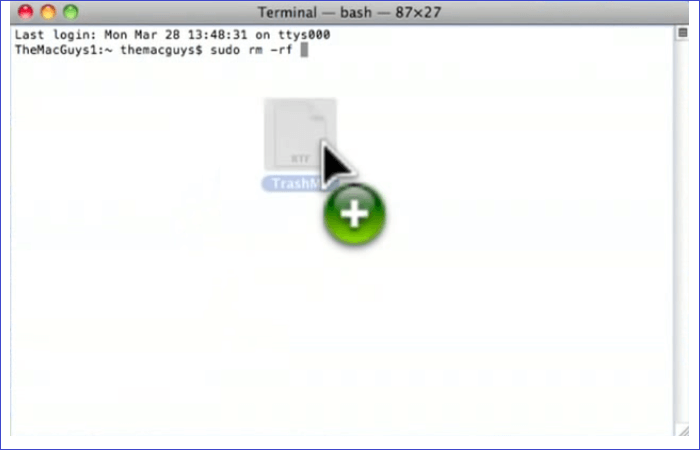
Step 1. Open Terminal.
Step 2. Type the following command, then put a space after it: sudo rm -rf.
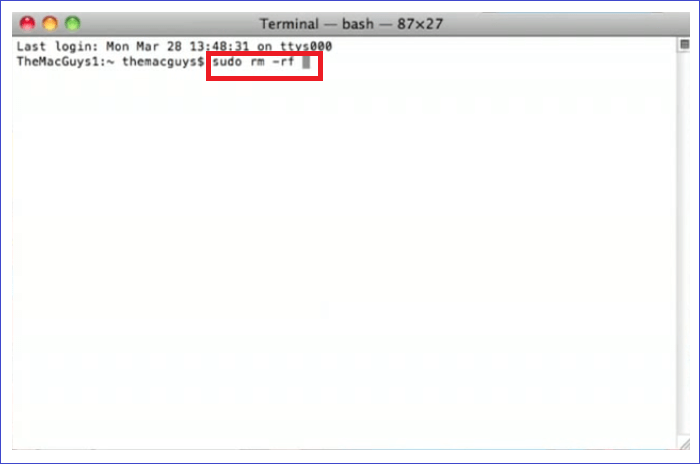
Step 3. To delete files, navigate to the Trash folder, select the files you want to delete, and drag them to the Terminal window. Then, press the Return key.
Step 4. To delete files from the Trash on a Mac, enter the admin password and confirm it, then run the command to force delete the selected files. This will delete files that had refused to empty manually or automatically.

More Helpful Guide: How to Recover Files from Emptied Trash on Mac
Have you ever emptied your Trash only to realize you still need some of the deleted files? If so, you're not alone. This situation can be frustrating, but fortunately, there is a solution. Using a professional Mac Trash recovery software like Deep Data Recovery for Mac, you can recover files from Emptied Trash.
This software helps in recovering lost data, including music files, videos, photos, and documents, by scanning various storage devices such as HDDs, SSDs, Time Machine backup drives, USB drives, SD cards, and cameras. It can also recover deleted files of any size, from small to large.
Qiling Data Recovery for Mac offers a range of features, including a file filter, bootable media support, scan mode, data protection, file preview, and cloud recovery capabilities.
To recover data from an emptied Mac Trash using Deep Data Recovery for Mac, follow these steps: First, download and install the software on your Mac. Then, launch the program and select the drive or volume where the data was stored.
Step 1. Select the location to scan

Launch Deep Data Recovery, select the storage device where data was lost, and click "Scan" to initiate the scanning process.

Step 2. Filter lost Mac data
The software will automatically scan for lost data on MacBook/iMac, and once the scan is complete, users can filter the wanted data using the "Type" and "Path" buttons.

Step 3. Recover lost data or files
Double-Click a file to preview it. Then, click the "Recover" button to restore the lost data to another place.
Final Verdicts
To delete Trash on Mac, you can use the manual method, which involves selecting the files and folders you want to delete, then dragging them to the Trash and emptying it. Alternatively, you can set your system to automatically delete files from the Trash folder every 30 days. However, if you encounter files that won't delete due to being locked or still in use, you can use the Terminal to force remove them.
Deleting all files from your Trash folder is an excellent way to free up space and make your system work faster. If you need to recover files emptied from Trash, consider using recovery software like Deep Data Recovery for Mac, which can also help recover partitions on Mac quickly.
How to Empty Trash on Mac FAQs
Knowing how to empty Trash on Mac is important, as it helps remove unnecessary files and create additional space. To empty the Trash on Mac, you can simply click on the Trash icon in the Dock, select the items you want to delete, and then right-click (or control-click) on the selected items and choose "Empty Trash" from the context menu. Alternatively, you can also right-click on the Trash icon in the Dock and select "Empty Trash" from the menu that appears.
1. How Do I Empty Trash?
On a Mac, you can empty the Trash manually, automatically, or forcefully using Terminal. The manual method involves selecting individual files to delete, while automatic emptying can be set to occur every 30 days. However, if specific files are causing issues, you can use Terminal commands to force remove them from the Trash folder.
2. Where Is the Trash Folder on Mac?
To access the Trash folder on Mac, click its icon in the Dock or press Command+Shift+G and enter "Trash".
3. Why Can I not Empty the Trash on Mac?
When it's hard to empty the Trash on a Mac, it might be because the selected files are still in use or locked. To fix this, you can use the Terminal to force remove them.
4. How to Delete the Trash via the Terminal?
To delete the Trash via Terminal, you can use the command `rm -rf /private/var/ttash` or `rm -rf /private/var/ttash/*` to remove all items in the Trash. However, be cautious as this command permanently deletes the items and does not move them to the Trash.
Step 1. Paste the following command into Terminal and press the Space key: sudo rm -rf.
Step 2. Open the Trash folder.
Step 3. To delete files from the Trash, select the desired files and drag them to the Terminal window.
Step 4. Hit Enter.
Step 5. To delete files from the Trash using Terminal, enter your Mac password to confirm the deletion process, then press Enter. This completes the deletion process.
Related Articles
- [Fixed] Right Click Not Responding or Working on Windows 10
- Upgrade Windows 10 from Home to Pro Edition for Free
- How to Solve Webcam Freeze Up in Windows 10 Error?
- How to Turn off System Restore Windows 10 [Three Ways]