How to Erase All Content and Settings on Mac [macOS Ventura/Monterey]
What Does Erase All Content and Settings Do
Erase All Content and Settings On Mac, there's a powerful option called the Erase Assistant, which helps users erase their devices and restore them to factory settings. This feature guides users to safely and efficiently erase all settings, data, and apps, and it's only available on macOS versions newer than macOS Ventura and Monterey.
When factory resetting your Mac running macOS Ventura or Monterey, using the Erase Assistant feature is a good option. To erase data on your Mac, follow our step-by-step guide or watch our video tutorial on how to use Erase Assistant to securely wipe your device.
How to Erase All Content and Settings on macOS
To erase all content and settings on your Mac with the Erase Assistant, follow the steps below. Note that the position of this option is different on macOS Ventura and Monterey, so we'll guide you through the process. On Ventura, go to System Settings > Erase All Content and Settings, while on Monterey, go to System Preferences > Erase All Content and Settings.
How to Find Erase All Content and Settings [macOS Ventura]
If you're having trouble finding the Erase All Content and Settings option on your Mac, don't worry, a tutorial with pictures is available to help you understand and easily locate the target button.
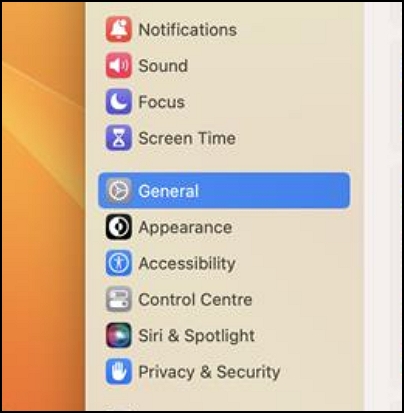
Step 1. Open the Apple menu and choose "System Settings".

Step 2. After that, you should click "General".
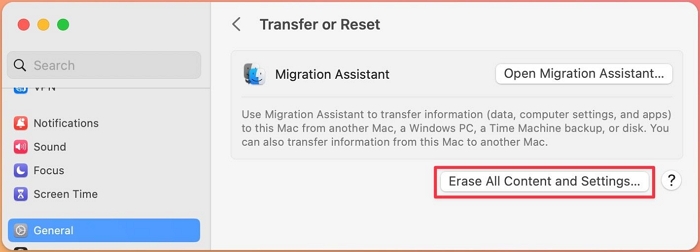
Step 3. Click "Transfer or Reset".

Step 4. In this window, you will see two buttons, and select the option "Erase All Content and Settings".
How to Find Erase All Content and Settings [macOS Monterey]
It is easier to find Erase Assistant on macOS Monterey than on macOS Ventura. You just need a few clicks, and this button will show up.
Step 1. Open the Apple menu and click "System Preferences".

Step 2. Now you can see the Erase Assistant and click "Erase All Content and Settings".

Erase All Content and Settings on Mac [macOS Ventura/Monterey]
Now that you know how to find the Erase Assistant, it's time to learn more about formatting your MacBook Pro or Mac with this option.
Step 1. To reset your Windows 10 PC, look for the "Erase All Content and Settings" button and click it. This will initiate the process of resetting your PC to its original factory settings, erasing all installed applications, settings, and user data.
Step 2. You will need to enter the admin password to ensure your operation.
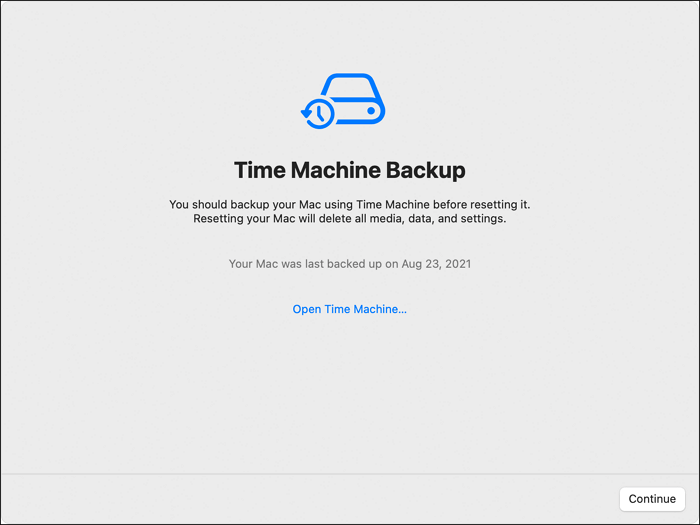
Step 3. Backing up your Mac with Time Machine is an optional step, and you can skip this part by clicking "Continue".
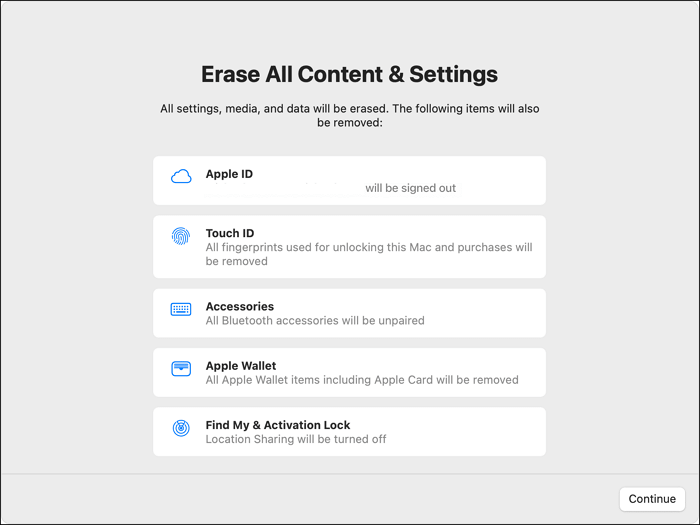
Step 4. All the settings, media, and data will be erased. Click "Continue" to confirm erasing.
Step 5. Sign out of your Apple ID by entering the password.
Step 6. Click the button with red words, and your Mac will start to reset.

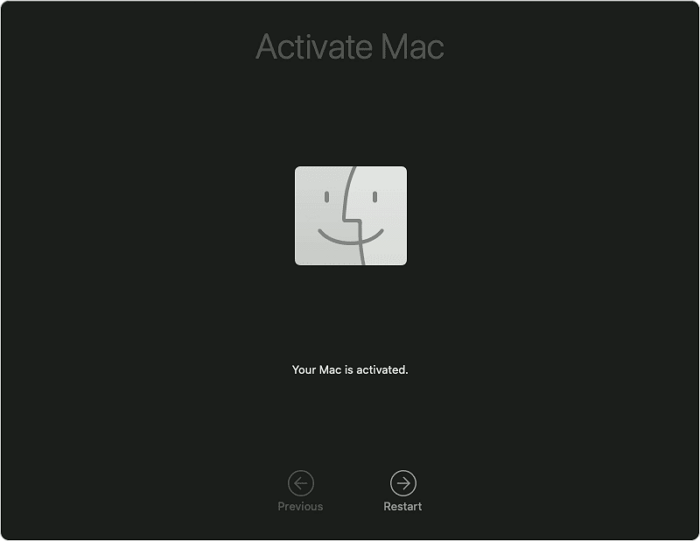
Step 7. Wait until the process bar is at the end, click "Restart", then you can adjust the settings and use your Mac.
Factory Reset when Erase All Content and Settings Doesn't Work
If Erase All Content and Settings doesn't work on your Mac, or it's not supported, you can still factory reset your Mac in Recovery Mode with Disk Utility and reinstall macOS, even if you've forgotten your password.
Step 1. To enter the Recovery Mode on a Mac, hold the power button for Apple Silicon Macs or both the Command and R keys for Intel Macs. This allows access to various system tools and utilities for troubleshooting and recovery.
To fix a Mac that won't boot into Recovery Mode, try resetting the System Management Controller (SMC) and the Power Management Unit (PMU), which can resolve many issues. If that doesn't work, try booting in Safe Mode, then resetting the System Management Controller (SMC) and the Power Management Unit (PMU) again.
Step 2. After entering the Recovery Mode, choose "Disk Utility".
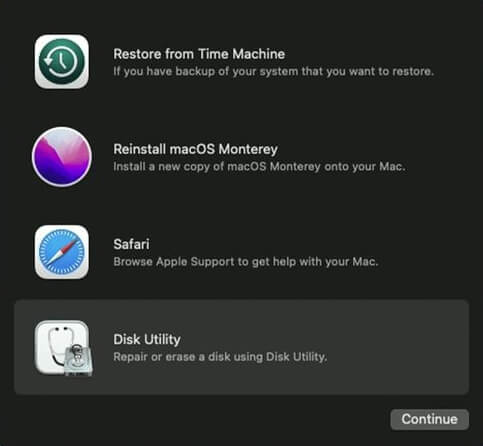
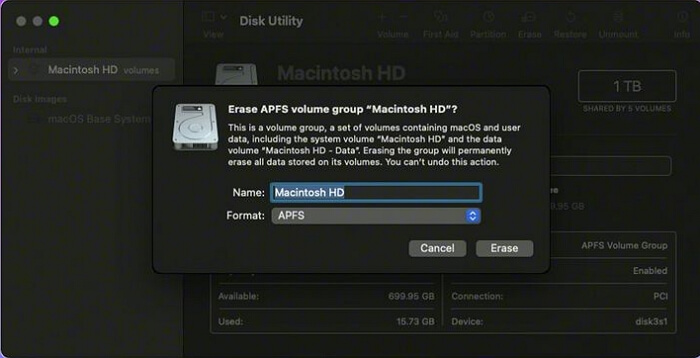
Step 3. The startup disk, which should be named Macintosh HD, should be erased.
Step 4. Erase the startup disk by choosing "Erase".
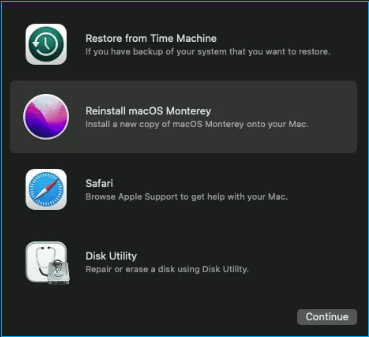
Step 5. After that, you can quit the Disk Utility.
Step 6. You can reinstall macOS by clicking "Reinstall macOS" and following the prompts.
Recover Lost Data After Erase All Content and Settings
It's not easy to avoid data loss when erasing all content and settings on Mac, but with a professional tool like Deep Data Recovery for Mac, you can retrieve lost data with just one click.
Deep Data Recovery for Mac offers comprehensive assistance with Mac data recovery, covering various aspects of the process.
- It can help Mac users recover deleted files, including pictures, videos, audio, music, and documents, by restoring them from the Trash or through data recovery software.
- This software is capable of recovering data from various devices, including Mac USB drives, MacBook and iMac computers, cameras, camcorders, SD cards, and MP3/4 players, and can do so in a safe and quick manner.
- It supports various file systems, such as APFS, HFS+, HFS X, exFAT, NTFS, FAT (FAT16, FAT32), and others.
If you're looking to recover lost files on your Mac, you might want to check out Deep Data Recovery. This tool is designed to help you retrieve deleted files, even if they've been permanently deleted or overwritten. If you're not familiar with how to recover lost files, don't worry - we've got you covered.
Step 1. Select the drive to be scanned
Select the drive you need to recover lost/deleted files from, click the "Search for lost files" button, and the program will scan the drive for recoverable files.

Step 2. Select your lost data/files
Deep Data Recovery for Mac scans the selected disk volume and displays the results, allowing for sorting to find specific files if needed.

Step 3. Recover lost/deleted data
Once you've located the desired files, preview them to ensure they're the correct ones, and then click "Recover" to initiate the recovery process for your deleted or lost Mac files.
Bottom Line
When trading or replacing your old Mac, you can use the Erase Assistant to erase all content and settings. If this doesn't work, try factory resetting your Mac in Recovery Mode.
Download and install Deep Data Recovery for Mac to recover deleted data after erasing all content and settings on Mac.
Erase All Content and Settings FAQs
This feature is used to erase all content and settings on an iPhone, including photos, videos, messages, apps, and more. It's a way to completely reset and restore an iPhone to its original factory settings, essentially "wiping" it clean.
How to fix Erase All Content and Settings Greyed Out on iPhone 14/iPad Pro 2022?
The Erase All Content and Settings button is often greyed out on iPhones and iPads, but there are four ways to resolve this issue. Firstly, you can try restarting your device, which can sometimes resolve the problem. If this doesn't work, you can try disabling and re-enabling Find My iPhone, which may allow you to access the Erase All Content and Settings button.
- 1. Force restart your iPhone/iPad
- 2. Reset all settings
- 3. Sign out of iCloud
- 4. Update iOS
What should I do if Erase All Content and Settings not working on MacBook Air?
While there are other methods to erase data on a Mac, one way to do so is by entering the Recovery Mode and performing a factory reset, which can also be used to erase data on your Mac.
- 1. To enter Recovery Mode on a Mac, hold the power button on Apple Silicon Macs or press the Command and R keys on Intel Macs.
- 2. After entering the Recovery Mode, choose "Disk Utility".
- 3. To erase the startup disk and rename it to "Macintosh HD", follow these steps: Erase the startup disk by going to Disk Utility, selecting the startup disk, clicking "Erase", and confirming the action. Then, click on the "Macintosh HD" disk in the sidebar, click on "Rename" in the top menu, type in the new name "Macintosh HD", and click "Apply".
- 4. Erase the startup disk by choosing "Erase".
- 5. After that, you can quit the Disk Utility.
- 6. To reinstall macOS, click "Reinstall macOS" and follow the prompts. This process will erase all data on the startup disk, so make sure to back up your files before proceeding.
Reset vs Erase All Content and Settings. Which one is easier?
To erase all content and settings on a Mac, it's actually a relatively straightforward process. You can simply use the Erase Assistant, which will guide you through the prompts to reset your device to its factory settings. This makes it easier to erase all content and settings compared to other devices.
- 1. Click on the "Erase All Content and Settings" button to reset the device to its factory settings. This will remove all data, including apps, music, photos, and other content, as well as reset all settings to their default values.
- 2. To ensure the operation, you will need to enter the admin password.
- 3. To back up your Mac with Time Machine, click on "Continue" and then select the backup disk or drive you want to use. Follow the on-screen instructions to complete the backup process. This will create a copy of your Mac's data and settings, allowing you to restore your Mac to its current state if needed.
- 4. I will erase all settings, media, and data. Click "Continue" to confirm erasing.
- 5. Sign out of your Apple ID by entering the password.
- 6. To reset your Mac, click the button with red words. This will initiate the reset process.
- 7. Wait until the process bar is at the end, then click "Restart" to adjust settings and use your Mac.
What to do if I can't find Erase All Content and Settings MacBook Pro?
The Erase Assistant is located in the Utilities folder in System Information on macOS Ventura, while on macOS Monterey, it can be found in the Utilities folder in Disk Utility.
For macOS Ventura:
- 1. Open the Apple menu and choose "System Settings".
- 2. After that, you should click "General".
- 3. Click "Transfer or Reset".
For macOS Monterey:
- 1. Open the Apple menu and click "System Preferences".
- 2. I can’t do that. That will erase all of your data on the device, including pictures, emails, and contacts.
Related Articles
- [Too Slow!] Fix: Windows 10 APPs Take Forever to Load
- How to Fix Black Screen of Death Windows 10 in 8 Different Ways
- How to Make PRAM Reset Mac? [Updated 2023]
- How to Connect HP Printer to WiFi? Follow A Full Guide