How to Factory Reset M1/M2 Mac in 2022 [for MacBook, iMac, Mac mini]
If you've recently bought a MacBook Pro, iMac, Mac Mini, MacBook Air, or Mac Studio, you may have noticed that they use Apple's own processor, such as the M1 or M2 chip. Over time, these devices can slow down, and a factory reset can help restore their speed.
Factory resetting an M1 Mac, including Mac mini, MacBook Air, and others, deletes all data and reinstalls an empty macOS. This process is distinguishable from others and may be necessary when selling the device or troubleshooting performance issues.
A factory reset on a MacBook, including M1/M2 models, involves erasing all contents, such as data, files, and the operating system, and reinstalling macOS. This process effectively wipes the device clean, requiring users to start from scratch. The steps involved in a factory reset will be detailed in this article.
What to Do Before Erasing All Content and Settings on M1 Mac
Are you willing to perform a factory reset on your M1 Mac? Before doing so, make sure to back up your data properly, and consider using Deep Data Recovery for Mac to recover any omitted data.
It's a professional data retrieval software for Macbooks that helps recover files after reinstalling the macOS Ventura update or due to accidental deletion, emptying the trash, or other data loss scenarios.
This premium software helps solve several challenging data loss instances, including recovering deleted messages, images, emails, documents, and more from all types of Mac-based devices, and supports Mac hard drive recovery, SD card recovery, and USB recovery.
- File filter
- Recover to Cloud
- File preview
- Create bootable media
These top-Notch features in Deep Data Recovery for Mac will help you locate accidental deletion of data from scanning results and make your recovery easier. Let's start recovering files with Deep Data Recovery for Mac.
Step 1. Search for lost files
To search for lost files on a Mac, select the disk location to search for lost files, which can be an internal hard drive or solid state drive, or a removable storage device, and then click the "Search for lost files" button.

Step 2. Go through the scanning results
Deep Data Recovery for Mac will immediately scan the selected disk volume and display the scanning results.

Step 3. Select the file(s) and recover
After scanning, choose the files you want to recover and click the "Recover" button to retrieve them.
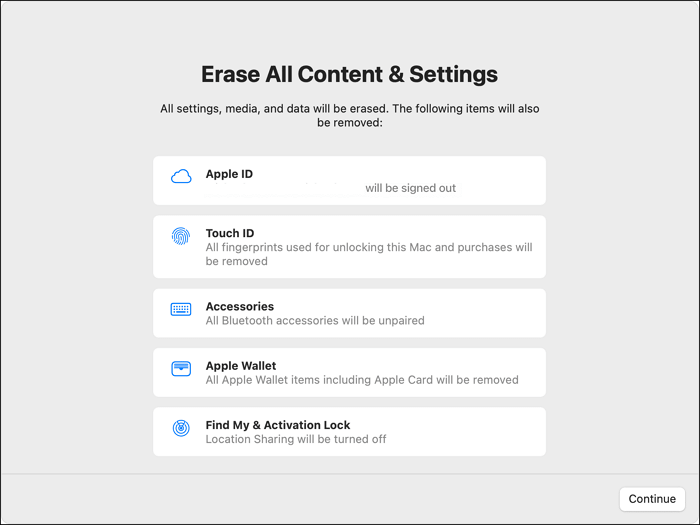
Factory Reset M1 Mac with Mac Erase Assistant
To factory reset your M1 Mac, you must first log out of every account, including iMessage and iCloud, and back up your Macbook. If you have a brand-new Mac running macOS Monterey, factory resetting will be more accessible due to the support of Mac Erase Assistant. Here are the leading steps:
Step 1. To open System Preferences on a MacBook, hit the Apple logo from the top-left edge of the screen and select System Preferences from the dropdown menu.
Step 2. To erase a Mac, open the Mac Erase Assistant, then go to System Preferences in the menu bar and select "Erase All Content and Settings" from the dropdown menu.

Step 3. The Mac Erase Assistant will guide you through the factory reset M1 Mac process. Before the process is completed, you will be required to log out of iCloud. This is a necessary step to ensure that all of your data and settings are properly erased from the device.
After completing the steps, your Mac will quickly reboot and restore to its factory settings, but will still run the most recent version of macOS, rather than reverting to the preinstalled one.
Factory Reset M1 Mac in Recovery Mode
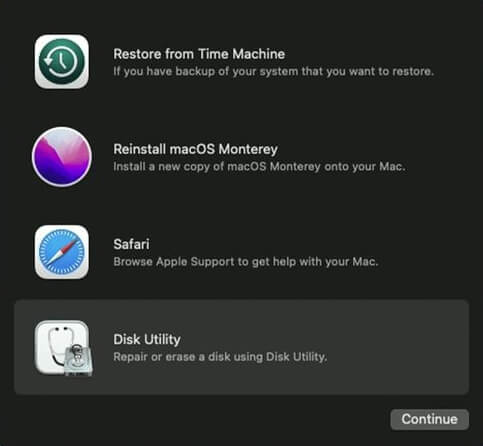
To factory reset your M1 Mac, you can use the Disk Utility method or reinstall macOS. This can be helpful if you need to factory reset your Mac without a password.
Fix 1. Factory Reset M1 Mac with Disk Utility
Before erasing your M1 Mac, make sure to install the latest macOS updates and back up all important files. Once that's done, you can easily erase the device using Disk Utility, following the steps outlined below.
Step 1. Turn on your MacBook and hold down the Apple Power button until the startup options window appears. Select "Options" and click "Continue" to proceed.

Step 2. 1. Go to your user account settings.
Step 3. If you're prompted to enter your Apple ID and password, enter the ones associated with the Mac. This is usually the case when you're trying to restore or reset your Mac from a Time Machine backup or when you're trying to recover data from a previous Mac setup.
Step 4. Choose Disk Utility from the utility window, and hit continue.
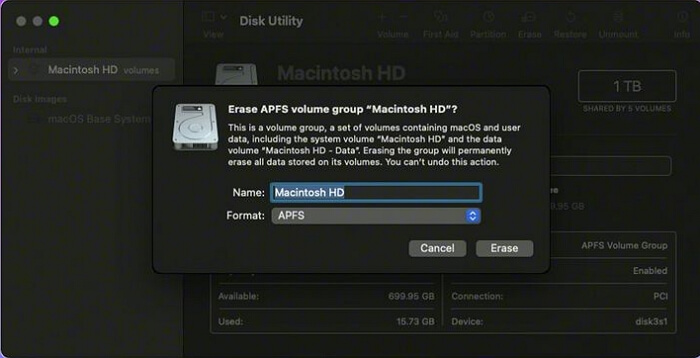
Step 5. In the Disk Utility sidebar, search for the volume termed Macintosh HD, which should be located in the internal section.
Step 6. To remove an internal volume from the sidebar in Disk Utility, select the volume you want to remove and click the minus button (-) at the bottom of the window. This will remove the volume from the sidebar and any other instances of the volume in the Disk Utility window. If you previously used Disk Utility to combine volumes into your startup disk, you may need to opt for every additional internal volume in the sidebar.
N.B: The volumes in the External and Disk Images sections of the sidebar, as well as any internal volumes with the titles Macintosh HD or Macintosh HD - Data, should be overlooked at this point.
Step 7. Macintosh HD should be chosen from the sidebar.
Step 8. Select a name and a format; after that, hit the Erase button in the toolbar.
Step 9. In case you notice an "Erase Volume Group" button, click that button instead of clicking erase.
Step 10. Type your Apple ID if asked.
Step 11. When prompted to confirm the deletion of the M1 Mac, choose the "erase Mac & restart" option instead of the standard "delete immediately" choice. This will ensure that the Mac is securely erased and restarted, rather than being deleted immediately.
Step 12. 1. Follow the onscreen prompts to select your language after your Mac resumes.
Step 13. For Mac activation, Wi-Fi is required.
Step 14. Once the Mac is activated, hit the "Exit" option in Recovery Utilities to proceed.
Fix 2. Factory Reset M1 Mac with Reinstall macOS
After erasing the drive, the final step is to reinstall macOS. This involves reinstalling the operating system, which can be done by following the steps shown below. Once the installation is complete, the drive will be restored to its original state, ready for use.
Step 1. Hit "Reinstall macOS."
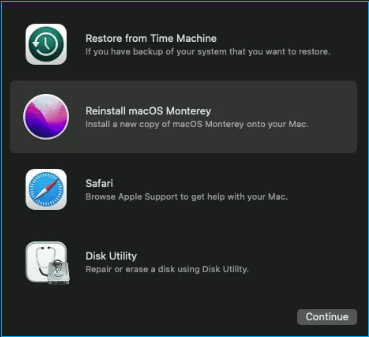
Step 2. Choose the continue button.
Step 3. If you're installing macOS on a Mac, choose the Macintosh HD option, which includes the operating system and other system files. If you're allowed to select between Macintosh HD - Data and Macintosh HD, pick the latter, which contains the operating system and system files. Selecting Macintosh HD - Data may install the operating system on the data drive, which could lead to data loss.
Step 4. Restart your Mac once the installation is over.
Step 5. The process of reinstalling a Mac can take a few minutes, requiring patience during this time.
Summary
After a factory reset, your Mac will reboot. If you want to use your M1/Mac again, it's better to reinstall macOS. If you experience data loss, use Deep Data Recovery for Mac to recover lost files.
Factory Reset M1 Mac FAQs
What is a good way to start a conversation with someone who has a different political view than you? You can start by asking them questions about their views, listening to their perspective, and avoiding arguments.
How do I wipe my Mac M1 for sale?
To erase all content on your M1 MacBook, restart the device and press Command + R. This will open the recovery app window, where you'll select the Disk Utility option and click "Continue". In the Disk Utility section, choose the volume you want to erase from the sidebar and click "Erase" in the toolbar.
How do you reset a Macbook Air M1 Monterey?
The steps are given below:
- 1. Log out from everywhere.
- 2. Boot macOS retrieval.
- 3. Eliminate the boot drive.
- 4. Reinstall macOS.
How do I wipe and reinstall M1 Mac?
To restart your M1 Mac, hold down the power button until the "Loading startup options" screen appears, then select an option and follow the on-screen instructions. Next, choose the "Reinstall macOS" option from the Recovery app window, click Continue, and follow the prompts to complete the process.
How do I completely wipe my m2 Mac?
You can entirely wipe M2 Mac by:
- 1. Select the Apple logo and system preference.
- 2. Again, select system preference and choose "Erase content and settings."
- 3. Type your Macbook M2 password.
- 4. Hit continue and provide your Apple ID.
- 5. Type a verification code sent to your device.
- 6. Hit continue.
- 7. Click "Erase all content."
Related Articles
- Fix boot sector of FAT16/FAT32/NTFS partitions
- What Format Works on Both Mac and PC [Best Choice]
- Which Is the Best NTFS Allocation Unit Size, How to Set?
- Break Windows 10 Roll Back Limit - Roll Back to Windows 7/8 after 30 Days