How to Restore System Image from External Hard Drive Windows 10
Why Create a System Image on External Hard Drive
A Windows 10 system image is an exact copy of the operating system, boot sectors, settings, programs, registry, and essential files on the C drive (generally speaking). It ensures you the computer protection and revives your Windows 10 installation quickly and easily.
The reason for creating a system image on the external hard drive is that when your computer corrupts, broken, crashed, or under the risk of virus attack, it may be inaccessible, and you can't make the system image recovery on the computer if you have backed up on the local drive. Furthermore, creating a system image on the external hard drive can save considerable space on the sized HDD/SSD.
How to Create a Windows 10 System Image Backup
Before you restore the system backup, you need to create a system image to the external hard drive before. What's more, you must create a system repair disc and the end of backup to access the recovery options if your computer is unable to boot.
Step 1. Connect the external hard drive to your computer.
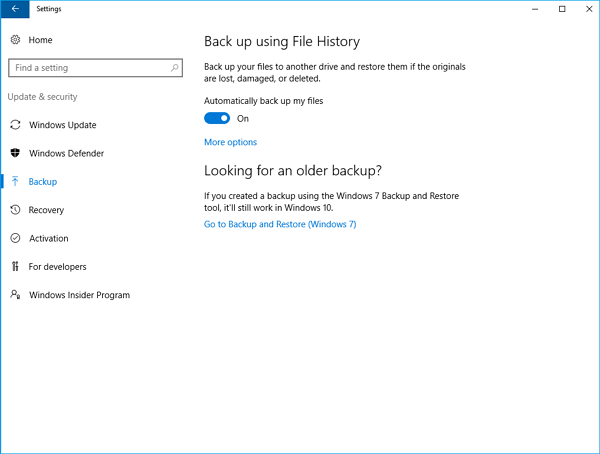
Step 2. Open "Settings" > click "Update and Security" > "Backup" > "go to Backup and Restore (Windows 7)".

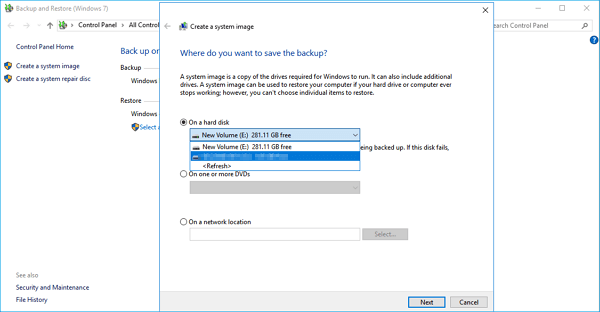
Step 3. Choose to "Create a system image" on the left pane > check "On a hard disk" option under "Where do you want to save the backup?". Choose the target external hard drive in On a hard disk drop-down menu.

Step 4. Click "Next" > "Start backup". Wait for a full backup of your system completes.

When the backup is done, you'll be prompted to create a system repair disk (CD/DVD) to access the recovery options if your computer is unable to boot.
How to Restore a System Image Backup of Windows 10
If your computer can boot normally, you can restore the backup image easily.
Open "Settings" > go to "Update & Security" > "Recovery". Click the "Restart now" button in the Advanced startup section. When your computer restarts, go to "Troubleshoot" > "Advanced Options" > "System Image Recovery" and follow the instructions to restore Windows 10 system image you've created on the external hard drive.
If your computer can't boot properly, you can do start over a Windows installation by restoring from the previous system backup.
Step 1. Connect the external drive with the system image backup and the system repair disc to your computer.
Step 2. Reboot your computer from the repair disk. You may need to change your system's BIOS settings to make sure it can boot from the CD or DVD drive by hitting "Delete/F2".
Step 3. When the "Windows Setup" appears, click "Next" > "Repair your computer" int the bottom-left corner > "Troubleshoot" > "System Image Recovery" > choose Windows 10.

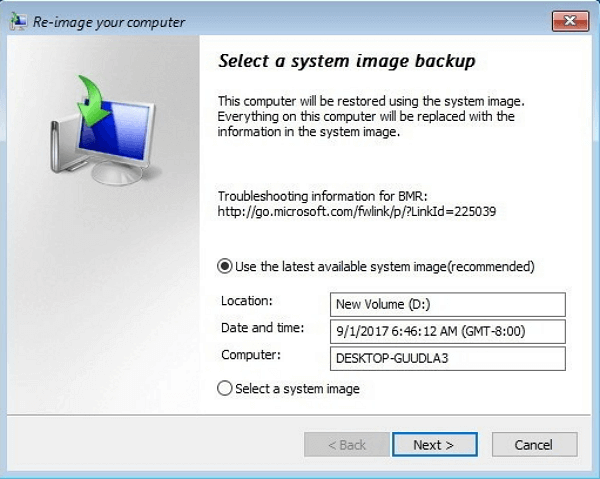
Step 4. Select the "Use the latest available system image" > "Next".

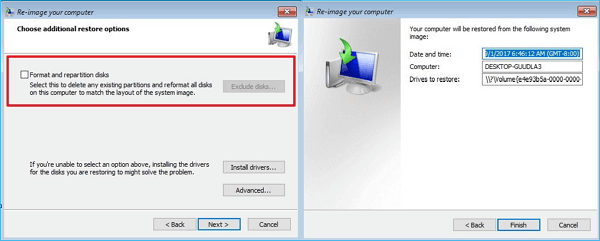
Step 5. If you want to restore the system image to a new drive, you can also select the "Format and repartition disks" option. (Warning: This operation will erase any existing partitions and disks on your computer.) Then, click "Next" > "Finish "> "Yes" to start the Windows 10 system image recovery from the external hard drive.

- Notice:
- Although you can use the system repair disc to help you boot your computer and restore the backup image when it's broken, it's troublesome. Besides, if there is no CD drive on your computer, you can't use the built-in utility for system image recovery. So, in the below section, we will introduce you an easier method to create and restore Windows 10 system image.
How to Create and Restore Windows 10 System Image Without System Repair Disc
Here, we highly recommend you Qiling Backup, a reliable and professional backup & recovery tool that enables you to back up your system, the whole hard drive or partition, personal data/files and installed applications with simple steps. Besides, you can use this tool to clone HDD to SSD, MBR disk to GPT disk or GPT disk to MBR disk from an old hard disk to a new one or small-size disk to large-size disk. But before you can restore Windows 10 system image from external hard drive, you need do as the following guides.
* To perform system recovery on a none-bootable machine, try to boot the computer through the Qiling Backup emergency disk.
Step 1. Launch Qiling Backup, click "Browse for Recovery".

Step 2. Guide to your backup destination, choose the system backup file you need. (The backup file created by Qiling Backup is a fvd file.)

Step 3. Choose the recovery disk. Make sure that the partition style of the source disk and the recovery disk are the same.

Step 4. You can customize the disk layout according to your needs. Then click "Proceed" to start system backup recovery.

Related Articles
- Windows 10 System Restore Points Gone and Missing
- Fix: Windows 10 Upgrade Stuck at 75% or 76%
- How to Cancel Windows 10 Updates Once Started
- Fix Hard Drive Won't Power Up/Turn on Without Data Loss