How to Create Clonezilla Bootable USB in Windows [Quick & Easy]🔥
Clonezilla is a great cloning and partition, but before moving further, we need to create a bootable USB flash drive to create clones or upgrade. This post will show how to create Clonezilla bootable USB in Windows.
What is Clonezilla Bootable USB & Its Benefits
Clonezilla is a partition and cloning tool that helps you create system backups and disk clones, upgrade the OS, deploy systems, and more. The free and open-source cloning software boasts features like making boot loaders, encryption, and support with various file systems.
While many prefer various methods to back up, the bootable USB is the best out of the lot. You can boot your computer without any reinstallation. Considering the threats, Clonnezilla offers you advantages like file compression and encryption to save space and provide security.
A bootable USB is beneficial in many ways and offers many advantages over other backup methods. Here's a list of benefits of creating Bootable USB media.
- Create a WinPE emergency bootable disk in case of data loss
- Boots the system without reinstallation
- Portability
- Compatibility
Start a live chat with an Qiling Expert to tailor a solution specific to your boot issues. We are here to assist you with the following as well:
- PC won't boot
- Cloned hard disk cannot boot
- System not booting error
2 Ways to Effectively Create a Clonezilla Bootable USB
If you want to clone a drive to a new one, you first must create a bootable media with a flash drive or USB to clone the drive. You can do this using two methods, but refer to the table below to choose the right tool to create Clonezilla bootable USB.
Here the table below gives us a detailed comparison of the two methods. Check it out now:
| 🆚Comparison | 🥇Qiling Disk Master | 🥈Rufus |
| ⏰Required Time | Very Quick | Quick |
| 🔒Difficulty | Low | Medium |
| 💻Effectiveness | High | Medium |
| 👩💻Suitable Users |
Beginners Time-savers |
All users |
📖Further Reading: Simplest USB Clone Tool to Clone USB Stick
Method 1. Use Qiling Disk Master
Qiling Disk Master is an excellent tool to create Clonezilla bootable media for your hard drives. You can also make system clones, images, backups, and upgrades for duplication. It offers the ability to create bootable media for the Cloneziall ISO files with advanced programs.
It is capable of creating rescue media in just a few steps. All you have to do is specify the hard drive or the system and choose the media file like a flash drive or CDs/DVDs, and in no time, you will have your output ready. Even more, you get additional features like cloning, images, recovering files out of bad/corrupt drives, or even creating smart backup and recovery solutions. Take a look at the key features.
| 🗃️Advanced Backup and Recovery Solutions | The tool offers solutions to create disk/partition, system, file backup solutions, and cloud storage space. |
| 📻Creating Bootable Media | You can make rescue media with USB flash drives and CDs/DVDs to back up your system without reinstallation in case of emergencies. |
| 🏠Security Zone | Store your backup files like clones, images, and important files in a security zone and protect them from external threats. |
| 🔘Simple and Flexible Cloning Options | Make system clones, disk clones with various options over SSDs, hard drives, and sizes to store according to your convenience. |
Here is the step-by-step instruction you need to follow to create a bootable USB with Qiling Disk Master:
Step 1. Prepare a USB drive which can be written and read.
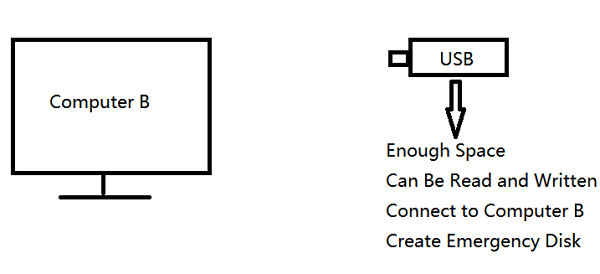
Step 2. Launch and install Qiling Disk Master on the Computer B.
Step 3. Find and click "Tools" and choose "Create Emergency Disk".
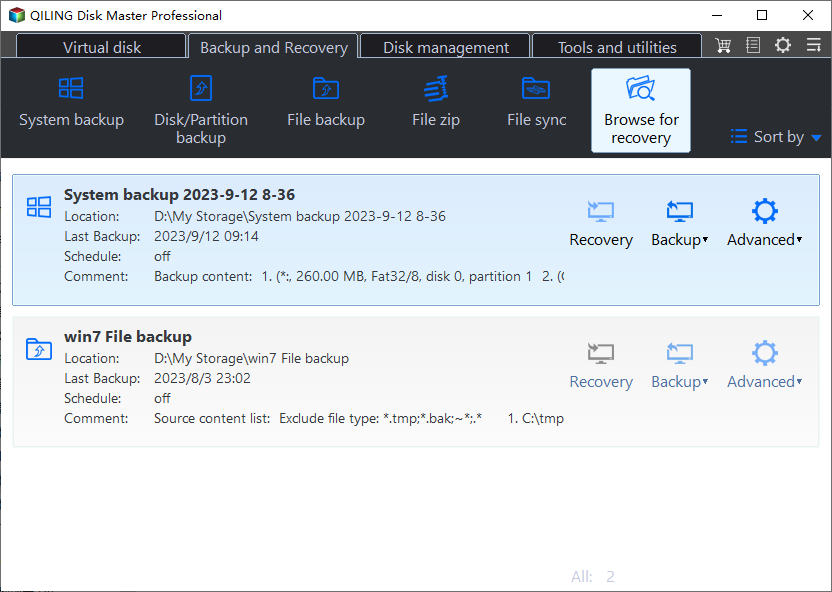
Step 4. Choose the Boot disk location. You can create an ISO file, a bootable USB or CD/DVD disc.
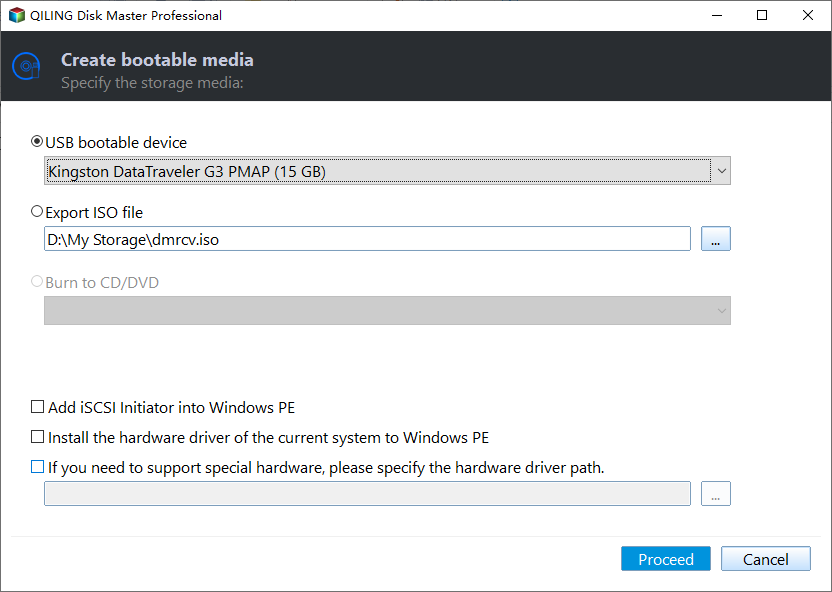
Step 5. Then click "Create" to start.
Method 2. Use Rufus
Another popular third-party tool you can use to create Clonezilla media is Rufus. This tool is used exclusively to create bootable USB flash drives for various disk cloning tools. This is a complex process, as any mistake while creating bootable media may wipe out your entire data. Refer to the steps below and execute them to create a Clonezilla bootable USB.
- ⬇️Download the ISO file from Clonezilla:
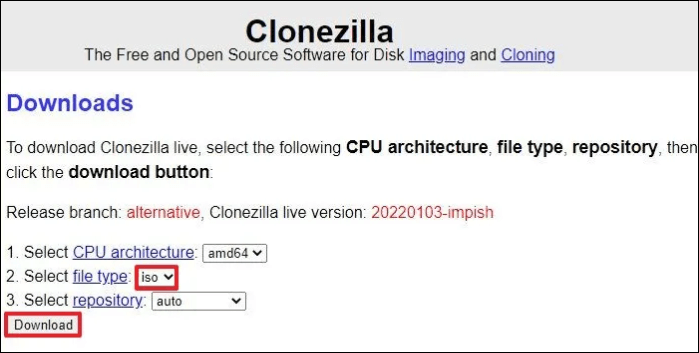
Step 1: Navigate to the Clonezilla download page on your computer.
Step 2: Click on the dropdown beside the file type, select ISO, and click Download.
- 🪜Creating Clonezilla bootable USB with Rufus:
While creating a bootable USB flash drive, make sure you have a flash drive with at least 4GB of free space.
Step 1: Go to the Rufus website and click the download link for the latest version under the Download section.
Step 2: Double-click on the file to complete the installation once you download.
Step 3: Launch the software and select your USB flash drive for bootable media under Device.
Step 4: Click on the Select button, and select the Clonezilla ISO file for Boot selection. Rufus will automatically change all the settings to create a bootable USB flash drive.
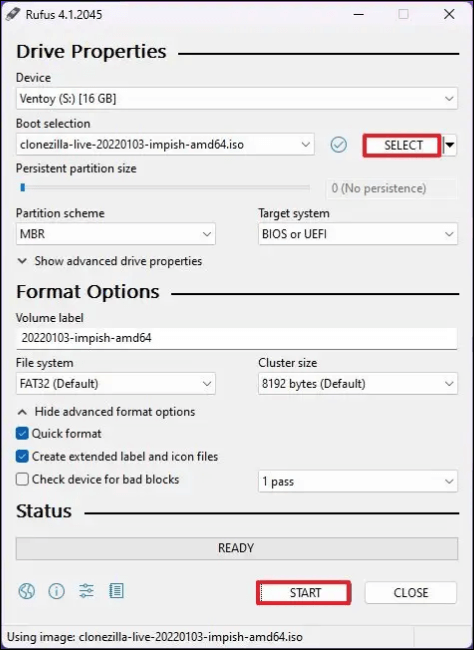
Step 5: Click Start when ready, and Rufus will detect the "ISOHybrid" image. Click on Write in ISO image mode.
Since the Clonezilla is a small ISO, the process won't take long. Ensure you connect your second hard drive to your system and check if it works.
Do remember to share this post with your fans if it is helpful:
Sum Up
Whatever the reason, cloning is really helpful for upgrading, duplicating, and backing up important data on our computers. While Clonezilla is a cloning tool, you need to know how to create Clonezilla bootable USB in Windows. In this post, we introduce your two methods to create bootable media using a USB flash drive.
The best way method is to use Qiling Disk Master, as it eases the whole process and removes your dependency on Clonezilla to make clones. With this tool, you can make clones, images, and backups and create bootable USB flash drives.
FAQs on How to create Clonezilla Bootable USB in Windows
Here are some of the most frequent FAQs asked on how to record a music video for YouTube. I hope you find these queries helpful.
1. How to make Clonezilla bootable USB with Rufus?
- Download the ISO file from the Clonezilla website.
- Go to the Rufus website and download the latest version.
- Complete the installation and launch the tool.
- Select your USB flash drive under the device section.
- Click on Select beside Boot Selection and add the ISO file.
- Click on Start to start the process.
2. How to create a bootable USB using Windows ISO?
- Download the Media Creation Tool from Microsoft to download the Windows ISO file.
- Launch the tool and select Create installation media (USB flash drive, DVD, or ISO file) for another PC.
- Set up the architecture, edition, and language.
- Choose the ISO file as your media and select the location.
- Once your Windows ISO file is ready, use the Media Creation tool again to make bootable USB flash drives or CDs/DVDs.
3. How to create a bootable USB for Windows 10?
- Download the Media Creation tool for Windows 10.
- Launch the tool and select the option to create Installation media from the options.
- Set up the basic requirements like language, architecture, and edition.
- Now, check the USB flash drive option.
- Select the drive you want to save your bootable media and wait for the tool to complete the process.
Related Articles
- How Long Does It Take Google Drive to Process a Video
- The Cloud File Provider Is Not Running: Causes and Solutions
- Quick Ways to Fix OneDrive Connect Problems
- Windows Backup Did Not Complete Successfully - How to Fix?