How to Create Clonezilla USB with Rufus (2023 Easy Guide)👍
In today's digital age, data protection and system management are essential. Creating a Clonezilla bootable USB drive helps users to ensure data security. Clonezilla is a powerful open-source disk cloning and imaging solution that allows users to secure and manage their data. Clonezilla has features if you need to upgrade storage, enhance data security, or streamline system deployment. To begin, you'll need to create a Clonezilla bootable USB drive.
This article from Qiling includes a step-by-step guide to create Clonezilla USB with Rufus. It also introduces an alternative and most effective tool to create bootable Clonezilla USB effortlessly.
Do remember to share it on Instagram or YouTube if it is helpful:
📕Preface: An Overview of Clonzilla USB
Data loss, whether through hardware failures, accidental deletions, or system crashes, can cause significant user setbacks. Clonezilla USB helps users avoid data loss, creating replicas of their drives, partitions, or entire systems. It is an open-source software solution that allows users to control their data and system management. It offers multiple features like disk cloning, data backup, and system imaging.
In addition to securing data, Clonezilla USB allows users to streamline system management and simplify hardware upgrades. As a bootable USB drive, it can turn any compatible computer into a data-saving powerhouse. Clonezilla USB has features if you need disk-to-disk cloning, disk-to-image backup, or multiple file systems support.

✅Pros: The Benefits of Creating Clonezilla Bootable USB
Creating a Clonezilla bootable USB drive offers multiple features for reliable data backup and restore, disk cloning, and system management solutions. Here are the pros of using a Clonezilla bootable USB:
- Portability and Accessibility: A Clonezilla bootable USB drive turns any compatible computer into robust cloning and data backup software. Users can access and clone their data on various devices without complex installations.
- Data Protection: Clonezilla creates precise copies of drives, partitions, or entire systems. It secures your important data against potential loss due to hardware failures, accidental deletions, or system crashes.
- Versatility: Its multi-file systems and storage media support make it suitable for multiple platforms. Whether you need to upgrade, change your device, or need data accessibility across multiple devices, Clonezilla can help.
- Incremental Backups: Clonezilla provides incremental backup to optimize storage space and reduce backup time by updating new data in previously backed-up files.
- Data Compression: With Clonezilla's compression options, users can reduce the size of backup images without compromising data integrity.
- Security: Its encryption features add an extra layer of protection against unauthorized access and prevent your data from corruption.
Share this post to Twitter or Reddit if it is helpful:
🙌Step Guide: How to Create Clonezilla Bootable USB with Rufus
Rufus is a versatile and widely used software for creating bootable USB drives quickly. It includes features for installing operating systems, updating firmware, and more. Here's a step-by-step guide to Create Clonezilla Bootable USB with Rufus:
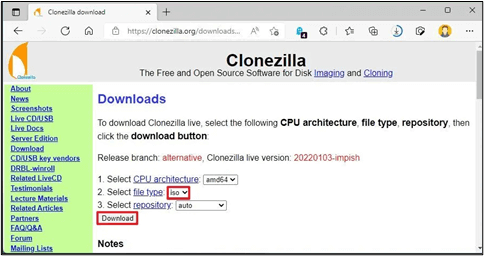
Step 1. Download the Clonezilla ISO file from the official Clonezilla website.
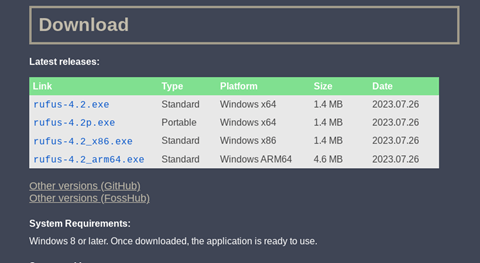
Step 2. Download Rufus from the official Rufus website and install it.
Step 3. Insert the USB flash drive (at least 1GB) into your computer and launch Rufus. Run the executable file.
Step 4. Click Device in Rufus and select your USB drive from the drop-down menu. Make sure to select the correct drive, as Rufus will erase all data on the selected drive.
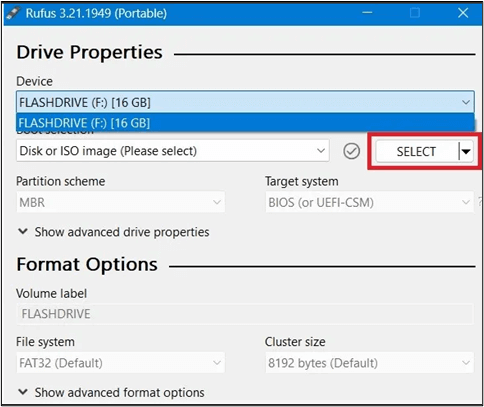
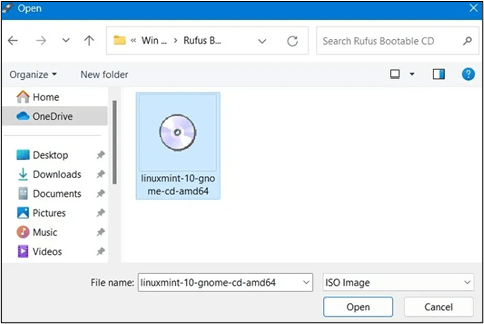
Step 5. Under Boot selection, click the Select button to select the downloaded Clonezilla ISO file.
Step 6. Configure Rufus Settings:
- In the Partition scheme, choose MBR (Master Boot Record).
- In the File system, select FAT32.
- For Cluster size, continue with the default setting.
- In the Volume label field, you can enter a name for your USB drive, but it is optional.
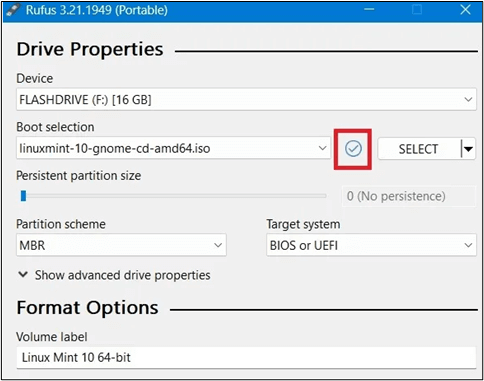
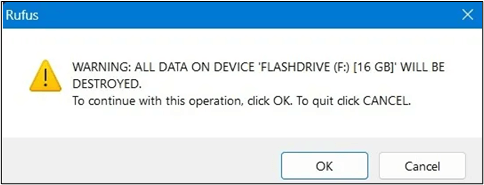
Step 7. Double-check your settings and click the Start button. A warning prompt will appear, informing you that all data on the selected USB drive will be deleted; click OK to proceed.
Step 8. Once Rufus has finished creating the bootable USB drive, you'll see a READY message at the bottom of the Rufus window. You can now close Rufus.
🎉Bonus: Create a Bootable USB Easily With Qiling Disk Master
While Rufus is a versatile tool for creating bootable USB drives, it has some limitations, too. New users unfamiliar with its settings and options may find it challenging to configure. Rufus primarily focuses on creating bootable USB drives and doesn't have built-in disk cloning or imaging capabilities. Moreover, users need to manually download the Clonezilla ISO file, which may cause inconvenience for some users.
An alternative and more user-friendly method to create a Clonezilla bootable USB drive is Qiling Disk Master. Qiling Disk Master is a comprehensive backup and recovery solution that surpasses Rufus in creating a Clonezilla bootable USB drive. It is a reliable backup and recovery software that simplifies data protection and system management. Its user-friendly interface and powerful features make it an excellent choice for beginners and experts. Here are the standout features of Ease US Todo Backup:
| 🧠Intelligent Cloning | Qiling Disk Master efficiently copies data from the source drive to the target drive, ensuring high speed and accuracy. Sector-by-sector cloning allows users to manage space and makes cloning to a smaller SSD easier. |
| 💁♂️VSS Service | The "Hot Clone" feature of Qiling Disk Master allows consistent and reliable backups. It ensures data integrity and regulates data usage even when backup files are in use. |
| ⌨️SSD Alignment | Qiling Disk Master aligns partition boundaries with the optimal block size of SSDs, enhancing performance and prolonging SSD lifespan. |
| 🔥Flexible Cloning Options | Users have the flexibility to choose from various cloning options, such as disk cloning, partition cloning, system cloning, and more. |
| 📻Bootable Media Creation | Qiling Disk Master includes a user-friendly tool for creating bootable USB drives, CDs, or DVDs. It allows users to create a bootable USB effortlessly without installing additional software. |
| 📀Disk Cloning and Imaging | Users can clone entire disks or individual partitions, making it an all-in-one solution for data backup and system cloning. |
| 🔒Encryption and Compression | Qiling Disk Master offers encryption options to secure backups and compression settings. |
Here is what you should follow to create a bootable USB with Qiling Disk Master:
Step 1. Prepare a USB drive which can be written and read.
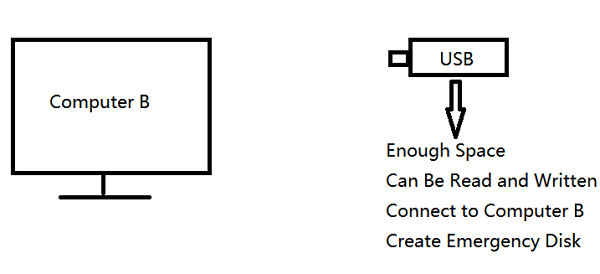
Step 2. Launch and install Qiling Disk Master on the Computer B.
Step 3. Find and click "Tools" and choose "Create Emergency Disk".

Step 4. Choose the Boot disk location. You can create an ISO file, a bootable USB or CD/DVD disc.
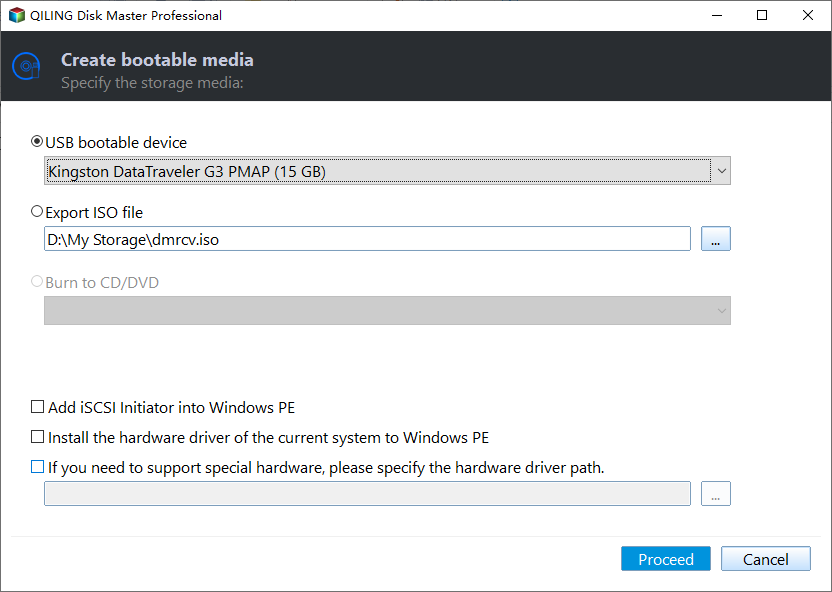
Step 5. Then click "Create" to start.
🎀Final Verdict
Clonezilla USB serves as a potent solution for data backup, disk imaging, and system cloning. The article mentioned the way to create Clonezilla USB with Rufus, highlighting its features and limitations. While Rufus is a good tool, it may require some technical expertise and lacks built-in disk cloning features.
The article introduced a more comprehensive and user-friendly solution, Qiling Disk Master, that stands out as the best solution. In addition to creating a Win PE bootable disk, Qiling Disk Master offers extensive disk cloning and imaging features. It serves as an inclusive data management solution with options like incremental backups, scheduled backups, and system migration. Whether you're a beginner looking for simple data backup or an advanced user looking for robust disk cloning, Qiling can help. Click here to download the app.
❓FAQs on How to Create Clonezilla USB with Rufus
Creating a backup of your data can prevent you from sudden data loss. Here, we've answered some frequently asked questions to help users create a Clonezilla USB with Rufus.
1. How do I create a USB image with Rufus?
Follow the steps to create a Clonezilla USB image with Rufus:
- Insert your USB drive into your computer's USB port.
- Download Rufus from the official website and run the Rufus executable file.
- Click Device and select your USB drive from the drop-down menu.
- Under Boot selection, click the Select button to locate and choose the ISO file.
- Configure Settings and Start the Process.
2. Is Clonezilla UEFI or Legacy?
Clonezilla is compatible with both UEFI and Legacy BIOS systems. If your computer's firmware settings and Clonezilla version are up to date, you can create bootable media for both UEFI and Legacy systems.
3. Can Rufus create a Linux bootable USB?
Yes, Rufus can create a bootable USB drive for various Linux distributions. To create a Linux bootable USB with Rufus, you need to choose the Linux distribution's ISO file in the Rufus boot selection. The remaining process is the same as for Clonezilla Bootable USB.
Related Articles
- Norton vs McAfee: Ultimate Comparison to Decide Which to Use
- How to Back up Windows 10 to Network Drive: 3 Ways Explained
- How to Fix the Task Image Is Corrupted or Tampered With (4 Ways)
- Exclusive Tips for How to Reset Lenovo/HP/Acer Laptop
- In-depth Guide | How to Update BIOS Without CPU🔥
- Top 10 Reasons to Download Qiling Disk Master