How to Install A New CPU on A Motherboard? [Fresh Guideline]
Recently, AMD and Intel unveiled their powerful and power-hungry new CPUs with immense performance gains from previous generations. So, there's no wonder many people still using computers from 2-3 generations ago wish to upgrade.
One major upgrade of this ilk is upgrading and installing a new CPU on a motherboard. However, it's not easy for a new user to understand how to install a new CPU on a motherboard. Because it's not as simple as showing up at a shop, buying it, and putting it on your computer.
Today, we're going to talk about a few important things if you wish to install a new CPU on a motherboard. So, let's dive right into it.
An Overview of CPU
On September 27th, 2022, AMD released their long-waited Zen 4 processors. Also called Ryzen 7000 series processors, these CPUs instantly became a hit with the audience. On the other hand, Intel released its 13th Gen CPU on October 20th of the same year.
Both these upgrades from the red and blue brands went toe-to-toe in gaming, productivity, and day-to-day usage. Hence, people have been looking for ways to upgrade their CPUs and install new CPUs on the motherboard they own.
But it's important to understand two things about these two new architectures:
- AMD's Zen 4 architecture upgrades to AM5 CPU socket—an upgrade from AM4 of the previous generation
- Intel's 13th Gen CPUs can be used with their z690 or 12th Gen motherboards
Therefore, for upgrading to a new AMD processor, you will need a new motherboard and new ram, as these processors are compatible with only DDR5. Whereas Intel motherboards will support newer CPUs even with DDR4 memory.
So, if you proceed further in this article, ensure you understand your motherboard's platform (socket), such as LGA 1700 for Intel and AM5 for AMD's new processors.
The Benefits of Upgrading CPU
The benefits of upgrading anything in the tech community aren't something out of comprehension. Every time new hardware is released, it goes up in performance, efficiency, and other elements. A new CPU can add many things to that list.
For instance, newer AMD and Intel CPUs are known to provide the following:
- Better performance in productivity applications and tasks
- Improved single-core performance
- Better performance-per-watt percentage
- Higher FPS in gaming
- Better usage of the latest and upcoming GPUs (From Nvidia and AMD)
- Higher quality visuals in images, rendering, gaming
- Better start-up timing and increased speed of switching between apps
Therefore, upgrading your CPU ensures that it uses your other components, such as SSD, Graphic Card, and Ram (Random-access memory), to their full potential. Resulting in higher gaming and productivity performance.
Preparations Before Installing A New CPU on A Motherboard
Before you order your CPU or try to put it inside your motherboard, it's important that you take all the preliminary steps. In this section, we'll list a few things you should do before installing a new CPU on a motherboard. Here we go:
Ensuring Compatibility With Your Motherboard:
The first thing you're going to do is ensure the CPU you wish to upgrade to is compatible with your motherboard. So, check the following aspects:
- The CPU goes into the slot on your PC, i.e., Intel's LGA 1700 (12th and 13th Gen), LGA 1200 (10th and 11th Gen), or AMD's AM4 (Zen 2 and Zen 3) or AM5 (Zen 4) sockets
- Check if your RAM is supported with the CPU you're going to use, i.e., DDR4 and DDR5
- Check if your motherboard's bios support the CPU on their website. If not, upgrade the bios before you upgrade the CPU
Make sure you check this information before you even order the CPU.
Necessary Equipment:
In this section, we'll talk about a few necessary pieces of equipment you will need. Such as:
- New thermal paste to put on your CPU for 100% contact with the CPU cooler
- Screwdriver or any toolkit with Phillip head screwdriver
- A grounding cable to keep you grounded
So, ensuring you have this equipment will help you install the CPU much more easily.
Creating A Backup Just In Case
Lastly, make sure that you create a backup before you proceed. There are times when installing a newer CPU might require you to reinstall Windows or lose the existing Windows. In that case, you need a professional backup tool.
We suggest that you should use Qiling Disk Master. The reason behind this suggestion is because:
- It helps you clone the operating system image or clone system.
- It helps backup data a lot more efficiently.
- As a quick backup and recovery software, it is specialized in saving time.
- It's supported on all Windows platforms, i.e., 7, 8, 10, 11.
- It offers a 250-GB cloud storage.
Therefore, make sure you create a backup of your important files or clone your operating system image in case you need it after installing your CPU.
[Full Guide] Install A New CPU on A Motherboard
Now that we have all the prerequisites let's get on with the CPU upgradation on your motherboard. In this section, we'll talk about installing a new CPU on your motherboard in both the cases of Intel and AMD.
Now, it's important to note that newer AMD processors use the same method as Intel platforms. In other words, they use the LGA (Land grid array) socket, so the processor doesn't have any pins; the motherboard does. So, instead of talking about AM5, we'll talk about AM4.
And for Intel, we'll talk about LGA 1700, as it's compatible with both 12th and 13th Gen CPUs. So, let's get started.
Intel: Installing a new CPU on an Intel Motherboard
Now, make sure you have a compatible motherboard and CPU to ensure these steps work properly. Once ensured, here's what to do:
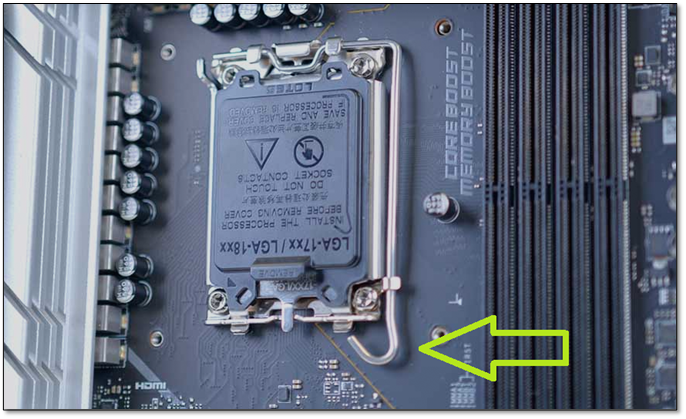
Step 1. Unlatch the socket arm on your Intel motherboard by pressing it down and moving it sideward
Step 2. Once the socket is open, pull your CPU out of the box
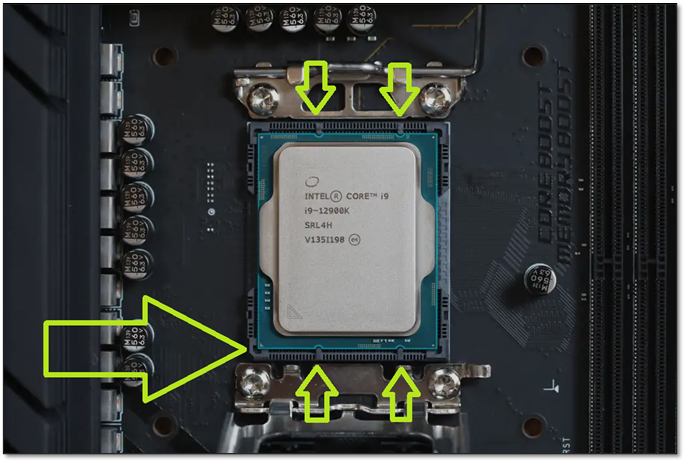
Step 3. Locate the golden triangle on the bottom-left of your CPU
Step 4. Align the triangle with the one on the motherboard socket
Or align the four dots/hatches on each side and place them down
Step 5. Place the socket back on your CPU and close the hatch until it's in the bracket
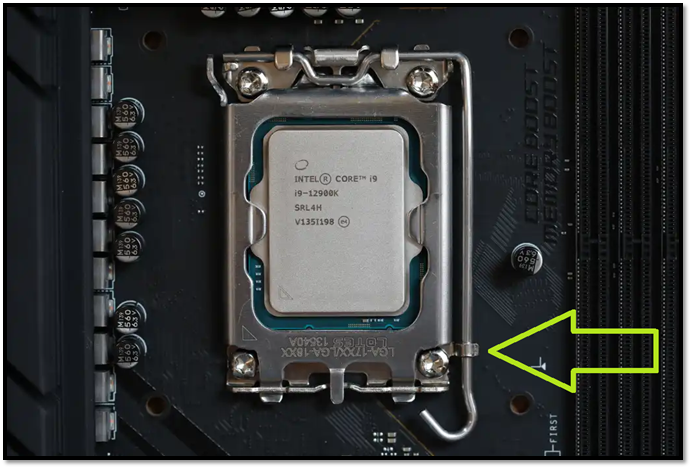
This will secure the CPU in the socket and be ready. Next, you will have to put your CPU cooler back on. But before that, make sure you apply a proper amount of thermal paste on your CPU before placing the cooler down.
AMD: Installing a new CPU on an AMD Motherboard
In this section, we're going to explore how to install an AM4 CPU. Since the installation method on AM5 CPU sockets is the same as Intel's, you can use the aforementioned steps if upgrading to a Zen 4 motherboard and processor.
If you're upgrading to Zen 3, i.e., AMD's 5000 series processors, then here's what you'll do:
Step 1. Unlatch the CPU arm on your AM4 socket
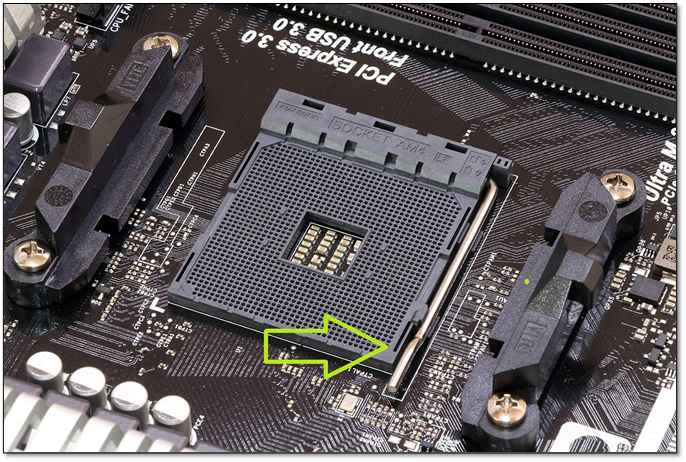
Step 2. Lift it all the way back so the pins are exposed (you won't see them)
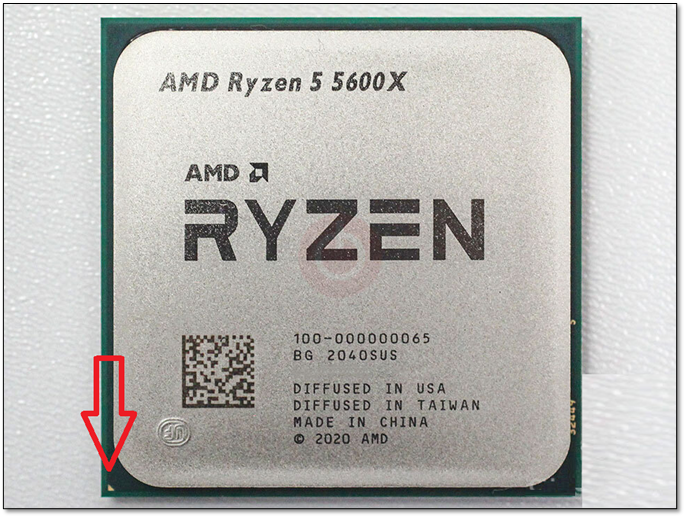
Step 3. Locate the triangle on the bottom-left of your CPU
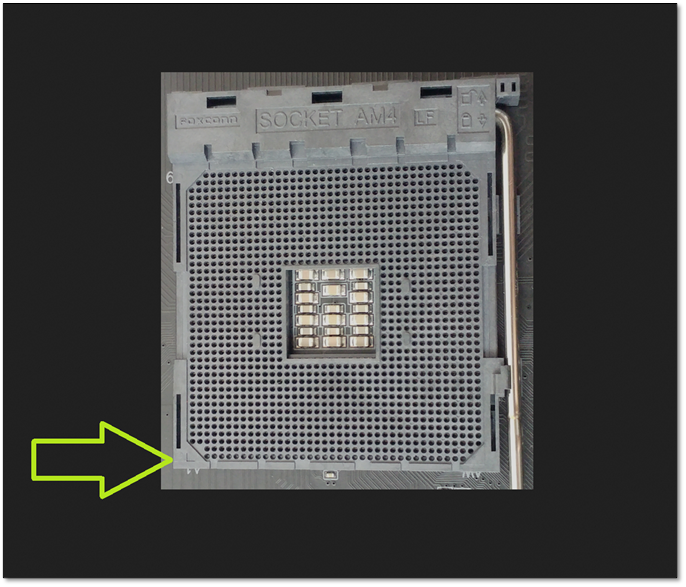
Step 4. Locate the same triangle on the socket of your motherboard
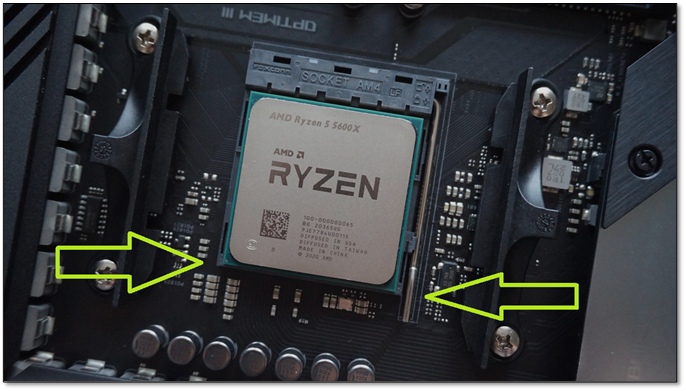
Step 5. Place the CPU in carefully until it's properly seated (do not force it)
Step 6. Close the latching arm
Once done, just apply the thermal paste and install the CPU cooler. Then, you will see that your CPU has upgraded once you start up your PC again.
The Bottom Line
There you have it, folks, the way to upgrade either of your Intel or AMD CPUs. It's important to talk about the fact that you need to ensure the CPU you're upgrading is compatible with your motherboard. Because otherwise, it won't work.
That's why you have to ensure you tend to all the prerequisites mentioned earlier in this article, including using a professional tool like Qiling Disk Master to ensure that you create a viable backup of your important data.
Once done, make sure you pick the right CPU for your platform and upgrade using the methods shown in this article.
FAQ on Installing A New CPU on A Motherboard
If you have further queries, then let's hope these FAQs will answer them.
1. Can I put a new CPU in my motherboard?
Yes, you can. As long as your CPU is compatible with your motherboard, you can install it using the methods shown in this article. Additionally, you may need a bios update to ensure your CPU works properly with your motherboard.
2. Do I need to remove the motherboard to install a new CPU?
Not necessarily, as most motherboards can switch the CPU without having to pull them out of the case. All you will have to remove is the CPU cooler before you install the new CPU.
3. How do I switch from the old CPU to the new CPU?
First off, you need to find out which of the new CPUs your motherboard is compatible with. Once you find out, follow the steps in this article to switch to a new CPU from your old one.
Related Articles
- [Steam Tutorial] How to Backup and Restore Steam Game Files
- 5 Best Photo Backup Software for PC in 2024
- Quick & Easy: Fix Cannot Download from Google Drive Problem