How to Backup Files to QNAP NAS (Quick & Easy)👍
Backup solution has become the core requirement for almost every computer user, especially for professionals. That's why such people use different storage equipment services like QNAP NAS.
But, the problem comes when a user has to perform a backup job for their data. In this blog, we will show you how to backup files to QNAP NAS in different ways.
Before that, you should clarify your doubts regarding why you need to create a NAS backup. Let us show you some points here:
- 👩👩👧👧QNAP NAS is managed by multiple users, which makes it important to back up data safely.
- 🔐It helps you keep data safe from technical errors in your computer.
Now, let's get started with the process of setting up QNAP NAS services and learn about the data backup process.
How to Setup QNAP NAS Before Backup
Before performing NAS backup, you just need to set up QNAP NAS carefully. It will help you avoid any unexpected conditions or errors during the installation and afterward. If you don't know how to set up backups using this system, you should read this section carefully.
Step 1. Turn on the QNAP NAS without the HDDs of your system.
Step 2. Download and Install QNAS from the official platform. It will automatically find your NAS and ask you to move ahead.
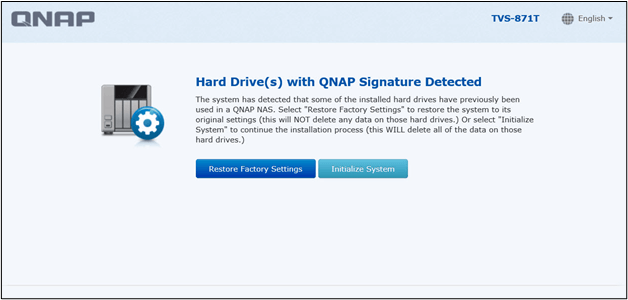
Step 3. Now, Plugin your HDDs in this step, and choose from the Factory Settings or Initialize System options shown on the screen.
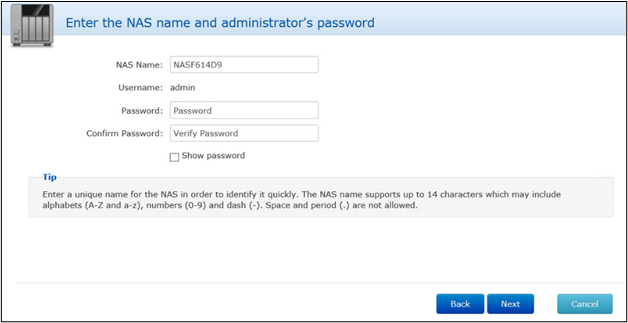
Step 4. Set your Username and Password on the newly opened screen and click Next.
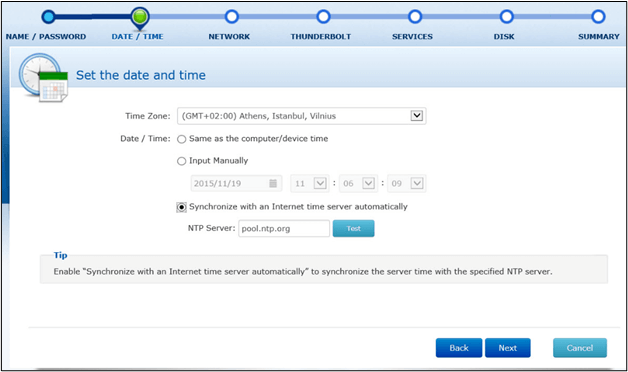
Step 5. Choose your Time format on the next screen.
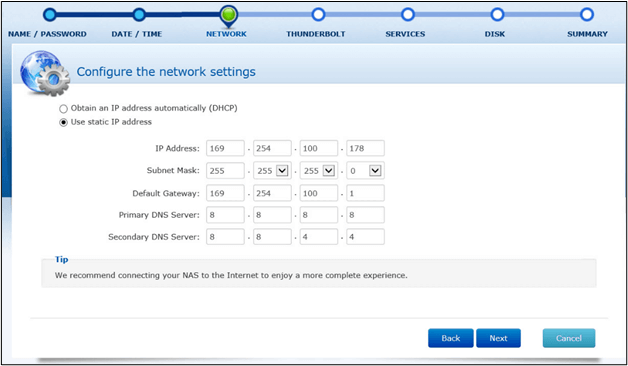
Step 6. Insert your QNAP IP Address.
Step 7. Keep following on-screen instructions. Tap on the Apply button when shown on the screen after the last custom settings page.
Be careful and follow these steps in the same pattern we have shared. You may not be able to install QNAP NAS properly if you have made a mistake. In turn, you may face errors like inappropriate real-time backup, technical problems, and many others.
📖You may be interested: How to Back Up QNAP | Backup Windows 10 to QNAP NAS
Back-Up Files to QNAP NAS with 3 Working Ways
By following the above steps, you must have set this storage in your device for network access. It is time to learn how to back up files to QNAP NAS through different approaches. We have shared 3 effective ways to accomplish this task.
| Methods | Effectiveness | Time | Difficulty |
|---|---|---|---|
| Simple to create backups, schedule it, and get all files saved in a cloud storage space | 5-10 minutes for the first set up | ⭐ | |
| File History | Restore files to a specific network on the system to avoid data loss | 10-15 minutes | ⭐⭐⭐ |
| Backup & Restore | Take your system to the level in which it was working smoothly and restore all files available in the drives at that time | 10-15 minutes | ⭐⭐⭐ |
Method 1. Save Files to QNAP via Qiling Disk Master
Whether you are looking to backup shared folders or even the whole disk from QNAP NAS, you will find Qiling Disk Master the best. It is one of the most advanced backup software available on the internet.
Using this, you can easily create a data image backup of your QNAP NAS. In its premium versions, it enables you to schedule backup and perform many other advanced features. Let us show you some important features and their brief overview here.
| Feature | Description |
| Centralized Backup | This backup software will manage all your devices from a single central location to avoid technical errors, save time, and avoid extra effort. |
| Customized Settings | Qiling Disk Master will allow you to add customized settings for data backup. You can add selected files and folders for backup and restore on Windows. |
| Scheduled Backup | In its premium version, you can schedule a backup to get your files saved in it without manual effort. It means you won't have to manually backup data from QNAP to this software. |
| Cloud Backup | Qiling Todo software has cloud-based storage to keep your data safe. So, it is almost impossible that you will lose data from QNAP. |
Follow the steps below to back up your files and folders to NAS with Qiling Disk Master easily:
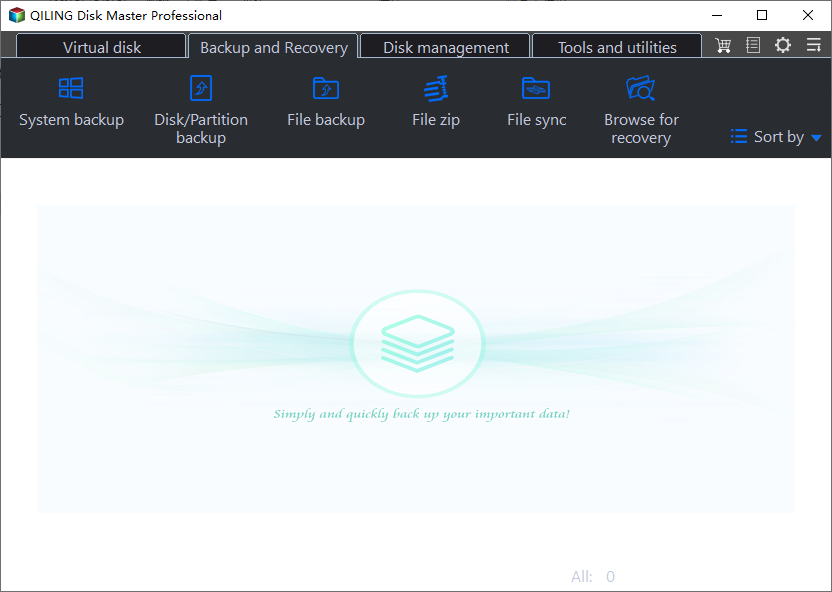
Step 1. For the first time you use Qiling Disk Master to back up files, click backup and recovery on tab page.
Step 2. Since you're going to back up files and folders on your computer, go on with the "File backup" backup mode, where you can select pictures, videos, documents and all other types of files to back up.

Step 3. Follow the paths to locate the files, folders or directories you want to back up, select them all.
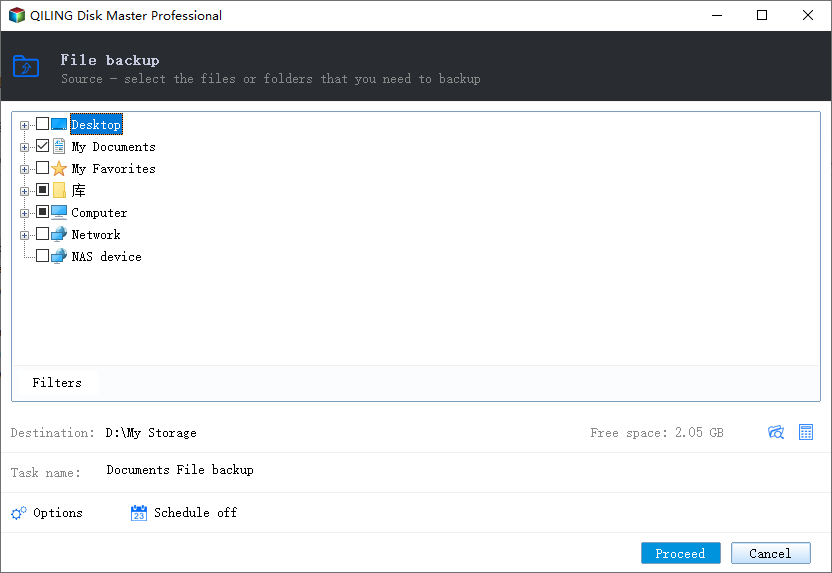
Step 4. Now you need to select a backup location to save and retain the backup.

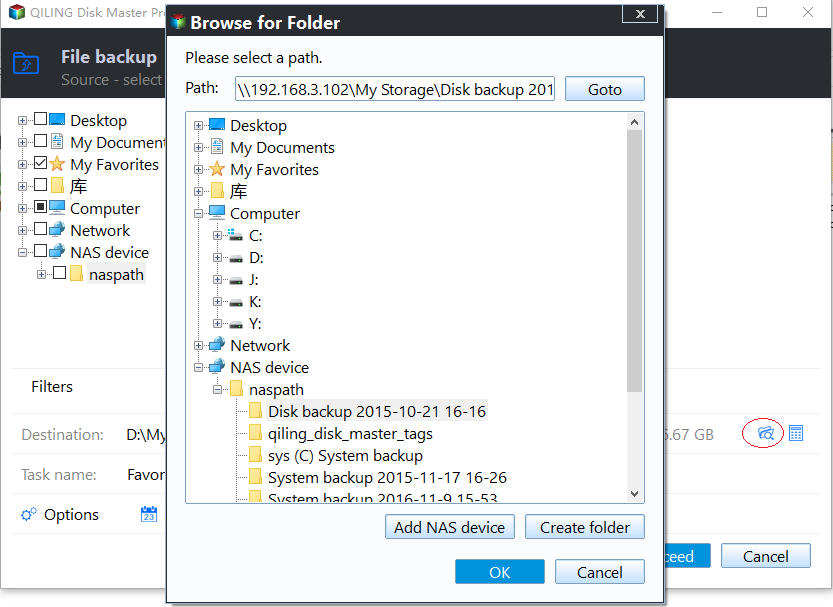
Step 5. Qiling Disk Master allows users to save the backup files to every device that is handy for you, like a local hard drive, external USB drive, SD card, network drive, or a NAS drive, plus a cloud drive of the Qiling brand. We personally recommend users to choose the cloud drive prior to a physical drive to save important backups due to the greater accessibility, flexibility and safety.
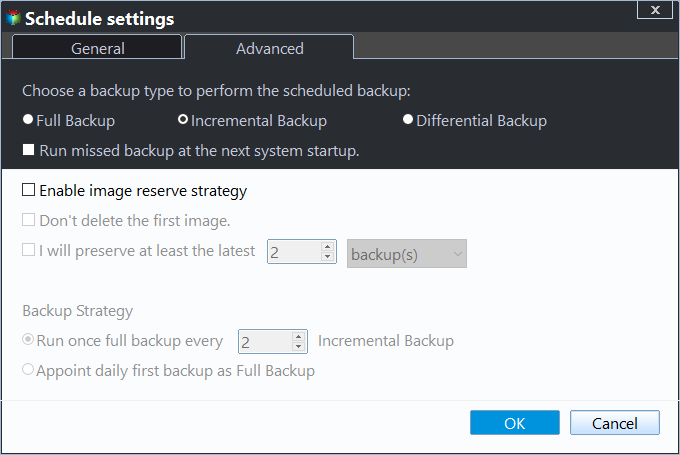
Step 6. If you're interested in an automatic and intelligent backup schedule for the next file backup task, go on with the "Options" setting. There you can encrypt a confidential file backup, compress the backup image size, or customize a backup scheme to tell the software in what time to start the next backup.
Customize an advanced and automatic backup task here:
Step 7. Click "Proceed" to start the file backup process. Your completed backup files are visible on the left area in a card style.
Method 2. Backup Files to QNAP NAS with File History
Windows OS has added a specific feature to do the file backup job without any third-party tool. Many users don't know about this feature which is called File History. In this section, we are going to show you how to backup files to QNAP NAS using the file history feature.
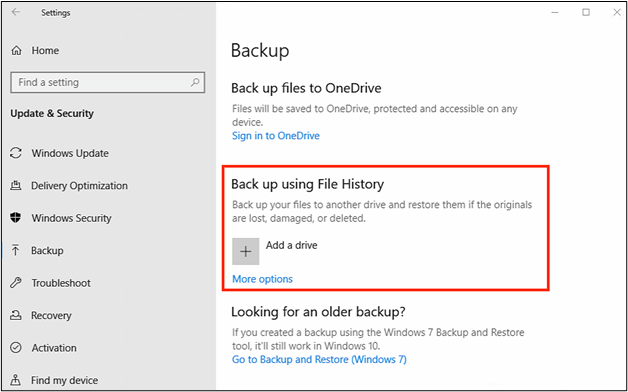
Step 1. Follow this method to reach Backup in Windows 10. Go to Settings > Update and Security > Backup.
Step 2. Tap on More options given below Add a drive.
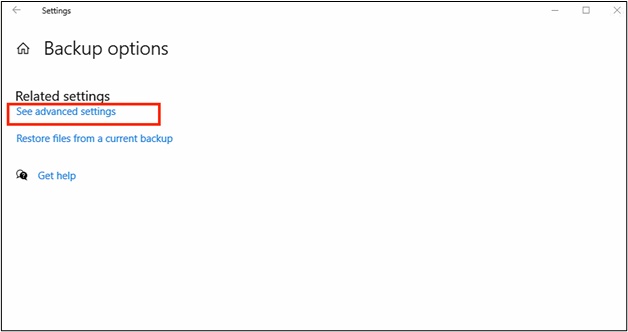
Step 3. Choose See advanced settings from the new window.
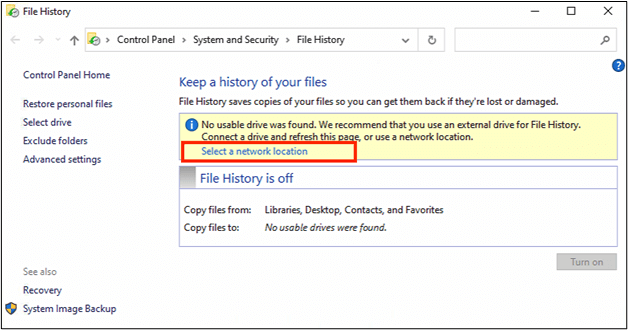
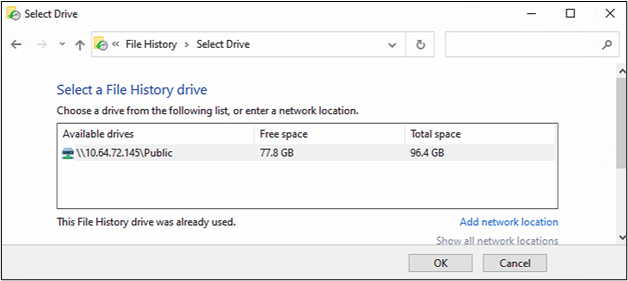
Step 4. Click on Select a network location option.
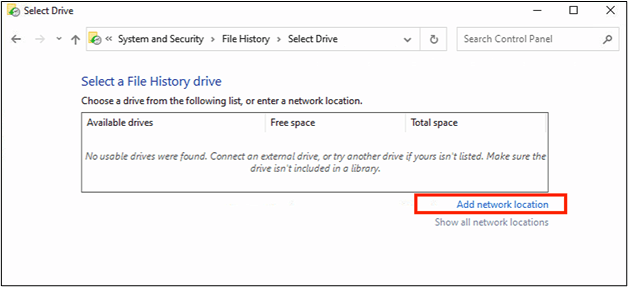
Step 5. If it is your first-time setup, tap on Add network location.
Step 6. Insert NAS IP into the search bar and choose the folder as your network location, and Click on OK when you have done with the setup.
Once you have completed these steps, you have turned on the "File History" backup method in Windows 10. From its advanced settings, you can perform different actions for scheduled file backup.
Best NAS for Home Media
Explore the top NAS solutions for home media storage. Here are the best NAS devices tailored to enhance your home entertainment experience. Read more >>
Method 3. Backup Windows 10 to QNAP NAS with Backup and Restore
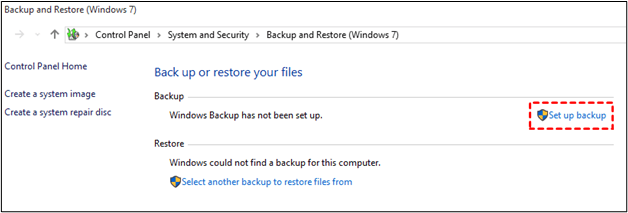
The Backup and Restore feature was introduced in Windows 7, and it is still available in Windows 10 and Windows 11. Using this option, you can create a replicate of your system on a specific network, i.e. NAS.
Whenever your system starts working wrong, you can restore it to the earlier state where it was working fine. If you don't know how to backup files to NAS using this built-in option, follow these steps.
Step 1. Access the Backup and Restore option using the pathway mentioned in the previous one. Tap on the Set up backup option available on the right side of the screen.
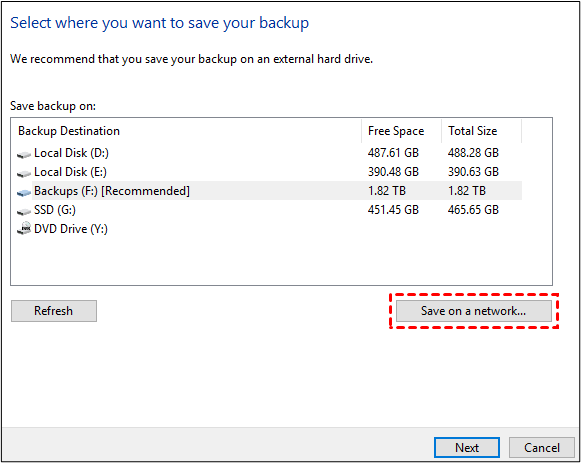
Step 2. Select Save on a network.
Step 3. Enter the NAS IP in the box with the Network Location label.
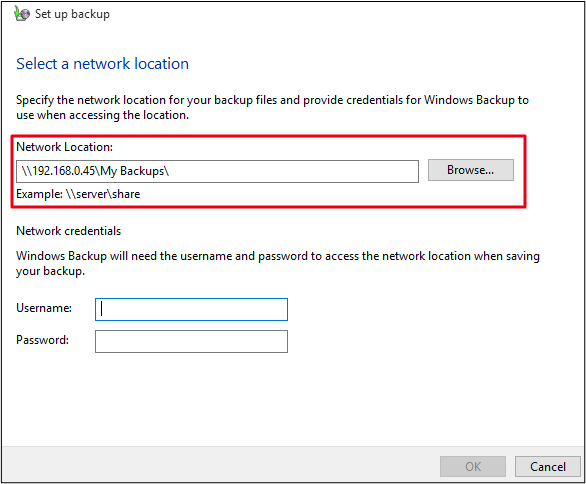
Step 4. Enter your Username and Password and then click on the OK button. Click on the Next button to continue.
Step 5. On the Review Backup screen, choose Change Schedule to set it as per your requirements.
With these steps, you can keep your data safe in a network using the built-in feature of Windows 10. The only thing you should take care of is network location, if you haven't selected the right one, you may not be able to find your data.
The Final Verdict
By reading this guide, you must have an idea about different ways to back up your data. You may be ready to accomplish this task after learning how to backup files to QNAP NAS. Undoubtedly, all these methods are proficient and can be followed.
But we recommend you go with Qiling Disk Master because of its advanced features. You won't lose a single file/folder with this software because of its cloud storage. In the case of Windows built-in features, you may lose the recent files if they haven't been backed up.
FAQs on File Backup to QNAP NAS
1. How do I set up a QNAP backup?
It will be pretty simple to create a QNAP backup to your required network. Let us share a few steps that you can follow:
- Go to the Backup and Restore option.
- Tap on New Backup Job.
- Select the Network destination where you want to take a backup.
- Tap on the Next button.
- Choose the Storage space.
- Click on OK to complete the task.
2. Can I connect a QNAP NAS directly to my computer?
Yes, you can connect QNAP NAS directly to your computer using an Ethernet cable.
3. How do I access QNAP NAS from my computer?
To access QNAP NAS from your computer, you must make sure that your computer is connected to the same network as the NAS. If you have confirmed, follow these steps.
- Go to Web Browser.
- Insert NAS IP in the address bar.
- Add your Username and Password to the new page that appears on the screen.
- Click on the Login button to get started.
Related Articles
- How to Copy and Backup Files without Admin Rights
- How to Do Offsite Backup? [2024 Three Ultimate Guide]
- Where Does Windows 10 Backup Save to? Get Full Answer
- How to Backup Onedrive to Synology NAS - 3 Effective Ways
- How to Backup SD Card to Google Drive
- Can I Clone BitLocker Encrypted Drive Without Disabling It? Yes! [3 Minutes Guide]