Backup User Profile in Windows 10 or Transfer to New PC [Complete Guide]
In Windows 10, the User Profile folder contains all the user's settings, files, and data. To backup the User Profile folder to an external hard drive, you can use the built-in File History feature or manually copy the files from the C:\Users\Username\AppData\Local folder to the external drive. Alternatively, you can use a third-party backup software to create a system image that includes the User Profile folder.
To transfer your User Profile from your current Windows 10 Pro computer to the new one, you'll need to use the built-in feature called "User State" which is also known as a "User Profile" or "User Data" in Windows. This feature allows you to transfer your user settings, desktop background, and other personalization settings from one Windows 10 computer to another. To do this, follow these steps:
This page provides a complete guide to backing up a User Profile, transferring it to a new PC, or another user account. If you need to do the same, follow the respective method and get started here now.
PAGE CONTENT:
- 1. What Is User Profile
- 2. How to Back Up User Profile in Windows 10 - 3 Ways
- 3. How to Transfer User Profile from Windows 10 to Another PC
- 4. How to Copy User Profile in Windows 10 to Another User Account
Overview - What Is User Profile
The User Profile is a collection of settings and information related to a user account on a Microsoft Windows System, including desktop settings and other user-specific details.
You can create a different profile on each computer you use, or you can select a roaming profile that is the same on every computer you use.
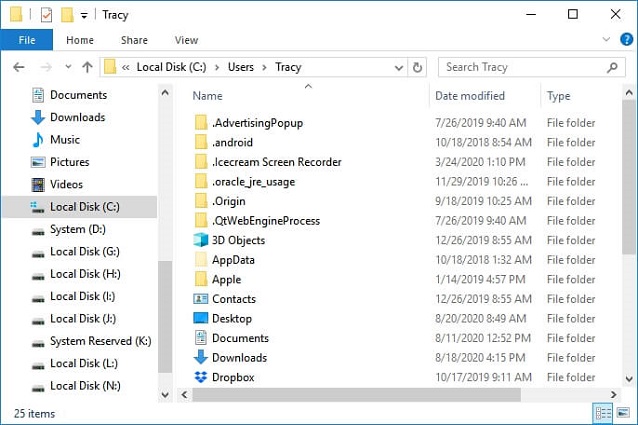
What is in the User Profile folder? It contains:
- Your personal data
- Information for system needs
- Desktop, downloads, documents, etc., general data,
- System restrictions, App data, and applications, etc.
Creating a backup of the User Profile data is indeed important, as it contains essential information for most Windows users. This data is crucial for their daily activities, and losing it could cause significant inconvenience. Therefore, taking steps to safeguard this data, such as creating a backup, is a prudent measure to ensure continuity and minimize potential disruptions.
But how to do so? Follow the respective guide as shown below, you'll fully back up the User Profile successfully.
Part 1. How to Backup User Profile in Windows 10 - 3 Ways
Here are the three methods for backing up a user profile in Windows 10/8/7 in one paragraph:
#1. Use Windows Backup Software - Easy
#2. Use Windows Backup Utility - Medium
#3. Use Windows Advanced System Properties - Medium
Tip
All three provided methods work to back up the Windows User Profile folder.
If you're not comfortable with command lines, you can take Windows backup software for a try. It's an easy way to backup your system and data.
Method 1. Backup User Profile in Windows 10 via Windows Backup Software
This tip applies to all levels of Windows users, but is especially helpful for beginners.
Turning to reliable Windows backup software is the easiest way to backup Windows User Profile. Qiling Backup is a recommended option.
Which two options are you referring to?
#1. Backup Windows System with User Profile in Windows 10
Qiling Backup's Windows System backup feature allows you to create a full backup of both User Profile data and the entire Windows system, making it a wise decision to back up your OS with User Profile to an external storage device.
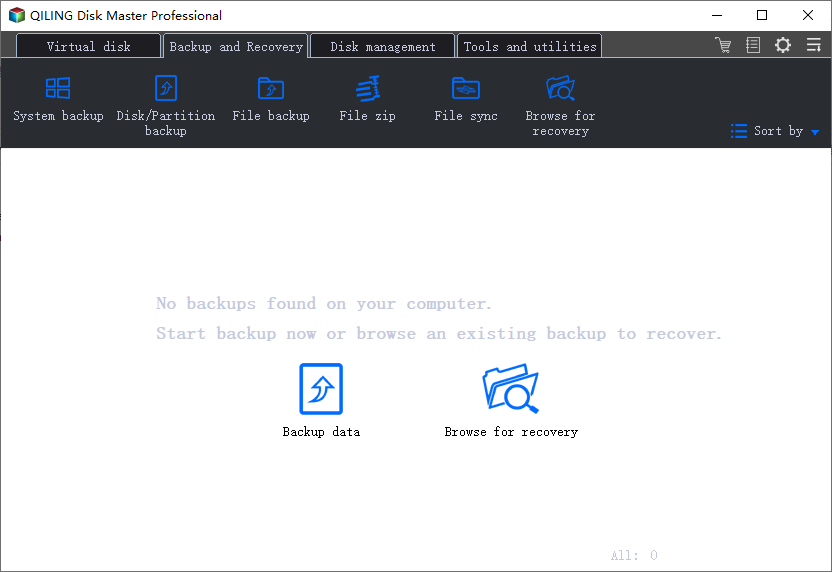
Step 1. Launch Qiling Backup, click "System backup", and image the entire operating system onto an external hard drive.
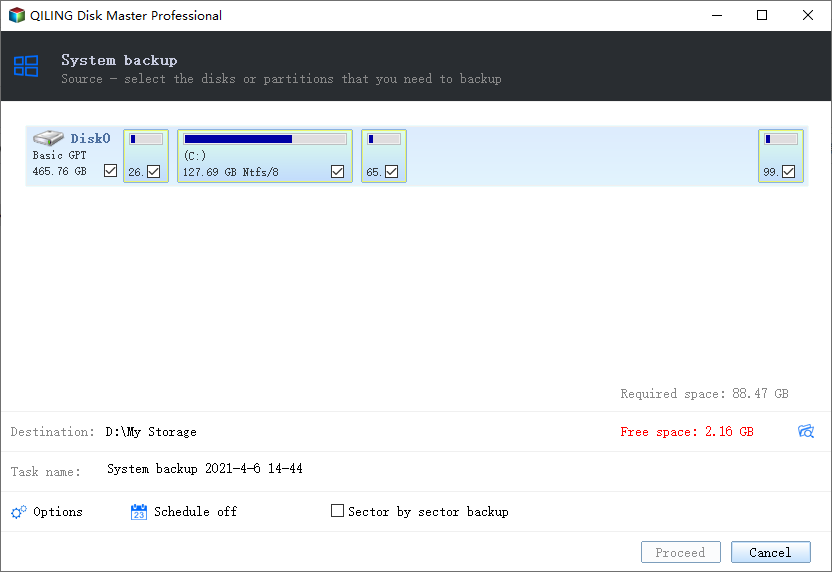
Step 2. The software automatically detects the current operating system, ensuring that all critical Windows system files are selected. You simply need to choose a backup location that is available.
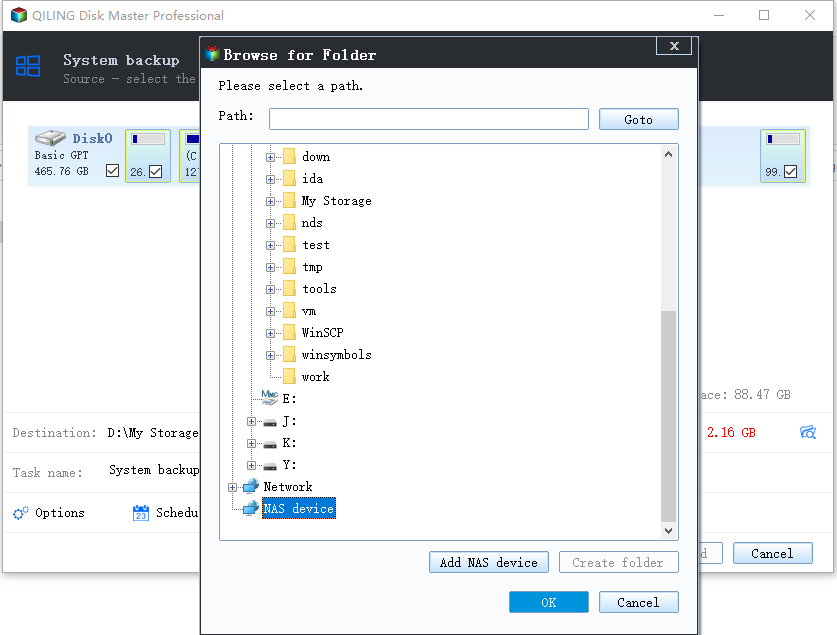
To backup Windows OS to an external hard drive, ensure the drive is connected to your computer and click "Browse" to select the external hard drive as the backup location.
Step 3. To confirm the backup location and set an automatic backup schedule, turn on the "Schedule" feature and click on "Backup options" to encrypt your backup.
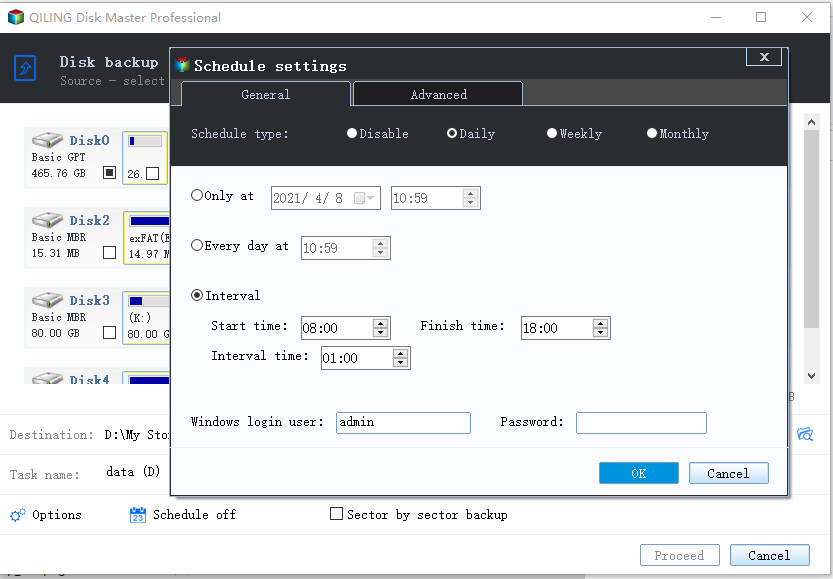
Click "Proceed" and the software will start immediately to backup the operating system to an external hard drive right away.
#2. Backup User Profile Data in Windows 10 (Documents & Desktop, etc.)
If you only need to back up some visible User Profile data like User folders, files, etc., on desktop, File Backup mode in Qiling Backup can help.
Step 1. Run Qiling Backup and choose "File backup" on the main window.

Step 2. On the "File Backup" window, you can select almost any type of file from various directories using the "User Defined" mode.
To quickly back up specific file types, use the "File Type" mode when backing up, which allows you to select the types of files you want to save, such as documents, pictures, videos, music, and more, making the process faster and more efficient.
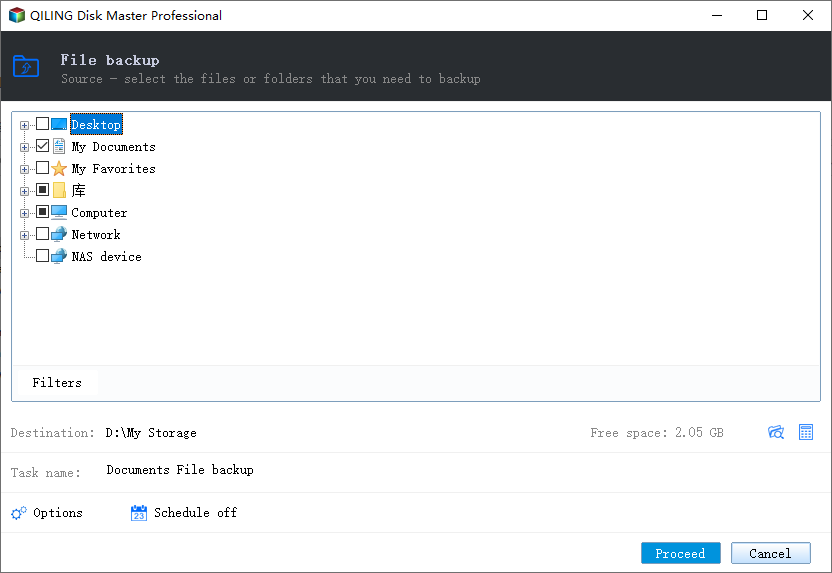
To proceed, add the plan name or text description to the file backup, followed by selecting a backup location.
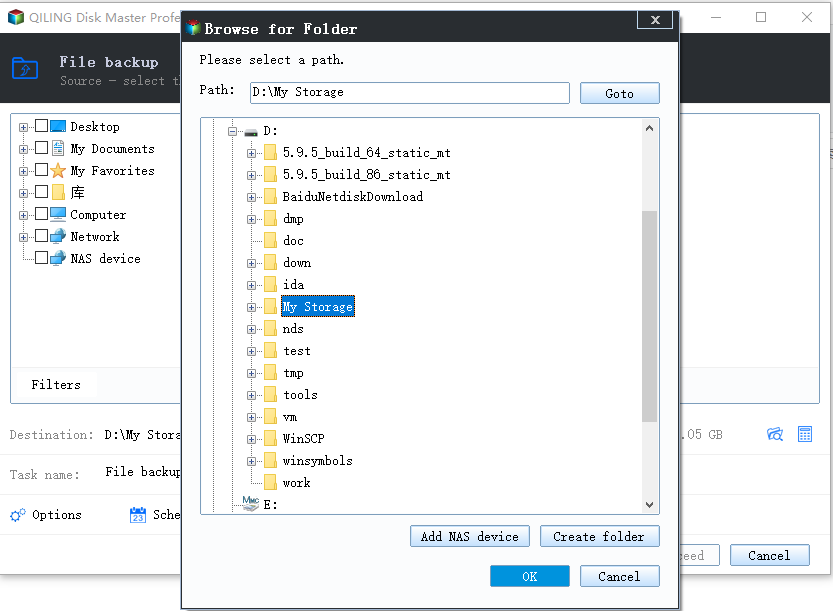
To backup files to an external hard drive, click "Browse..." in the "Destination" area.
Connect the external hard drive to the computer, expand the "Computer" option, and select the external hard drive. Click "OK" to confirm the selection.
If you're interested in getting more backup features, click on "Schedule", "Image-reserve strategy" and "Backup options" to find them.
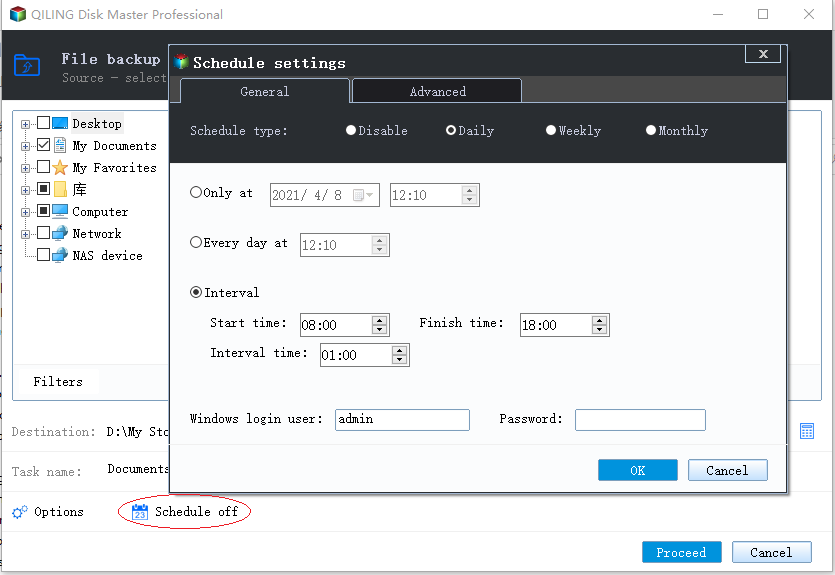
Step 3. After settings were all made, click "Proceed".
#3. Restore User Profile Backup
When you lose user data or documents on your computer, you can immediately restore them from the file backup image. This allows you to recover lost files and get back to work quickly.
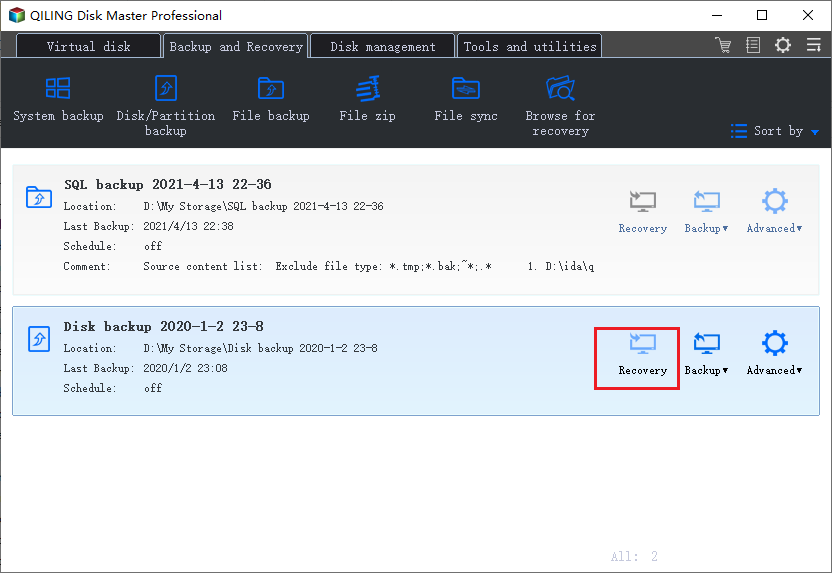
To restore a user profile, go to Qiling Backup, click "Browse to Recover", select the desired backup image of the user profile, and choose a target location, then click "Recovery".
Method 2. Backup Windows 10 User Profile using Windows Backup Utility
This guide is geared towards experienced Windows users who are looking for a more advanced solution than using Qiling Backup.
Windows Backup and Restore, also known as Backup and Restore (Windows 7), allows users to manually create a backup of their Windows system and user profiles.
The tool allows you to create a full copy of all the User Profile files and data in Windows 10, which can be useful for backing up user settings and data.
#1. Steps to Backup Windows 10 User Profile
Step 1. Connect an external hard drive or USB to your PC to save the backup image of the User Profile.
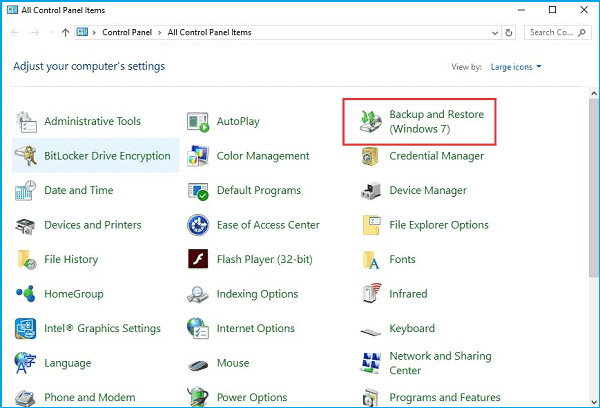
Step 2. Click on "Start" and click "Control Panel" then choose "Backup and Restore (Windows 7)".
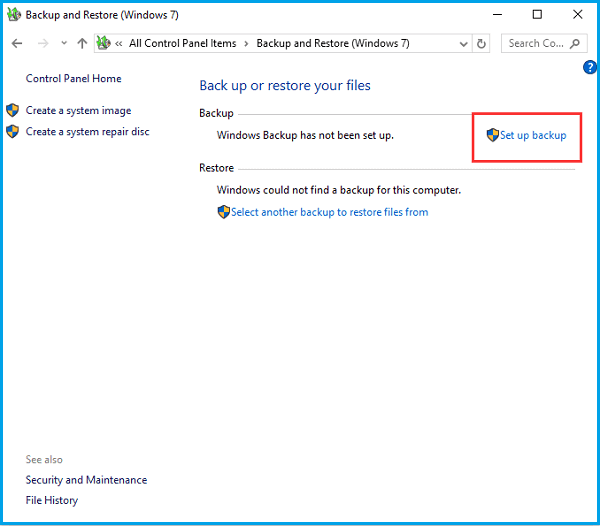
Step 3. Click "Set up backup" on this screen.
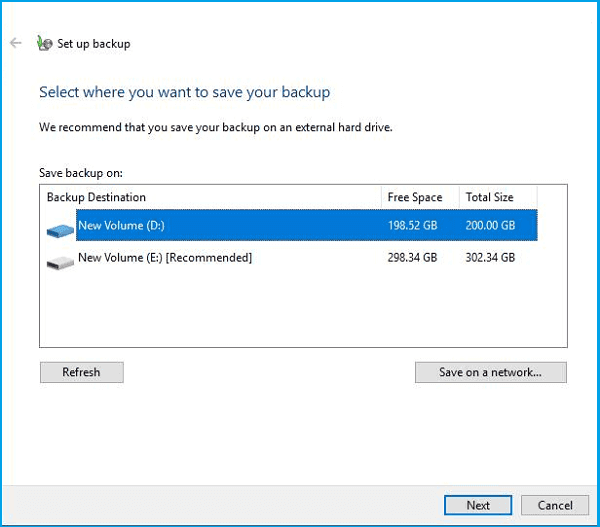
Step 4. Select the external device or a local drive as the target location to save the backup image and click "Next" to proceed with the backup process.
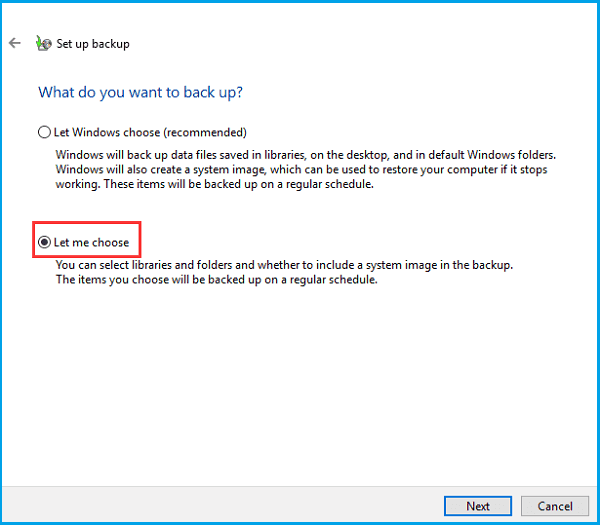
Step 5. On the next screen, select "Let me choose" and click "Next".
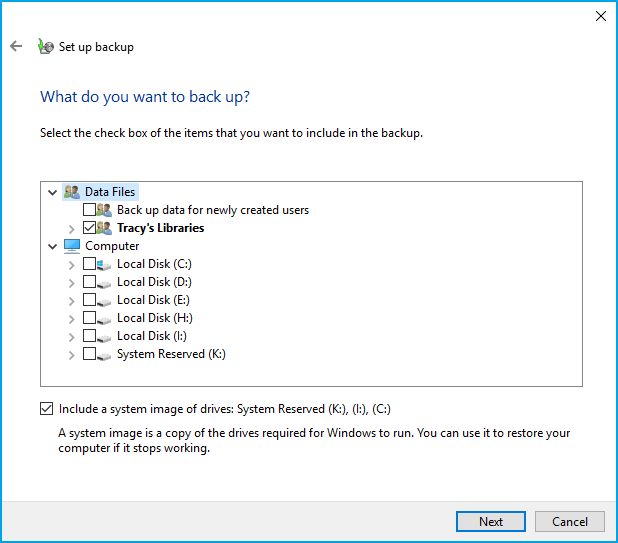
Step 6. Select the specific user library or all of the created Users Profiles that you need to transfer.
To back up the User Profile only, select the option to exclude a system image and proceed with the backup.
Step 7. Next, it will give you a summary of this backup operation. If no issues, click "Save settings and run backup".
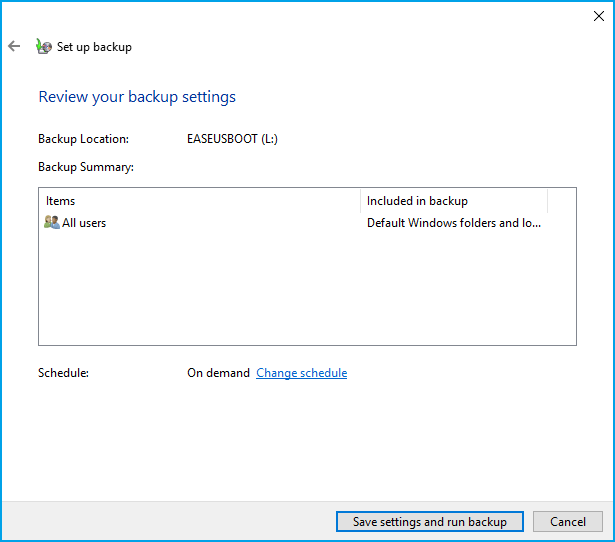
Wait for the process to complete.
#2. Restore User Profile in Windows 10:
Step 1. Connect the external hard drive with your User Profile backup to Windows 10.
Step 2. Open Control Panel, then click "Backup and Restore (Windows 7)".
Step 3. Click "Select another backup to restore files from", select the backup that contains User Profile, and click "Next".
Step 4. Click "Browse for folders" and select the User Profile folder. Click "Next".
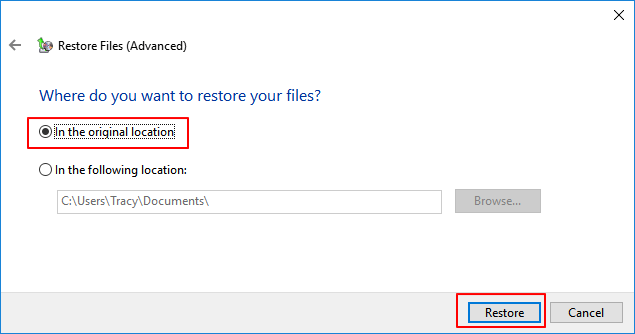
Step 5. Check "In the original location" and click "Restore".
Method 3. Backup and Copy User Profile in Windows 10
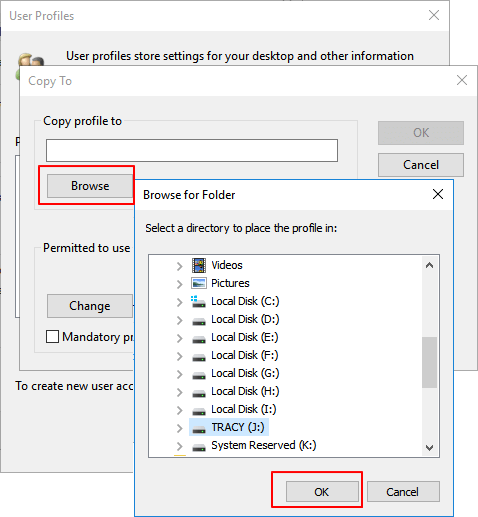
Step 1. Right-click on This PC, select "Properties" and click "Advanced system settings".
Step 2. Click "Settings" in the User Profiles section.
Step 3. Select the Default Profile and click "Copy To".
Step 4. Click "Browse" to save the User Profile folder to another location - an external disk.
Part 2. Transfer User Profile in Windows 10 to Another PC
To transfer or migrate a User Profile in Windows 10 to another computer, follow these steps: First, ensure that the User Profile is backed up on the old computer. Then, on the new computer, go to Settings > Accounts > Your email and accounts, and click on "Add a account" and select the account you want to transfer the profile for.
If you're looking to transfer your User Profile data from Windows 10 to another computer, you have two straightforward options.
Create a system OS Image with User Profile and Transfer It to New PC
Qiling Backup allows you to transfer the Windows OS with User Profile to a new PC in Windows 10/8/7. To achieve this, you'll need to follow a series of steps, which I can provide if you'd like.
- To backup and save the system image, connect an empty external hard drive or USB to the computer. Then, go to the Windows Settings, click on "Update & Security", and select "Backup" from the left menu.
- To transfer a system image to another computer, follow the guide provided in the link here: Transfer System Image to Another Computer.
Part 3. Copy User Profile in Windows 10 to Another User
Copy and migrate User Profile data from one user to another user within the same PC.
To copy a user profile in Windows 10, follow these steps:
Step 1. Restart PC and login into the User Account in which you want to migrate User Profile.
Step 2. Connect an external hard drive with huge free space to your PC and open Windows File Explorer.
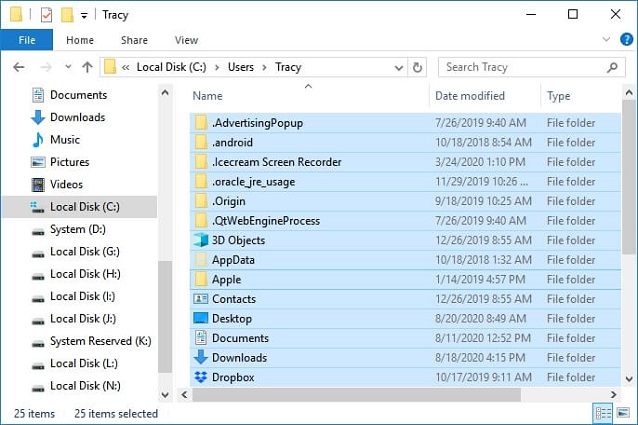
Step 3. Go and copy your User Profile data in this path: This PC/Local Disk (C:)/User/UserName/.
Copy everything under your User folder to the external hard drive.
Step 4. Click the Windows icon, and click the user icon.
Step 5. Select the other User Account that you want to copy the User Profile to, log in.
Step 6. Copy and paste the User Profile data to the new user folder: This PC/Local Disk (C:)/User/NewUserName/.
After making changes, you can restart your PC to save them. Once your PC is back on, you can use the User Profile in your new User account on the same computer.
Conclusion
This page provides three comprehensive guides on backing up a User Profile, transferring it to a new PC, or to a new user account in Windows 10.
- To backup User Profile in Windows 10, let Qiling Backup help. It's easy and effective.
- Qiling PCTrans allows for a reliable transfer of a user profile to a new PC using its PC to PC mode.
- To copy a User Profile to a new User Account, you can manually copy and paste the necessary files and settings from the old account to the new one, effectively transferring the user's preferences, applications, and other personalized settings.
User Profile data is indeed important. Take your steps and follow this guide to protect your User Profile right now.
Related Articles
- Create Windows 10 Backup System Image
- How to Clone Hard Drive in Windows 7 32 Bit or 64 Bit to Another Hard Drive
- Copy/Move Windows.old Folder to External Hard Drive
- How to Backup PC Files to Dropbox
- USB Bootable Software & Bootable USB Creation Tool