Cloned Hard Drive Won't Boot? Make Cloned Drive Bootable in 3 Fixes
If your cloned hard drive or SSD won't boot, don't worry! This page is here to help. Cloning a hard drive or SSD is a great way to create a duplicate of your original drive, but sometimes the cloned drive won't boot.
These methods also work to fix various cloning issues, such as a cloned drive not booting on Windows 10, a cloned SSD not booting, a cloned m.2 SSD not booting, a Samsung SSD clone not booting, Windows 7 not booting after cloning a hard drive, and more. Follow these steps to identify and resolve the issue on your PC with ease.
Cloned Hard Drive Won't Boot, How to Make It Bootable?
I'd be happy to help! You cloned your 250GB disk to a 520GB Seagate hard drive, but now Windows won't boot from the cloned drive. This is likely because the cloned drive's boot sector and partition table are not properly set up for Windows to recognize. To make the cloned drive bootable, you can try using a tool like EaseUS Todo Backup or AOMEI Backupper to create a bootable clone. These tools can help you create a bootable image of your original drive and clone it to the new drive. Alternatively, you can try using a Windows installation media to reinstall Windows on the cloned drive, which may help resolve the issue. Would you like me to elaborate on either of these options?
The cloned hard drive won't boot issue is a common problem that has troubled numerous users. To fix it, you should first find the possible reasons that might cause the error, such as incorrect boot order, corrupted boot sector, or issues with the cloned drive's partition table. Once the cause is identified, you can take appropriate steps to resolve the issue, which may involve adjusting the boot order, running a disk check, or re-cloning the drive using a different cloning software.
Cloned hard drives or SSDs may fail to boot due to various causes, including corrupted boot sectors, incorrect drive configuration, incompatible firmware, or issues with the cloning process itself. Additionally, problems with the cloned drive's file system, such as incorrect partitioning or formatting, can also prevent it from booting up.
1. Source disk contains bad sectors, which makes cloned disk unbootable.
2. The clone is incomplete as it only copied the system drive, but the boot drive was not cloned.
3. A conflict occurs when a source disk with a Master Boot Record (MBR) style partition table is being copied to a target disk with a GUID Partition Table (GPT) style partition table.
4. When trying to change the boot drive in BIOS, but the system still boots from the old drive, it's likely due to the system's UEFI firmware not properly updating or the boot order not being changed correctly. This can be caused by various factors such as a faulty UEFI firmware, incorrect BIOS settings, or a hardware issue with the boot drive itself.
5. The computer's motherboard is unable to boot from a UEFI-compatible GPT disk that has been cloned.
6. The computer is unable to boot up the cloned SSD because it lacks the necessary drivers, specifically for M.2 drives.
Don't worry if you're not sure why your cloned disk won't boot - just try the provided solutions and you'll likely get it up and running again. Whether it's a corrupted boot sector, a mismatched disk configuration, or some other issue, these troubleshooting steps should help you resolve the problem and get your cloned disk booting on your PC.
Preparations
Here are some preparation tips for you to follow:
#1. Prepare a new equal or bigger disk
If the new disk is smaller than the used space on the source disk, the cloning process may not complete or may only partially clone data to the new disk.
To create a comprehensive disk cloning process, ensure your new disk is the same size as or larger than the source disk.
#2. Pick up a reliable disk cloning software
To clone a hard drive to a new HDD or SSD without bootable issues, it's crucial to use a comprehensive disk cloning software that can handle the process efficiently.
Here, Qiling Disk Copy is recommended for its advanced and flexible cloning feature, with 24/7 tech support, allowing you to clone a hard drive and make the cloned drive bootable on all Windows OS.
To resolve the "cloned disk not bootable" issue on your own, follow these methods. You can try booting from a live USB or CD, then use a tool like GParted or EaseUS to resize or reformat the cloned disk. Alternatively, you can use a tool like Clonezilla or Acronis True Image to clone the disk again, this time using a different method or settings.
Note: To resolve the "cloned disk won't boot" issue, it's crucial to have a precise and detailed approach to the cloning process. This involves accurately mirroring the source disk, including all necessary files, partitions, and boot information.
Method 1. Restart Disk Cloning, Making Cloned Disk Bootable
To resolve the issue where a cloned disk won't boot due to existing bad sectors on the disk or an incomplete disk clone, you can try running a disk check and repair on the cloned disk. This can be done using the built-in disk checking tool, such as chkdsk in Windows or fsck in Linux, to identify and repair any bad sectors or file system inconsistencies.
If the source disk has bad sectors or the cloning program only cloned the system drive while leaving out the boot drive, the cloned disk may not be able to run Windows.
To resolve the issue, restart the cloning process using a reliable disk cloning software, such as Qiling's Disk Copy, which offers a direct resolution to effectively clone a disk to another SSD or HDD with ease.
To ensure a smooth disk cloning process, activate the software first by clicking the provided button to obtain an activation key. This will initiate the cloning process.
#1. Restart Cloning Disk to New Disk
First, you need to clean up the disk, leaving the whole disk empty. Then connect or insert your new hard drive or SSD to the source PC as a second drive and follow these steps:
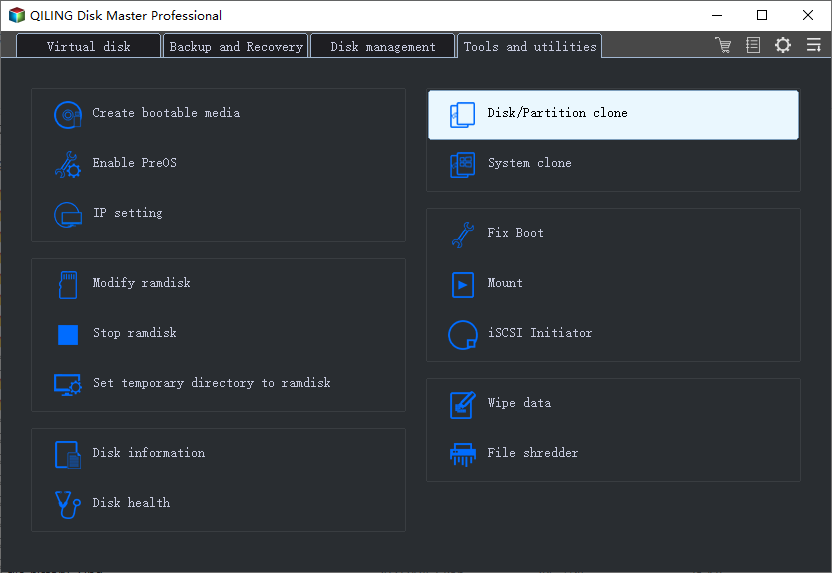
Step 1: Download, install and run Qiling Disk Copy on your PC, click "Disk/Partition clone" to start cloning.
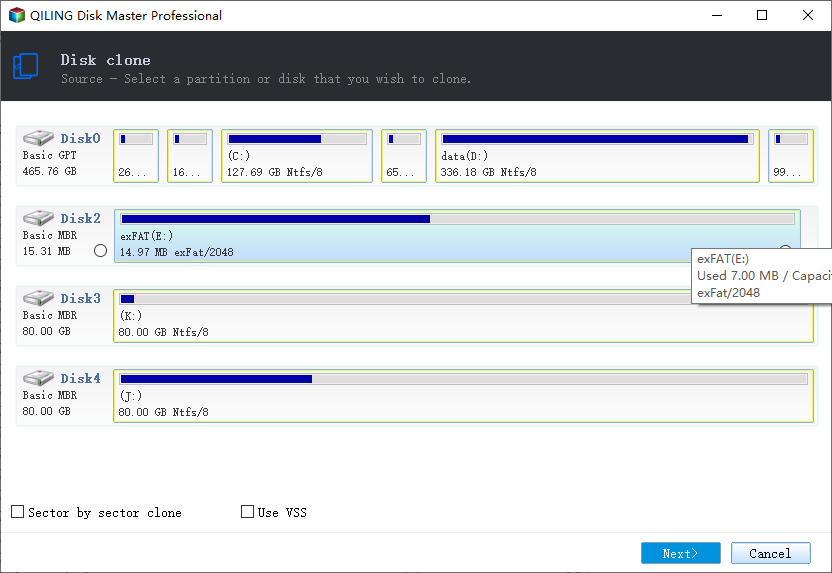
Step 2. Select the source disk that you want to copy or clone and click "Next".
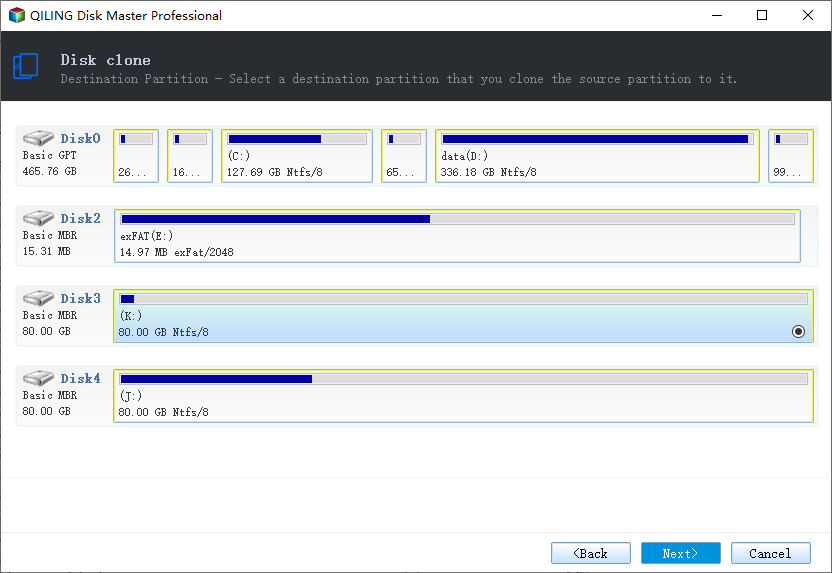
Step 3. Select the destination disk.
Note: The destination disk should be at least the same size or larger than the source disk to copy or clone the source hard disk.
Step 4. Check and edit the disk layout.
If your destination disk is an SSD drive, remember to select the "Optimize for SSD" option when the target is SSD.
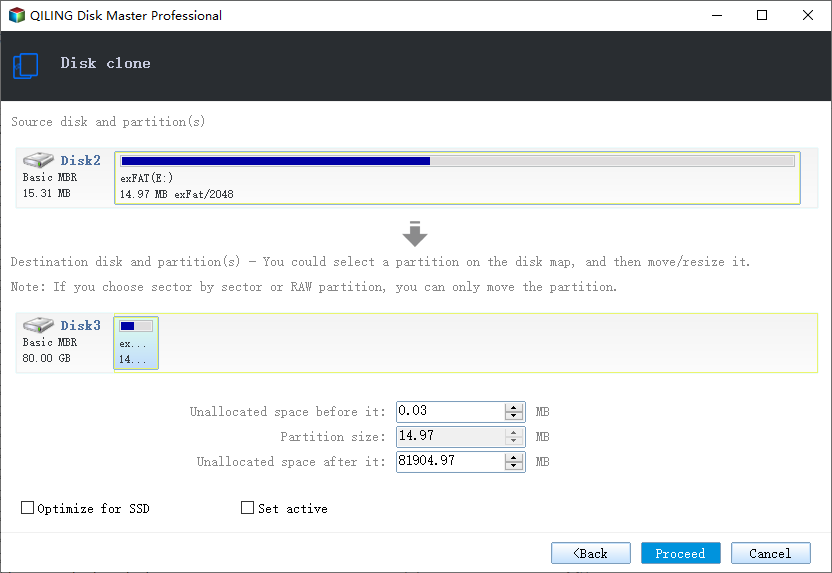
Step 5: Click "Proceed" to start the hard drive cloning process.
A message now appears, warning you that data will be lost. Please confirm this message by clicking "OK".
#2. Make Cloned Disk Bootable
After the cloning process is finished, change the boot order to prioritize the newly cloned disk, ensuring the computer boots from it instead of the original disk.
Step 1. Keep the new disk inserted on your PC.
Step 2. Restart your PC and simultaneously press F2, F12 or Del key to enter BIOS.
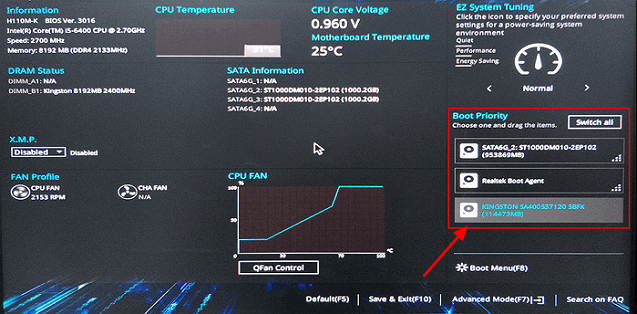
Step 3. Go to the Boot section, change the boot priority, and set computer to boot from the new cloned disk.
Step 4. Save the changes and exit BIOS. Then restart the PC.
The computer will automatically boot up from the new disk after this step.
Method 2. Convert Disk to MBR/GPT and Restart Cloning Disk
A cloned hard drive may fail to boot due to a conflict between the Master Boot Record (MBR) and GUID Partition Table (GPT) formats. This issue can be resolved by using a tool like EaseUS Todo Backup or EaseUS Partition Master to convert the cloned hard drive's format to match the original drive's format, thus ensuring a successful boot.
When cloning a disk from an MBR (Master Boot Record) disk to a GPT (GUID Partition Table) disk, the cloned disk may not boot due to the computer's inability to support UEFI boot mode, which is required for GPT disks. This is because the computer only supports BIOS Legacy boot mode for MBR disks.
If the source system's disk is using GPT but the target disk is using MBR, the cloned disk cannot be made bootable.
To resolve the issue of mismatched partition styles between the source and target disks, it's recommended to convert the target disk to either MBR (Master Boot Record) or GPT (GUID Partition Table), ensuring the new disk's partition style matches the source disk's. This approach can help prevent potential boot issues and ensure a seamless migration process.
Here is how to start:
#1. Check The Partition Style of Both Source and Target Disks
Step 1. Insert the new disk into your computer as the second drive via a SATA cable and a power cable.
Step 2. Open Disk Management, right-click on the source disk, and select "Properties".
Step 3. Check the partition style of the selected disk.
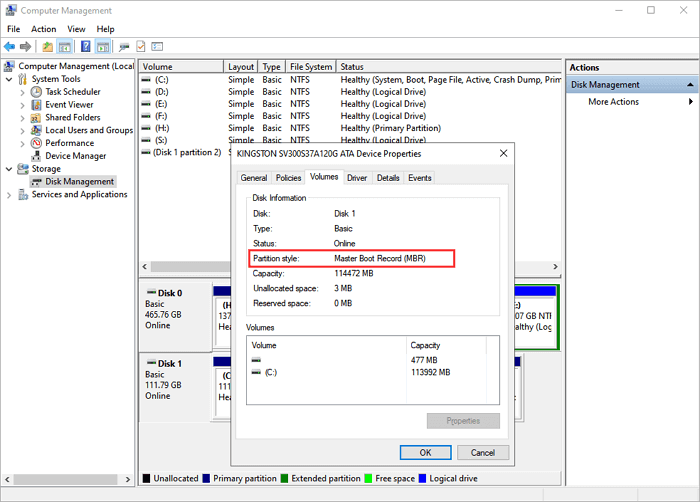
Step 4. Repeat Step 2 and Step 3 to check the partition style of your new disk.
#2. Convert the New Disk to MBR or GPT
To convert a GPT disk to MBR, you'll need to use a tool like `gdisk` or `fdisk` to rewrite the partition table in MBR format. This will erase all data on the disk, so be sure to back up any important files before proceeding.
If the source disk is with GPT partition table but the target disk is with MBR partition table, the target disk's MBR will be converted to GPT partition table. This is done to ensure that the target disk can be used with the same partitioning scheme as the source disk.
Here, you can try Qiling Partition Master Free Edition which allows you to flexibly convert a disk to MBR or GPT. The software will guide you through the process of converting from MBR to GPT, ensuring a smooth transition with minimal data loss.
Step 1. Download and launch Qiling Partition Master on your Windows computer.
Step 2. Click the MBR disk that you want to convert, click "More" and choose "MBR -> GPT".
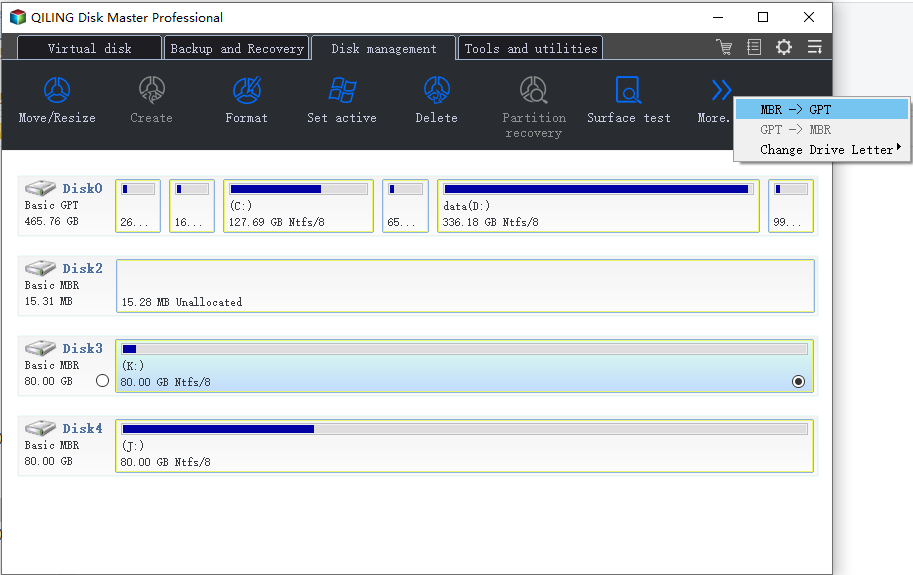
To convert GPT to MBR, repeat the process listed above and right-click the new disk to select "Convert to MBR" as the conversion mode.
#3. Empty the New Disk
To erase everything, including partitions, from the target new disk, you can use Qiling Partition Master's Delete All Partition feature for a quick guide, or manually delete the partitions and then wipe the disk clean.
To ensure the entire disk is empty, you can format it in Disk Management. Here's how to do it: In Disk Management, right-click on the disk you want to format and select "Format".

#4. Repeat the Disk Cloning Process, Making It Bootable
To clone a disk using Qiling Disk Copy, start by downloading and installing the software. Then, select the source disk and target disk, and choose the cloning mode.
Method 3. Run DISM Install Drivers, Making Cloned Drive Boot
To resolve the cloned hard drive not booting issue due to disk driver issues on the source computer, you can try reinstalling the disk drivers on the source computer. This can be done by going to the Device Manager, finding the disk driver, right-clicking on it, and selecting "Uninstall device".
When you clone a disk to a new disk, like from a traditional hard drive (HDD) to a newer solid-state drive (SSD), such as an M.2 SSD, and your computer doesn't have an M.2 SSD driver, the cloned disk won't be able to boot. This is because the computer's BIOS or UEFI firmware doesn't recognize the new SSD as a bootable device.
Step 1. Insert and connect the cloned disk correctly to your computer.
Step 2. Open Device Manager, expand IDE ATA/ATAPI controllers, right-click the listed controller and select "Properties".
Step 3. Check the controller type of your device and then download a disk driver for your cloned disk.
Step 4. Save the downloaded driver to a secure location on your device and remember its location.
Step 5. Search cmd and right-click to open it, select "Run CMD as Administrator" on your computer.
Step 6. Type the following command and hit Enter:
Dism /Image:E: /Add-Driver /Driver:"Y:\Z.inf"
To install the Windows Subsystem for Linux (WSL) on Windows, you need to run the command "wsl --install" in the Command Prompt as an administrator. If you're using Windows 10, you can also enable the feature through the Settings app.
Replace Y: with the location of your downloaded disk drive.
Step 7. When the process finishes, exit Command Prompt.
After cloning the disk, you can restart your PC and set it to boot from the new disk. Wait patiently for the Windows OS to boot up and run on the new disk.
Tips: Avoid Cloned Hard Drive Won't Boot Issue
To avoid cloned hard drive won't boot issue, analyze the causes and follow these tips: check if the cloned drive is bootable in BIOS settings, ensure the cloned drive is set as the primary drive in the BIOS, check for any bootable issues with the cloned drive, and update the BIOS to the latest version. Additionally, you can also try to use a third-party cloning software that supports bootable cloning, such as Acronis True Image or EaseUS Todo Backup. By following these steps, you can make your cloned drive bootable in Windows 10/8/7 and avoid the cloned hard drive won't boot issue.
1. Ensure the target drive is empty, formatted or uninitialized.
1. When looking for a reliable disk clone software, Qiling Disk Copy is a top choice. It offers a straightforward and efficient way to clone a disk, ensuring that all data is accurately copied. This software is ideal for users who want to create a duplicate of their disk for backup purposes, upgrade their operating system, or transfer data to a new device. With Qiling Disk Copy, users can easily clone their disk, including the operating system, programs, and data, without any hassle.
2. To ensure a smooth disk cloning process, it's essential to have the source and destination disks of the same type, either both MBR (Master Boot Record) disks or both GPT (GUID Partition Table) disks. If they differ, you may need to convert one to match the other, either from MBR to GPT or vice versa, to maintain compatibility and avoid potential issues during the cloning process.
3. To ensure a smooth cloning process, it's essential to verify that your computer supports UEFI boot mode. If the destination hard drive is partitioned using the GPT (GUID Partition Table) format, which is commonly used in UEFI systems, your computer must be capable of booting in UEFI mode.
4. Make sure you have cloned the system reserved partition, which is separate from the system partition (C: drive), before proceeding.
5. Make sure you have set the clone hard drive as the first boot drive.
6. If your clone uses an MBR system partition, you need to enable CSM in your BIOS to allow booting from both UEFI and Legacy OPROM devices.
7. 1. Disconnect the original disk from the server.
Conclusion
If you're experiencing issues with a cloned hard drive not booting, this page provides reasons behind the problem and offers three practical methods to help resolve the issue. On this page, we covered the reasons why you were unable to boot a cloned disk and offered three practical methods to help you resolve the "cloned hard drive won't boot issue".
For beginners, we recommend trying Method 1, which involves re-doing the disk cloning process using reliable disk cloning software like Qiling Disk Copy.
If a conflict between disk partition styles (MBR and GPT) is preventing you from booting Windows 10 from a cloned drive, follow Method 2 to convert the target disk to MBR or GPT first. After that, you can repeat the cloning process and set up Windows to boot from the new disk.
Related Articles
- How to Transfer or Copy Windows 10 to a USB Flash Drive Easily and Quickly
- [Windows Clone] How to Clone OS in Windows 10/8/7
- How to Copy Hard Drive to New Computer
- Western HDD Bad Sector Repair Tools and Solutions