How to Copy/Move Recovery Partition to USB or Another Hard drive [2 Ways]
You can copy a recovery partition to another hard drive, and there are two ways to do it. In Windows 10/8/7, you can use the built-in feature to copy and move the recovery partition to a USB drive or another hard drive, or you can use a third-party tool to achieve this. This page will guide you through both methods.
PAGE CONTENT:
- Advantages of copying recovery partition to USB
- Method 1. Copy Recovery Partition to USB with Windows Built-in Tool
- Method 2. Move Recovery Partition to Another Hard Drive with Third-Party Tool
Overview of Recovery Partition
A recovery partition is a volume on the system disk with no drive letter, containing system recovery information that can be used to perform a factory reset on a Windows computer in case of a disaster or system failure. It is often shipped with new laptops or desktops, or automatically generated during Windows OS installation.

Advantages of Copying Recovery Partition to USB or Another Drive
Many users are attempting to copy or move the recovery partition to a USB, new hard drive, or SSD, primarily due to two reasons. Firstly, it allows for easy recovery of their system in case of a hardware failure or malware attack, providing a convenient and quick way to get their system back up and running. Secondly, moving the recovery partition to a separate storage device can also help to free up space on their primary drive, making it a useful solution for those with limited storage capacity.
1. Free Up Disk Space
The recovery partition can take up a lot of space, but moving it to a bootable USB or external hard drive can free up local disk space.
2. Protect Recovery Partition Information
In extreme cases, a computer's entire hard disk can fail, preventing it from booting due to logical or physical errors. However, by moving the recovery partition to a new hard drive or bootable USB, you can safeguard the recovery partition information and potentially rescue the computer from catastrophic scenarios.
How-to Tutorial: Copy Recovery Partition to USB or New Hard Drive [2 Ways]
To safely copy and move the recovery partition to a target device, such as a USB drive or another drive, follow one of the two efficient methods listed below, depending on your specific needs. By choosing the most suitable approach, you can ensure a successful transfer.
Method 1. Copy Recovery Partition to USB with Windows Built-in Tool
Applies to: Copy recovery partition to USB.
- Source: Microsoft Support
- https://support.microsoft.com/en-us/windows/create-a-usb-recovery-drive-460091d5-1e8f-cb33-2d17-8fdef77412d5
Windows has a built-The tool for making repaired copies of Windows is a good way for users to back up the recovery partition. It's also known as creating a USB recovery drive, and is officially provided by Microsoft. This method allows users to copy the recovery partition to a USB drive, providing a convenient and reliable way to back up and recover their system.
To transfer files from your old computer to your new one, you'll need a USB flash drive or external hard drive with a capacity of at least 16GB and formatted to FAT32. This will allow you to store the files and transfer them to your new computer.
Which one to pick? Here is Editor's Pick:
- Qiling Backup + OneDrive/Google Drive/Dropbox is the best option if you prefer to back up your entire computer to the cloud.
- OneDrive or Google Drive are both good options for a cloud backup service to back up a computer folder if you're looking for a simple, economic solution.
Consider starting a cloud backup solution to automatically back up your computer files to the cloud.
Here are the detailed steps to copy recovery partition to USB with Windows Built-in tool:
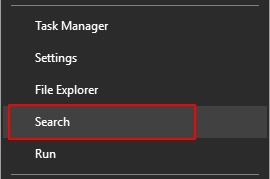
Step 1. Right-click the Windows icon on your computer and click "Search".
Step 2. Enter recovery drive in the search box, and then select "Create a recovery drive".
Step 3. When the recovery drive tool opens, select the option to copy the recovery partition from the PC to the recovery drive and then click "Next".
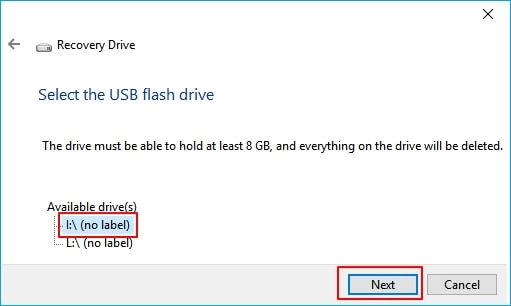
Step 4. Insert a USB flash drive or external disk into your PC, select it and then select "Next".
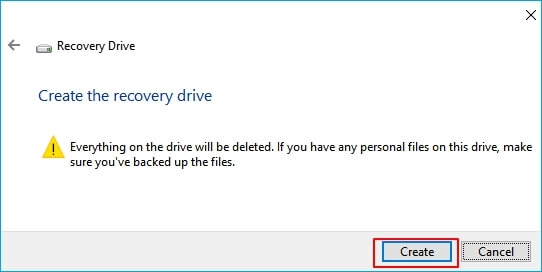
Step 5. Select "Create". It will start to copy the recovery partition to the USB or hard drive.
To delete the recovery partition and free up space on your disk, you can use the built-in Disk Cleanup tool in Windows. However, this method may not work on all systems. Alternatively, you can use a third-party tool like EaseUS Partition Master or MiniTool Partition Wizard to delete the recovery partition.
Step 6. When the process completes, to remove recovery partition and free up disk space, select "Delete the recovery partition".
Step 7. Then select "Delete". When the removal is done, select "Finish".
Step 8. Remove the USB drive.
Now, you can reset or restore your system from the recovery USB anytime without a recovery partition on your computer.
Tip
1. To ensure the recovery USB works anytime, keep it in a safe place and avoid storing other files or data on it. This will prevent any potential damage or corruption that could render the USB useless for recovery purposes.
2. If you've upgraded your computer to Windows 10, the USB recovery drive you created may contain an older version of Windows. To avoid this, you should upgrade to Windows 10 after refreshing or resetting your PC with the recovery drive.
Method 2. Clone/Move Recovery Partition to Another Drive with Qiling Cloning Software
To recover or clone the recovery partition, you need to create a bootable USB drive or clone the recovery partition to another drive. This process involves creating a bootable USB drive with the necessary tools, booting from the USB drive, and then either copying the recovery partition to the USB drive or cloning it to the target drive.
Another efficient way to try is to turn to third-party tools for help, such as Qiling Disk Master system backup software, which can assist with your needs.
- Copy recovery partition to the USB drive.
- To clone everything in the recovery partition to another drive, you can use a tool like Acronis True Image or EaseUS Todo Backup. These programs allow you to create a sector-by-sector copy of your recovery partition to a new drive, including all files, folders, and system settings.
- Easy & Fast: 1-click to copy and move recovery partition.
Compared to Windows built-The recovery tool's disk/partition clone feature is more reliable for copying and moving recovery partitions. To utilize this feature, download the software and follow the instructions to copy the recovery partition to a new hard drive or USB drive.
To clone a partition to another drive, follow the guide below. If you need to clone to a different device, simply change the target device accordingly.
Connect the external USB drive to your PC first, then connect the other hard drive or SSD to your PC. Make sure the external drive is empty, then follow the instructions to clone the internal drive to the external drive. The external drive will now contain a copy of the internal drive.
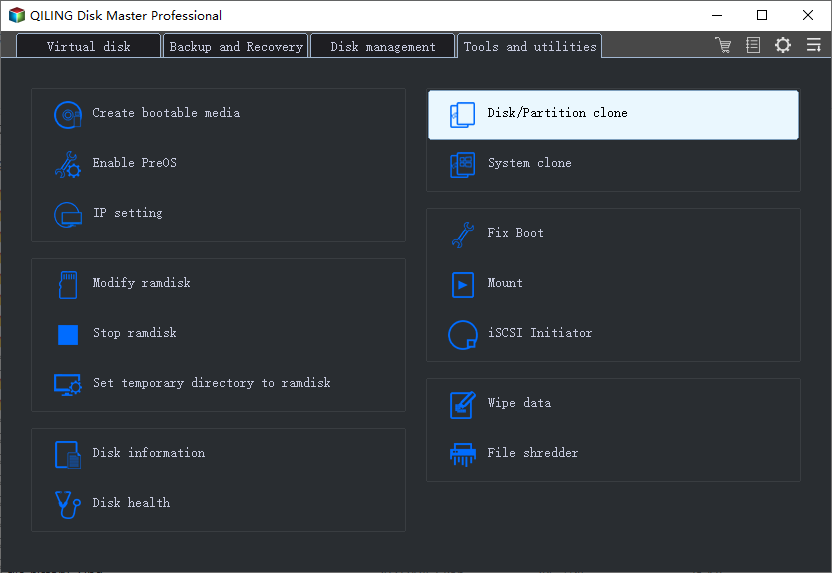
Step 1. Launch Qiling Backup and select the "Clone" feature from the list on the tool page.
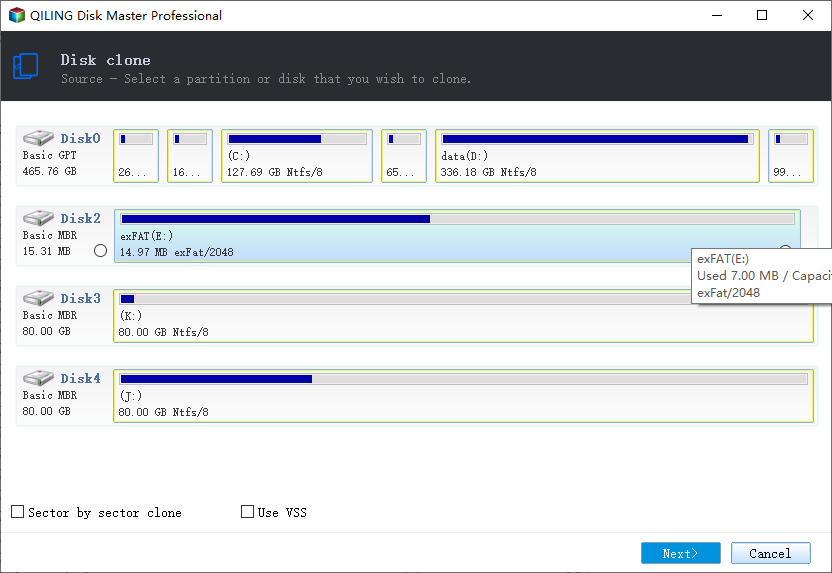
Step 2. Select one partition or several partitions that you want to clone and click "Next".
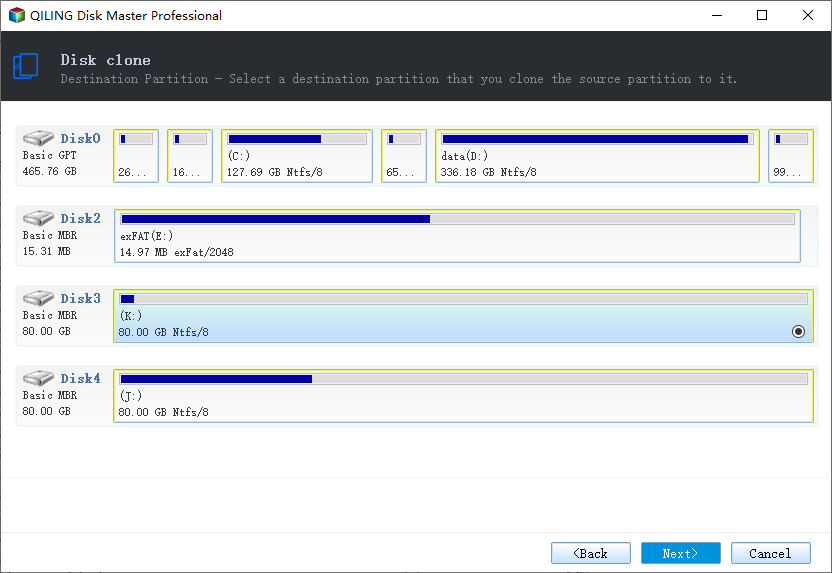
Step 3. Select destination - new disk (HDD/SSD) to save cloned partitions with data, then click "Next".
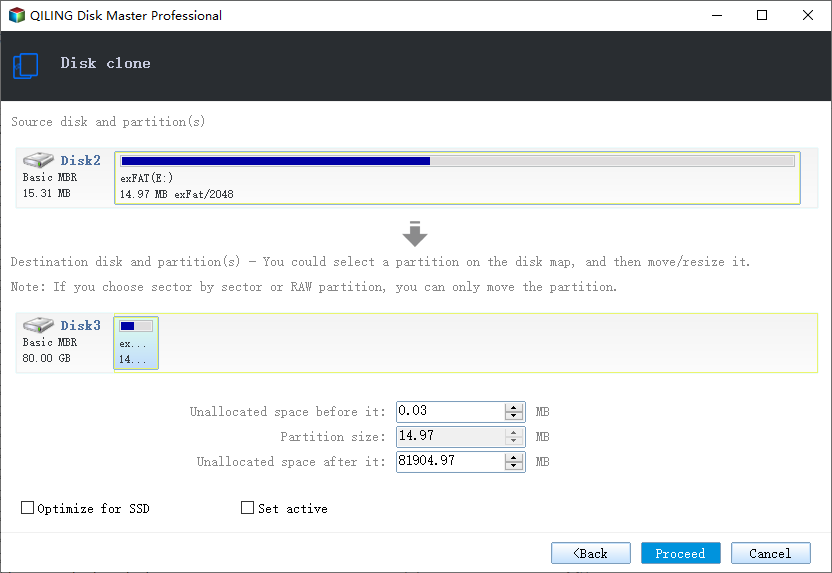
Step 4. Then click "Proceed" to execute all operations and clone one or multiple partitions into new disk drive.
If your destination disk is an SSD, check the box to "Optimize for SSD" to improve SSD performance.
Tip
Sector by sector backup - When backing up data, it's recommended to use the "Sector by sector" option to ensure that all data sectors, including blank ones, are included in the backup. This is particularly useful in case of file system errors, but it may slow down the backup process and result in a larger image file compared to a normal backup.
Destination - Click the folder icon to modify your backup destination.
Plan name and Description - This plan aims to help individuals create a realistic and achievable budget, taking into account their income, expenses, and financial goals. By tracking and categorizing expenses, identifying areas for reduction, and prioritizing needs over wants, individuals can make informed decisions about how to allocate their resources.
A schedule is to create an automatic backup plan.
Backup options are to edit the advanced parameters.
Image-The reserve strategy is to reserve the limited image as per the image retention rule.
Bonus Tip: Recovery Partition Alternative - Create OS Backup
Sometimes, the recovery partition may not work as expected on your computer, preventing you from refreshing or restoring it to a previous healthy state.
We come up with a bonus tip to resolve the recovery partition issue. Instead of creating a recovery partition, we can create an OS backup of our computer, which serves as an alternative solution.
Qiling Backup's OS backup feature simplifies the backup process for users of all skill levels.
Copy and Move Recovery Partition Is Possible, Start Now
The recovery partition is a section of your computer's hard drive that contains system recovery information. It's often used when your system drive runs out of space or to safeguard this data by copying and moving it to a USB drive or another partition. This allows you to free up space on your system drive and still have a backup of your system recovery information.
You have two options to recover your Windows system: use the built-in Recovery Drive tool or let Qiling Backup's disk partition clone feature assist you.
For Windows beginners, we recommend trying Qiling Backup, which allows you to copy and move the recovery partition to a USB or another drive. Take your first steps and get started now.
Related Articles
- How to Clone Windows 10 Operating System
- [Free] How to Make a Full Backup of Windows 10/8/7
- ISO to USB: How to Burn ISO to USB in Windows 10
- Make External Hard Drive Bootable in Windows 10
- How to Change Android SD Card to A Bigger One in Windows 10/8/7