Create System Image on USB Drive in Windows 10/8/7
If you are looking for a solution on creating Windows system image to an external USB drive, follow this page for a complete guide.
PAGE CONTENT:
- Benefits of Create a System Image on USB Drive
- Guide to Create a System Image on USB Drive in Windows 10/8/7 (2 Methods)
- Troubleshoot "Can't Create System Image on USB" Error (4 Methods)
Benefits of Create a System Image on USB Drive
Some of you may have the same doubt that why are so many users choose to create a system image on a USB drive. Here below is the list, you'll find the benefits and reasons:
- 1. Free up space on the system hard drive, save more usable storage space
- 2. Safe way to back up Windows system, installed programs and saved data on the system drive
- 3. Portable to restore system image to any computer
- 4. Emergency restore when the system goes wrong or bring system back to the previous stable state
Unlike the system restore point, the biggest advantage of creating a system image is its portability. You can either save your system backup image to the local drive or on an external storage device.
So how to create a system image to USB? Follow the guidelines below, you'll learn how to accomplish the task on Windows 10, 8 or 7 and troubleshoot "can't create system image to USB drive" error on your own.
Guide to Create a System Image on USB Drive in Windows 10/8/7
Before you start, here are something important that you should know in advance:
Important
1. About USB Drive: Both external USB storage drive and USB flash drive can be used for saving system backup image.
2. About USB Space: The USB drive must be empty and its storage space should be equal to or even bigger than the used space of your system partition.
3. About Tools: Use the same tool that you used to create the system image to restore it.
There are two methods that you can apply to create a system backup image to the USB drive: 1. Use automated Windows backup software for help; 2. Use Windows built-in tool for help.
Method 1. Use Automated Windows Backup Software for Help
Advantages: 100% secure, 3-step operation, compress system image - saving storage space on USB drive, applicable for all levels of users
If you are not quite familiar with system backup in Windows PC or you need a time-saving method to create a system image to the USB drive, you are at the right place.
Professional Windows backup recovery software - Qiling Backup can help. With it, you can flexibly back up and save the system image to any storage devices like hard drive partition, external hard disk, USB or SD card, etc. without extra operations.
Connect the empty USB to your PC, and follow the below steps to create a system image to the USB on your own:
Step 1. To backup your Windows 10/8/7 to a USB storage device, please safely connect it to your computer and let Windows recognize the USB and assign it with an invalid drive letter. Now, Launch Qiling Backup.
Step 2. Click "System backup" on the "Backup and recovery" page to start.
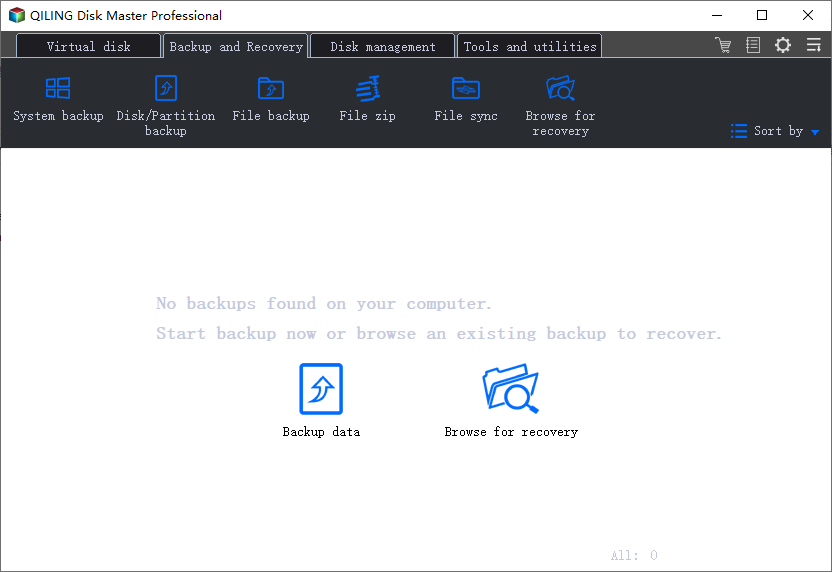
Step 3. In the lower area, some of the backup settings are manageable. For example, edit the system backup info by giving it a plan name and some text description
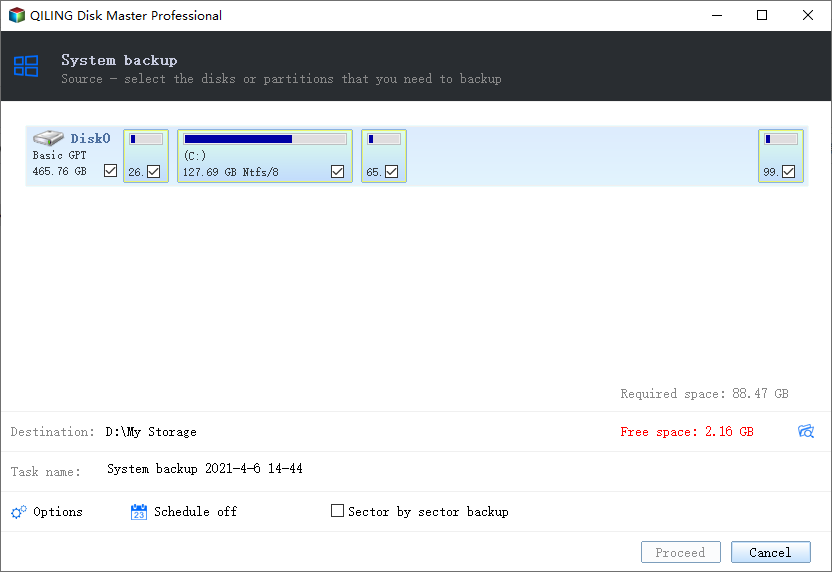
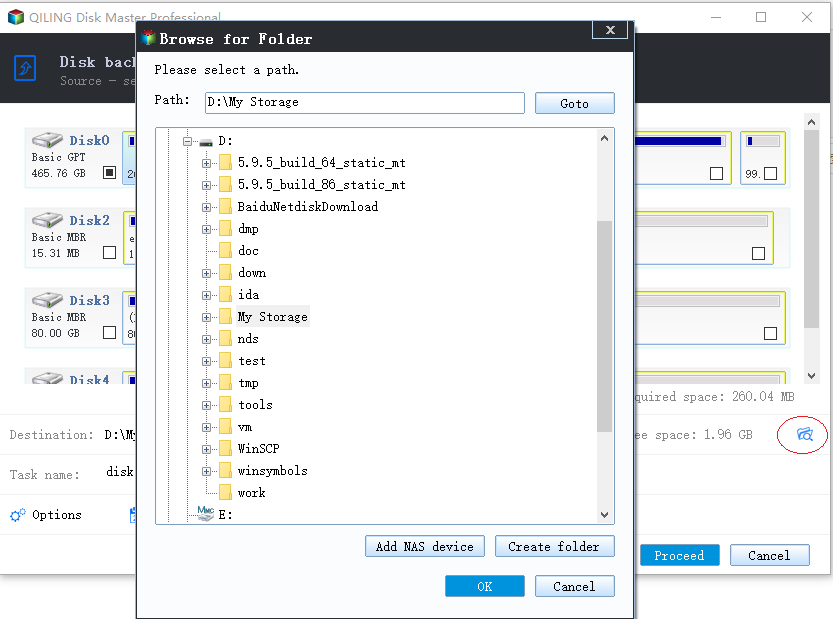
Since you're going to backup the operating system to a USB drive, click "Browse" in the "Destination" area to choose a specified system backup location, which is the USB drive you just connected. You can find it under the "Computer" directory. Click "OK".
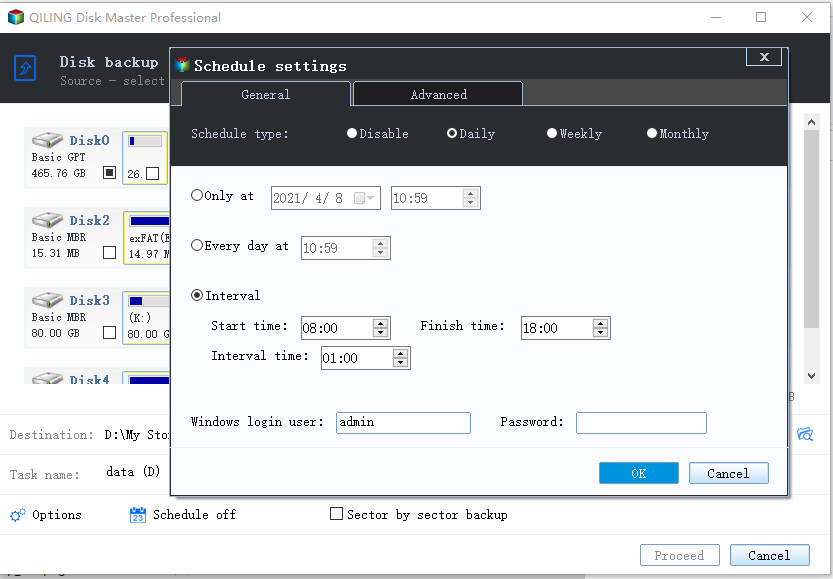
Here, don't miss one noticeable feature if you wish an automatic way to backup Windows operating system as soon as plugged in the USB flash drive the next time. Click "Schedule" and choose "the "Schedule Type".
Step 4. Click "Proceed". Wait for a while so you can have a system backup on your USB flash drive!
Wait patiently till the backup process finishes. With the image, you can restore your system anytime.
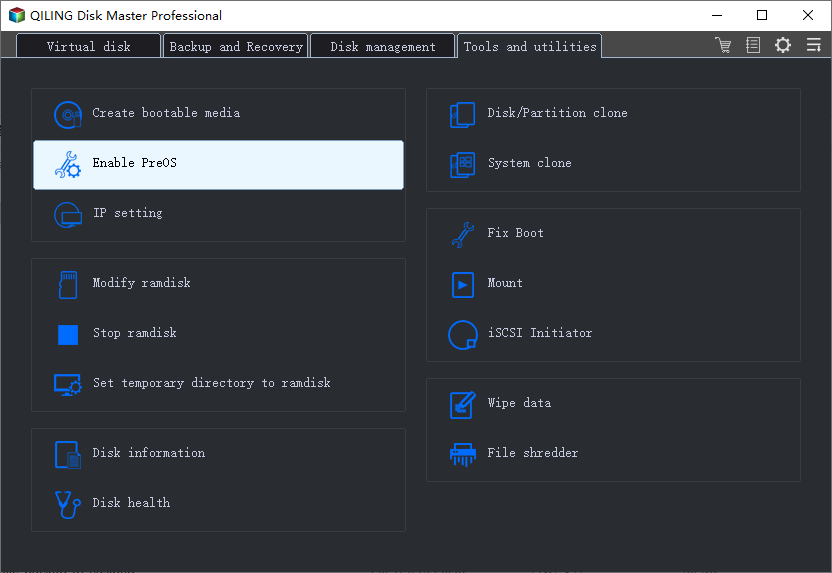
PLUS: In case the current system goes wrong, you can turn on the Enable PreOS feature in Qiling Backup. When the system goes wrong, you can boot from Qiling Backup and immediately restore the Windows system from the created image on the USB drive.
Method 2. Use Windows Built-in Tool - Backup and Restore(Windows 7) for Help
Advantages: free
Although, it's said that the create system image will be compressed by using Windows Backup and Restore option on Windows PC. However, don't expect the system image won't take too much space on the USB drive.
Note: Remember to format your USB flash drive to NTFS in advance. Otherwise, you'll meed "can't create system image to USB drive" error. The solutions toward this error have been covered in Part 3 on this page.
Let's see how to manually create a system image on Windows 10/8/7 on your own:
Step 1. Connect the empty USB flash drive to your PC. If it's a USB flash drive, format it to NTFS first.
Step 2. Open "Backup and Restore" (Windows 7) pane.
- On Windows 7: Right-click on the Start icon > Select "Control Panel" > Select to open "Backup and Restore".
- On Windows 10/8: Right-click on the Windows icon > Select "Search" > Type in: Control Panel and select to open it > Click "Backup and Restore (Windows 7).
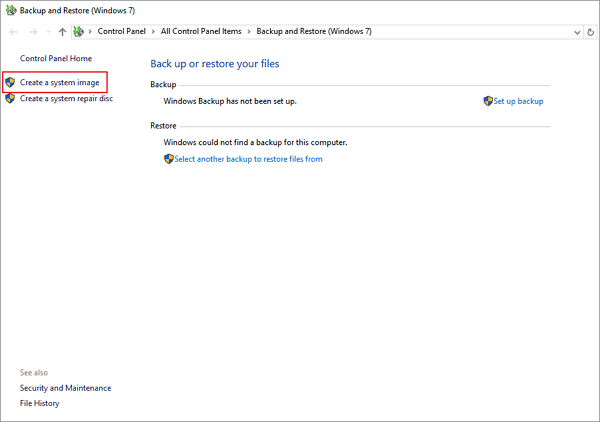
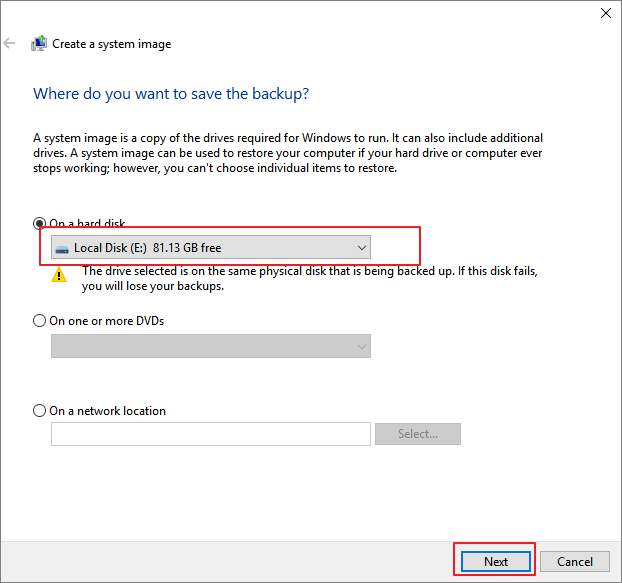
Step 3. Click "Create a system image".
Under the On a hard disk section, select the external USB drive or USB flash drive as the destination disk to save Windows system image, click "Next" to continue.
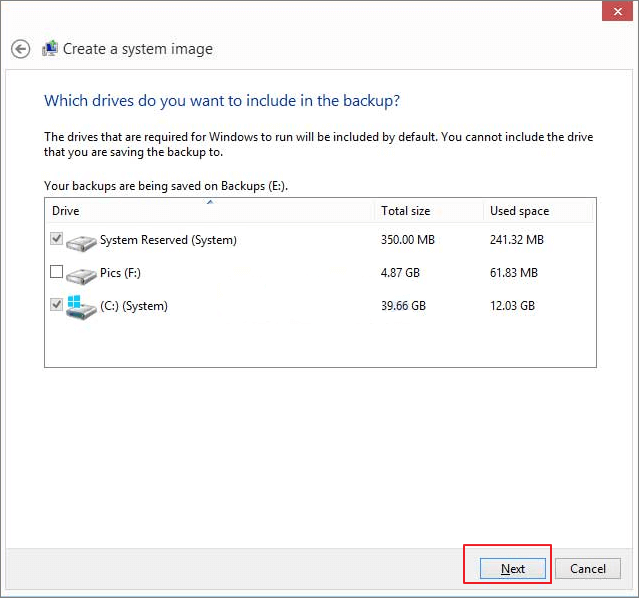
Step 4. The System and the System Reserved partitions to be selected by default, click "Next" to continue the process.
Step 5. Click "Start backup" to begin creating your current system image to the USB drive
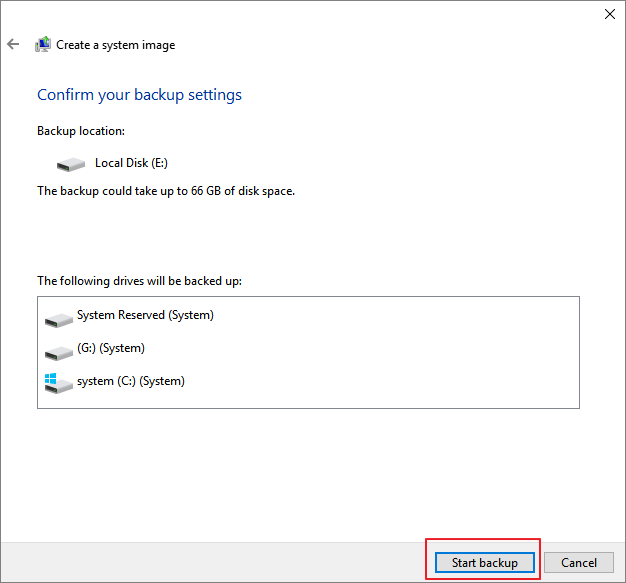
When the process finishes, you've successfully created the system backup image to your USB drive.
For Your Information:
1. Only when the current Windows OS can boot up or boot into the restore window, can the system image created by using Windows Backup and Restore be restored.
In other words, when the current system can't boot up, you can't restore Windows with the image in your USB drive.
2. The system image can only be used to restore to the source computer.
3. You cannot restore the system image to another PC using a different system, for example, to restore a Windows 7 system image to a Windows 10 computer. It's not supported.
Troubleshoot "Can't Create System Image on USB" Error
If you failed to create a system image on USB drive, or Windows won't allow you to save the system image to your target USB drive, don't worry.
By following provided solutions here, you'll effectively resolve this issue on your own.
Troubleshoot - "This drive cannot be used to store a system image..."

If Windows prompts this error message to you, saying that "This device cannot be used to store a system image because it is not formatted with NTFS", take it easy! You can directly go back to Method 1 in Part 1 and use Qiling Backup to create system image.
Or you can also effectively resolve this issue by formatting the USB drive with the below steps:
Step 1. Connect the USB drive to your PC and open Windows Explorer.
Step 2. Locate and right-click on the USB drive, select "Format".
Step 3. Set the file system to "NTFS" and click "Start".
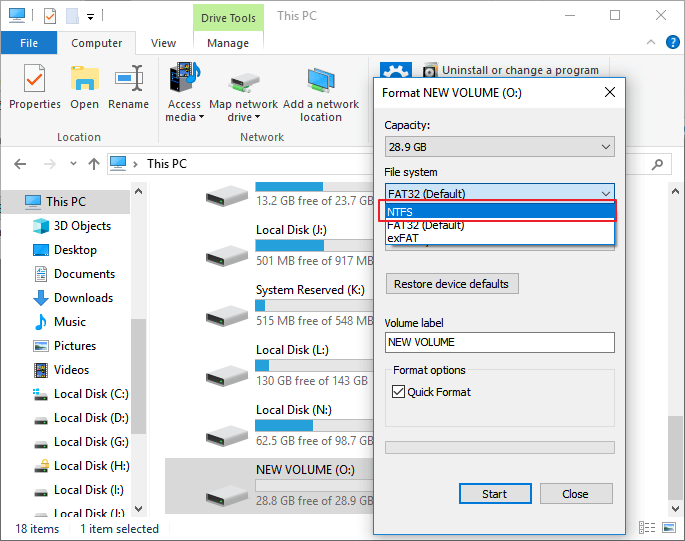
After this, you can continue the manual process of creating system image to your USB drive by repeating Method 2 in Part 2.
Troubleshoot - "The drive is not a valid backup location"

Sometimes, due to system error or USB drive issue, you may not be able to create a system image on the USB drive. As the reasons that cause the issue are various, so they are to the solutions.
Therefore, try the listed solutions one by one until the USB is available for saving system image again in Windows 10/8/7:
Method 1. Check and Fix USB Drive Error
When the USB drive contains file system errors or internal errors, it may not be able to function properly.
You can either apply partition manager software - Qiling Partition Master with its check file system error feature to repair USB drive error.
Or follow the manual steps here to manually check and fix USB drive error:
Step 1. Connect the USB to your PC, open File Explorer and right-click on your USB, select "Properties".
Step 2. Go to the Tools tab and click the Check button
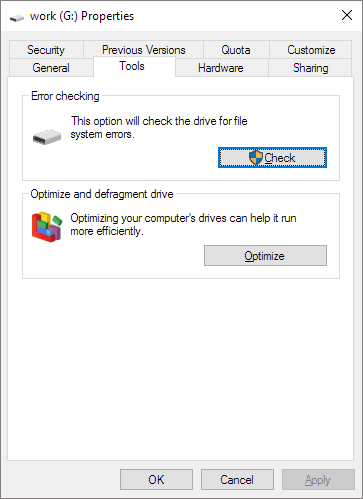
Step 3. Let the scan process complete, then close the scan window.
Step 4. Eject the USB and reconnect it to your PC again.
If the USB shows up and can be accessed smoothly, you can continue the system image creating process again.
If USB doesn't show up properly, go to the next method to update your USB drive driver.
Method 2. Update USB Drive Driver
If the USB driver is outdated, it may also stop you from creating the system image.
Here are the steps to update your USB drive driver:
Step 1. Connect the USB flash drive or external USB drive to PC, open "Device Manager" and then expand "Disk drives".
Step 2. Find and right-click the problematic USB drive and select "Update driver".
Step 3. Click "automatically search for driver software online".
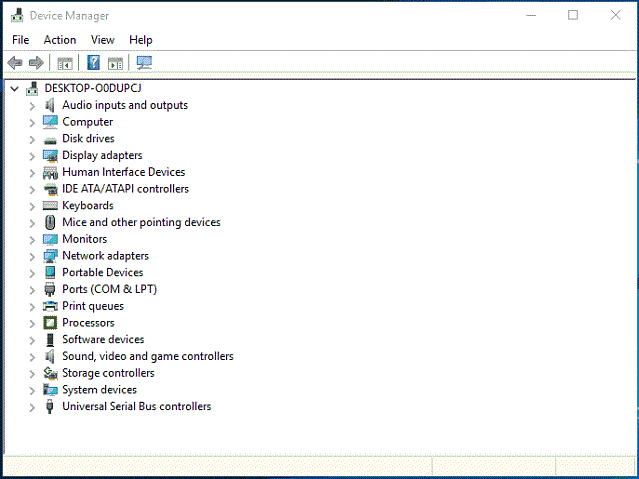
Wait for the driver to be updated, then reboot your computer. Afterward, you can try to reconnect your USB drive to PC and check whether the USB drive shows up or not.
Method 3. Create a Directory on USB Drive and Share It as A Network Drive
Step 1. Format USB to NTFS and create a new folder at the black place in the Drive.
Step 2. Share the USB as a network drive:
- Right-click the directory and choose "Share with", "Specific people".
- Choose yourself from the list of users and click "Share" and "Done".
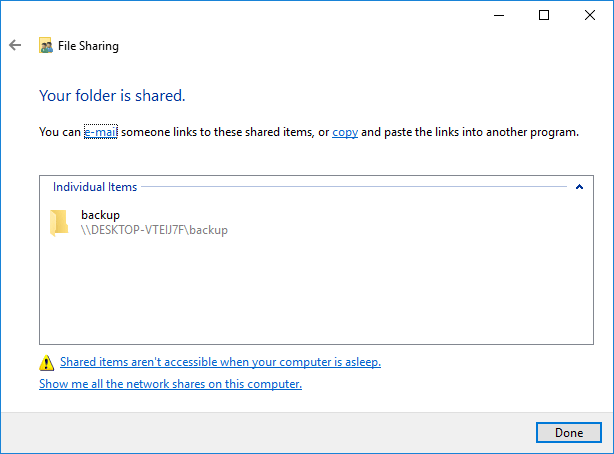
Step 3. Ensure the advanced share allow permissions are set to full control.
- Right-click the directory, select "Properties".
- At the Sharing tab, click "Advanced Sharing".
- Click "Permissions" and set all permissions to "Full Control".
Step 4. Create the system image to the USB shared network drive with steps in Method 2 Part 2.
Note: While selecting the target drive to save the system image, browse to your own computer and select the USB share. And enter your computer's login credentials, if your password is blank use 1 space and click "OK".
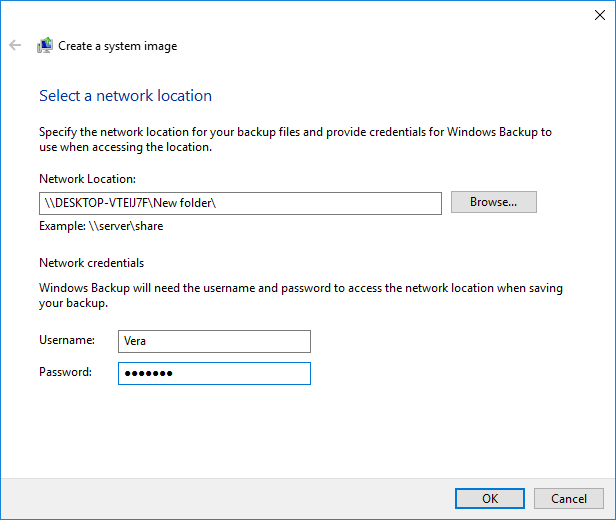
After following the provided methods, you can now repeat the steps to create a system image to your USB drive again.
To Sum UP
When you are planning to create a system backup image so as to protect your Windows system, a secure and space-saving method is to use a USB drive to save the image.
To do so, you can either choose automated Windows backup software or manually back up Windows on your own. For a secure and time-saving tool, automated Qiling Backup is available to help.
If you can't create the image to USB, refer to Part 3 for a complete and effective solution.
Related Articles
- How to Clone SSD to Larger SSD in Windows 10/8/7
- Make External Hard Drive Bootable in Windows 10
- How to Clone Windows 10 to USB Drive on Your Own
- How to Clone C Drive to SSD in Windows 10
- Auto Backup VMware with Best VMware Backup Software