How to Enable SMB on Windows 10?
To enable SMB on Windows 10, you need to go to the Control Panel, click on System and Security, then click on File Explorer Options. In the File Explorer Options window, click on the View tab and then click on the "Show" dropdown menu and select "Use Sharing Wizard". Then, click on the "Apply" button to save your changes. Next, click on the "OK" button to close the File Explorer Options window. After that, go to the Start menu and search for "SMB" and click on the "Turn on" option. This will enable SMB on your Windows 10 system. Once SMB is enabled, you can access files over a network using the SMB protocol.
Quick Navigation :
- Why You Need to Enable SMB1 Windows 10
- Method 1. Enable SMB1 Windows 10 Using Control Panel
- Method 2. Enable SMB1 Windows 10 Using PowerShell
- Method 3. Enable SMB1 Windows 10 Using Command Prompt
Why You Need to Enable SMB1 Windows 10
SMB, or Server Message Block, is a client-server communication protocol that enables sharing of files, printers, and serial ports on a network. It allows users to read and write files by connecting to network devices like routers, NAS, or other computers, providing access to shared resources.
Windows 10 no longer installs SMB Version 1 (SMB1) by default due to its outdated and insecure nature. This has led to errors for some users, including "You can't connect to the file share because it's not secure" and "The specified network name is no longer available", when trying to access files.
To fix errors related to SMB1, you need to temporarily enable SMB1 on Windows 10. There are three top methods to do this.
Method 1. Enable SMB1 Windows 10 Using Control Panel
To enable SMB1 on Windows 10 temporarily, you can follow these steps: Go to the Start menu, type "Turn Windows features on or off," and click on it. In the resulting window, scroll down and check the box next to "SMB 1.
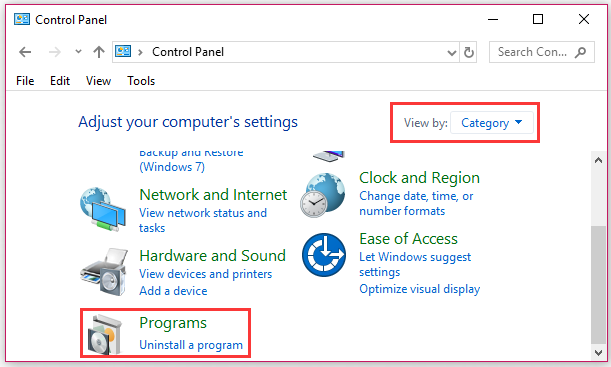
Step 1. Type control in the search box and select Control Panel from the best match.
Step 2. Change the View by to Category, and then click on the Programs section.

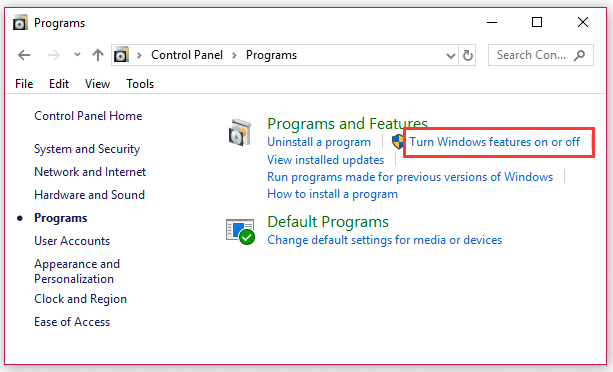
Step 3. Click on the Turn Windows features on or off link.

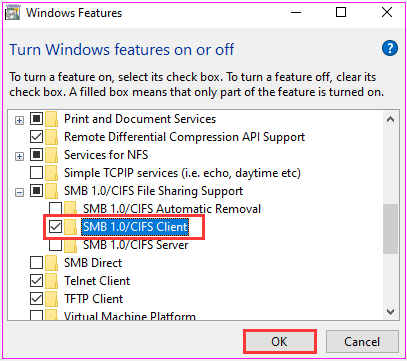
Step 4. Then expand the SMB 1.0/CIFS File Sharing Support section and select the checkbox for the SMB 1.0/CIFS Client.

Step 5. Click on the OK button to save this change and restart your computer.
To resolve network errors caused by Windows 10 SMB1 enable operation, you can try disabling SMB1 on your Windows 10 device. This can be done by going to "Control Panel" > "Programs and Features" > "Turn Windows features on or off" and unchecking the box next to "SMB 1.
Method 2. Enable SMB1 Windows 10 Using PowerShell
Windows PowerShell can also be used to enable SMB1 on Windows 10, and the detailed steps to do so are as follows.
Step 1. Type PowerShell in the search box, and then right-click the Windows PowerShell and select Run as administrator.
Step 2. Type the following command and hit Enter to check if the SMB1 is enabled.
Get-SmbServerConfiguration | Select EnableSMB1Protocol

Step 3. You can type the following command to enable SMB1: `smbclient /mnt/c / -U %username% -P %password% -m 1` and hit Enter. This command will enable SMB1 on your system.
Set-SmbServerConfiguration –EnableSMB1Protocol $true
If the first two methods fail, you can enable SMB1 on Windows 10 by disabling the SMBv3 protocol. To do this, you'll need to open the Command Prompt as an administrator and run the following command: `reg add "HKLM\SYSTEM\CurrentControlSet\Services\LanmanServer\Parameters" /v SMB1 /t reg_dword /d 1`.
Method 3. Enable SMB1 Windows 10 Using Command Prompt
To enable SMB1 on Windows 10 using the Command Prompt, you can run the command "reg add "HKEY_LOCAL_MACHINE\SYSTEM\CurrentControlSet\Services\LanManServer\Parameters" /v SMB1 /t REG_DWORD /d 1" to add the necessary registry key, then restart the LanManServer service by running the command "net start LanManServer" to apply the changes. This will enable SMB1 on your Windows 10 system.
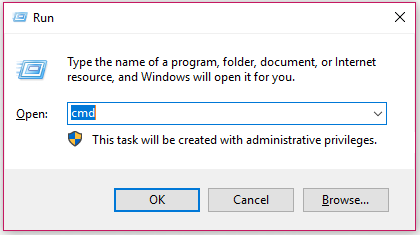
Step 1. Press the Windows key + R to open the Run dialog box, and type "cmd" in it. Then, press Ctrl + Shift + Enter to open the elevated command prompt.

Step 2. Type the DISM /Online /Enable-Feature /All /FeatureName:SMB1Protocol command and hit Enter. After that, restart your computer.
To check if SMB1 is enabled on Windows 10, go to the Control Panel, click on "Programs and Features," then click on "Turn Windows features on or off." In the list of available features, look for "SMB 1.
Related Articles
- How to Clone Windows 10/8/7 to Another Computer
- How to Back Up Network Shared Files Using Network Backup Software
- Hard Disk Backup in Windows 10/8/7 [Beginners' Guide]
- What Is the Recovery Key for Lenovo Laptop?
What Is the Recovery Key for Lenovo Laptop? What can it do for a Lenovo laptop? Can it solve the system problem easily? This short post is going to tell you all these answers.