Windows 11/10 Boot Repair: Fix UEFI Boot Issue on Windows 11/10/8/7
To troubleshoot Windows 11/10 boot issues, you can try various repair methods. One useful way is to use the built-in System Restore feature, which can revert your system to a previous point when it was working properly. Another option is to use the Automatic Repair tool, which can diagnose and fix boot problems. You can also try the System File Checker (SFC) tool, which scans and replaces corrupted system files.
PAGE CONTENT:
- Fix 1. Use Startup Repair
- Fix 2. Use Command Prompt
- Fix 3. Change BIOS Settings
- Fix 4. Add Disk Driver
- Fix 5. Change the SATA Mode
- Fix 6. Repair Hard Disk Partition Errors with Qiling Partition Master
- Fix 7. Create Windows Bootable Media with Qiling Partition Master
Windows 11/10 may fail to boot due to issues with the master boot record, which can be repaired using the Windows 11/10 recovery environment or manually with the Diskpart command prompt and other solutions. To fix computer UEFI boot errors, you can try automatic startup repair, or use alternative methods if that doesn't work. Before attempting any fixes, consider cloning your boot drive to another drive using a tool like Qiling Partition Master to ensure your data is safe.
Your Smart Windows 11 Update Disk Manager
- MBR to GPT Converter, Make Disk Ready for Windows 11.
- Migrate Windows 11 to New SSD.
- Handy to Extend or Combine Partitions in Windows 11.
- Clone and Upgrade Disks without Data Loss.
UEFI (Unified Extensible Firmware Interface) and BIOS (Basic Input/Output System) are two different firmware interfaces used to manage and control the boot process of a computer. While BIOS has been the traditional choice for decades, UEFI has become the new standard for modern computers. The main difference between the two lies in their architecture and functionality.
Method 1. Use Startup Repair for Windows 11/10 Boot Repair
Windows Automatic Repair is a built-in tool that allows users to troubleshoot and potentially fix common errors on their Windows PC, including UEFI/EFI boot issues on Windows 11, 10, 8, or 7.
1. Boot Up Windows from Installation Media
Step 1. Insert Windows 11/10/8/7 installation disk or USB to your PC.
Step 2. Restart PC and boot from the disk or USB.
2. Enable Automatic Repair Option
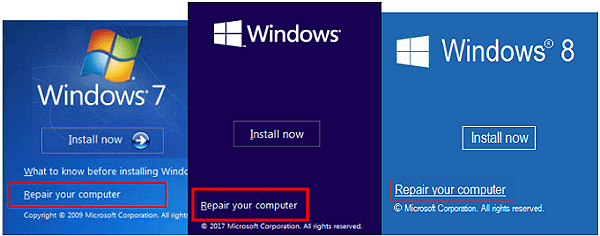
Step 1. Click "Repair your computer" at the Install now screen.
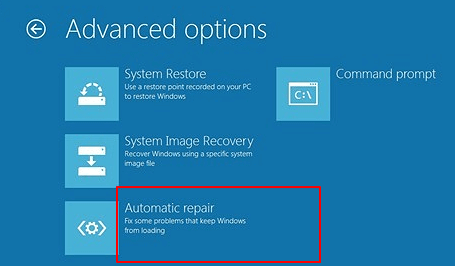
Step 2. Click "Troubleshoot" at choosing an option screen > click "Automatic repair".
Step 3. Choose an account from the list to continue at the Automatic Repair screen and wait for the process to finish.
When the process is complete, you can restart your PC, and then you should be able to use your computer normally again.
Method 2. Use Diskpart to Fix UEFI Boot Error in Windows 11/10
If you're a Windows 11/10 or 8 user experiencing a UEFI boot error, you can try two free solutions to resolve the issue. Firstly, you can try the free methods to fix the UEFI boot error, which may involve following a series of steps to troubleshoot and resolve the problem.
1. Enter Command Prompt from Advanced Options
Step 1. Insert Windows 11/10/8/7 installation disk or installation USB into PC > boot from the disk or USB.
Step 2. Click "Repair your computer" or hit F8 at the install now screen.
Step 3. Click "Troubleshoot" > "Advanced options" > "Command Prompt".
2. Run Diskpart to Set Partition ID and Assign a Drive Letter
Step 1. Type below command and hit Enter each time:
- diskpart
- list disk
- sel disk 0
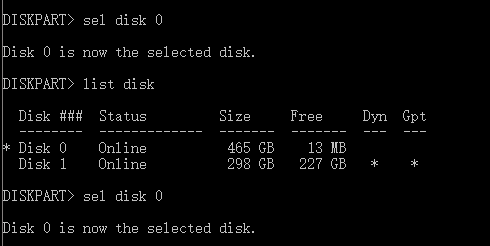
Step 2. When the message "Disk 0 is now the selected disk" shows up, type list vol and hit Enter.

Diskpart will now show the full list of volumes on your PC, find the UEFI volume from the list, which is typically Volume 2.
Step 3. Type below command and hit Enter each time:
- sel vol 2
- set id=c12a7328-f81f-11d2-ba4b-00a0c93ec93b
- Or SET ID=ebd0a0a2-b9e5-4433-87c0-68b6b72699c7

Step 4. Assign the drive letter by typing below command and click Enter:
- 1. Go to Disk Management in the Control Panel.

3. Repair the Boot Record
Step 1. Open Command Prompt as an administrator, enter below command:
- To access the UEFI firmware settings, navigate to the UEFI partition, which is typically located on a separate drive, such as G:. Once you've identified the correct drive letter, you can access the UEFI settings by typing "cd /d G:\EFI\Microsoft\Boot\" in the command prompt.
- Enter exit when the process completes.

Step 2. To repair the Boot Record, open CMD and enter below command line:
- bootrec /fixboot
- Enter exit when the repair process completes.

4. Rebuild the BCD Store
Step 1. Type each command line and hit Enter each time:
- ren BCD BCD.old
- bcdboot C:\Windows /1 en-To install Windows 11/10/8.1/8 on a computer, the user must first ensure that the computer is compatible with the operating system. If the computer is compatible, the user can create a bootable USB drive or CD/DVD with the installation media. The user should then insert the bootable media into the computer and restart it.

Step 2. Type exit in Command Prompt when the process completes and then restart your PC.
Now that the UEFI boot issue is resolved, you can successfully boot up Windows 11, 10, 8, or 7 on your PC again.
Method 3. Change BIOS Settings
To boot your system, select the boot mode that matches the type of disk on your system: choose Legacy support for MBR system disks and UEFI for GPT system disks.
To access the BIOS, press and hold one of the common keys such as F1, F2, F10, Delete, or Esc, or a key combination like Ctrl + Alt + Esc, while your computer is booting up. This will take you to the BIOS interface.
Method 4. Add Disk Driver to Repair Windows 11/10 Boot
When replacing a RAID with a different machine or swapping the original SATA or IDE disk for a newer NVMe SSD, startup issues may arise. To resolve this, you can manually add the driver to the restored Windows image using the following Windows command line.
Dism /Image:X: /Add-Driver /Driver:"y:\z.inf"
The Inf file is located at "X:\Windows\INF\".
Method 5. Change the SATA Mode for Windows 11/10 Startup Repair
After restoring the older XP system, a blue screen or boot cycle may occur, so try changing to IDE mode to see if it will start up.
If you're experiencing boot issues after upgrading from an older HDD to a newer SSD, check if your BIOS is set to boot in AHCI mode. If you had it set to RAID mode, ensure the correct RAID driver is installed in your cloned system to resolve the issue.
Method 6. Check and Repair Hard Disk Partition Errors with Qiling Partition Master
Qiling Partition Master allows users to check and fix partition errors in Windows 10, 8, or other Windows OS with a one-click solution. To use the software, users simply need to download and start Qiling partition management software, locate the hard disk, and then run the check file system.
Qiling Partition Master can automatically analyze and repair hard drive errors, and this free partition manager can also be used to fix USB drive errors or hard drive errors under different Windows systems. To use it, simply follow the steps below to easily check and repair your hard disk. The software will run repairs automatically, and the process can be completed with ease.
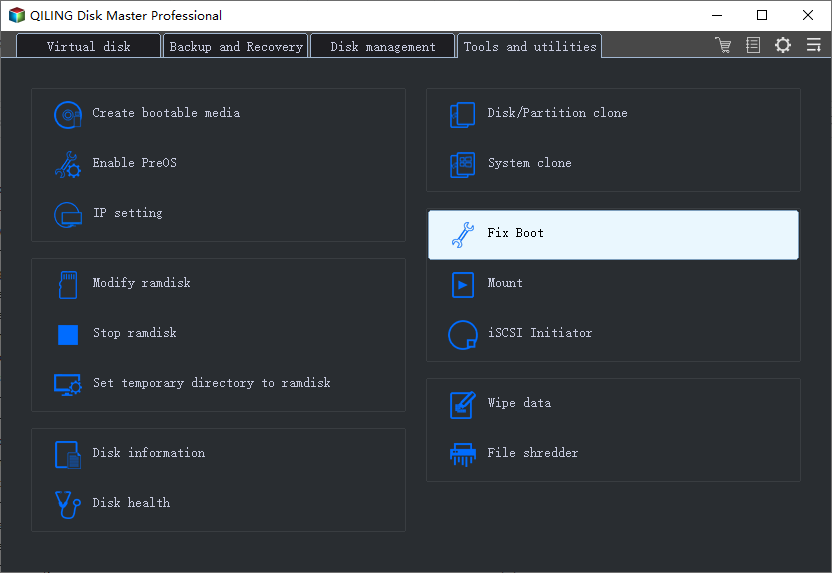
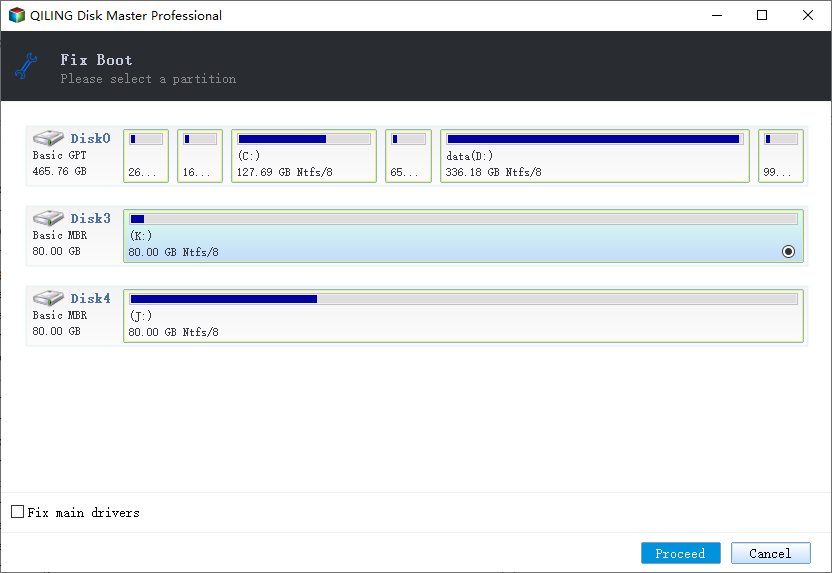
Step 1. Choose "Fix boot" in the "Tools and utilities" page to start.
Step 2. Select the HDD that you want to fix. Click "Proceed" to continue.
Method 7. Create Windows Bootable Media with Qiling Partition Master
Looking for a bootable partition manager that can resize partitions is a common query on partition manager forums. This approach will guide you through creating a bootable USB drive partition manager using Qiling partition Master.
Qiling Partition Master is a partition manager for Windows that allows users to create a bootable USB device, enabling them to safely manage hard disc partitions from the USB drive, supporting both 32-bit and 64-bit operating systems.
Qiling Partition Master can also partition external hard drives aside from hard discs and RAID.
Step 1. To create a bootable disk of Qiling Partition Master, prepare a storage media like a USB drive or CD/DVD disc, and correctly connect it to your computer.
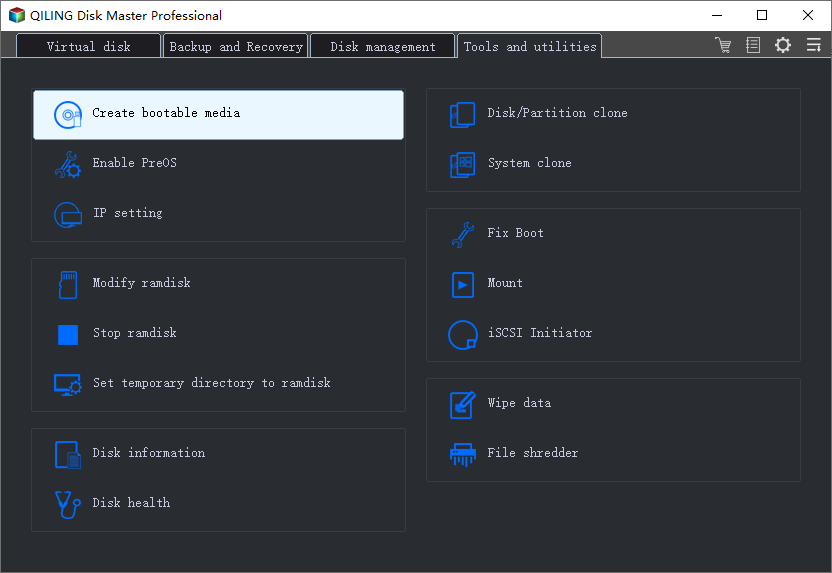
Step 2. Launch Qiling Partition Master, find the "Create bootable media" feature in tools page and click on it.
Step 3. Choose USB or CD/DVD according to the device you connect to the computer, then click "Proceed".
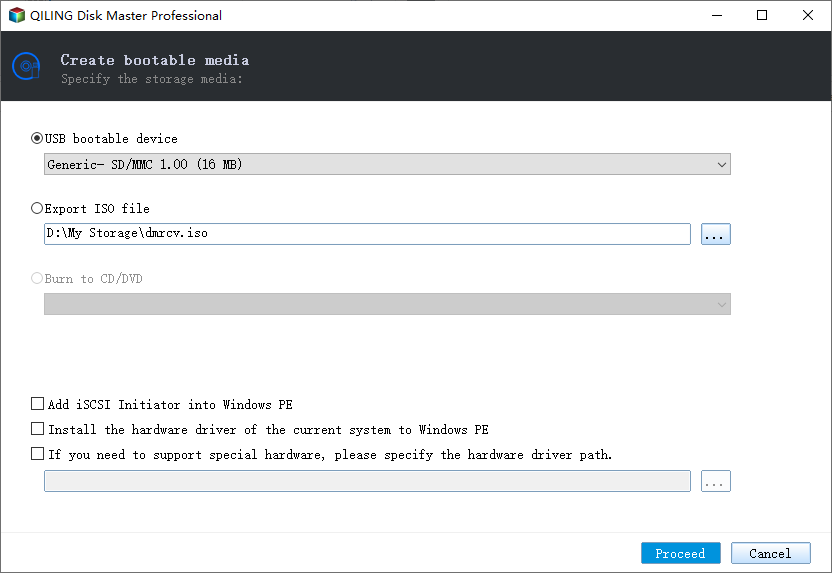
After creating the Qiling Partition Master WinPE bootable disk, the process is complete. You now have a bootable drive that allows you to manage your hard disks and partitions in case your computer fails to boot normally.
To load the RAID driver in a WinPE environment, click on "Add Driver" from the menu bar, which allows you to install the driver for your device, including RAID drives, that may not be recognized without the appropriate drivers installed. This is especially useful for devices that require specific drivers to function properly under WinPE.
To Sum Up
Windows 11/10 boot repair can be a complex issue with various solutions depending on the cause and problem. The common UEFI boot issues can be addressed through the approaches mentioned, but if those don't work, contacting a technical support team for specialized services may be necessary.
If you're experiencing issues with your Windows 11/10 boot repair, you can use Deep Data Recovery to safely recover your important data from a non-booting PC or laptop hard drive, avoiding the risk of losing or overwriting your files.
Windows 11/10 Boot Repair FAQs
The following four questions are highly relevant to UEFI boot repair. Check the answers to get you through.
1. How do you repair Windows 11/10 if it does not boot?
For Windows 11/10 UEFI boot repair, you can perform an automatic startup repair or using command prompt to complete. The step-by-step instructions are given for each part, check the guides carefully.
2. How do I repair Windows 11/10?
To repair Windows 11/10 boot, access the Startup Repair tool. To do this, turn your computer on and off three times, turning it off when you see the Windows logo. After the third boot, Windows 10 will enter diagnostics mode. From there, click "Advanced options" and select "Startup Repair" to follow the on-screen instructions.
3. How can I repair the Windows 11/10 UEFI bootloader?
To fix Windows 11/10 UEFI boot problem:
- Insert the Media (DVD/USB) in your PC and restart
- Boot from the media
- Select Repair Your Computer
- Select "Troubleshoot" > "Advanced Options"
- To initiate the process, choose Command Prompt from the menu. Then, type and run the command "diskpart" to open the Diskpart utility. Next, type and run the command "sel disk 0" to select the disk you want to work with, and finally, type and run the command "list vol" to view a list of available volumes on that disk.
4. How do I fix a boot startup problem?
If your Windows 11/10 startup is experiencing issues, there are several effective solutions to consider. You can try repairing your EFI Bootloader, which can be done through various methods, to fix the problem and get your system up and running smoothly again. Additionally, other solutions may be available to address specific startup issues, so it's worth exploring different options to find the one that works best for you.
- Fix boot with Qiling Disk Master
- Use the Startup Repair tool
- Fix BCD errors
- Use Diskpart in Command Prompt
- Add startup item
- Add disk driver
- Change BIOS settings
- Change SATA mode
- Fix MBR
- Restore and repair system partitions
- more fixes...
Related Articles
- How Do I Use DiskPart to Delete All Partitions in Windows? Your 2021 Guide Is Here
- Partition Manager for Windows 11 Free Download in 2021
- How to Fix Hard Drive Very Slow in Windows 10/8/7
- PC Won't Turn on, But Motherboard Light Is on/It's Plugged In
- What Is NTFS File System and Do I Need It? [Check The Answer Here]
- How to Install Operating System on SSD and Everything Else on HDD