How to Format a Bootable USB Drive in Windows 10
To properly format your 4GB bootable USB drive and restore its full capacity, you can try the following: insert the USB drive into your Windows 10 computer, go to File Explorer, right-click on the USB drive, and select "Format." In the Format dialog box, make sure the file system is set to FAT32 or NTFS, and the allocation unit size is set to 4096 bytes. Also, ensure that the "Quick format" option is unchecked. This should allow you to format the USB drive and restore its full 4GB capacity. If the issue persists, you may want to try using a third-party USB formatting tool or checking the USB drive's physical condition.
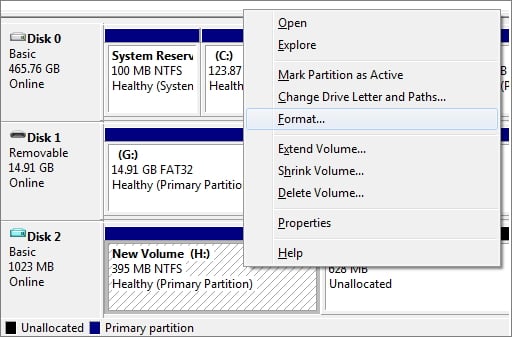
To format a bootable pendrive in Windows 10 using Disk Management, follow these steps: Open Disk Management by searching for it in the Start menu, right-click on the pendrive, and select "Format". Choose the file system (FAT32 or exFAT), label, and allocation unit size as desired, and then click "OK" to format the pendrive. This will erase all data on the pendrive, so be sure to back up any important files beforehand.
Solution 2. Format bootable USB drive by using Diskpart command
Solution 3. Format bootable USB drive with Qiling Partition Master
Solution 1. How to Format Bootable Pendrive in Windows 10 via Disk Management
To format a bootable USB drive on Windows 10, you can use the built-in Disk Management utility. This utility allows you to create, delete, and format partitions on your USB drive, including making it bootable. Alternatively, you can use the Command Prompt to format the USB drive.
To format a bootable USB drive on a Windows PC, simply connect the drive to the computer, press the "Windows + R" keys to open the disk management window, and then right-click on the bootable drive and select "Format".
Solution 2. Format bootable USB drive by using Diskpart command
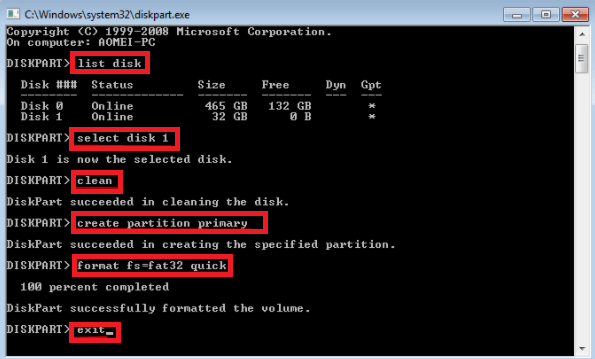
If you're familiar with the command prompt, you can use the diskpart command to format your USB drive. This method is also a practical choice for those who are comfortable with the command prompt.
Step 1: Press "Windows key + R" simultaneously, type cmd in the search box and open "Command Prompt".
Step 2: Type diskpart. Run the Pop-up window that appears.
Step 3: Type list disk.
Step 4: You should type `select disk 0` (or the number of the drive of the bootable USB that is going to be formatted) and press Enter.
Step 5: type clean.
Step 6: Type create partition primary.
Step 7: To format the bootable USB drive, go to "My Computer" or "This PC" on your Windows 10 computer, right-click on the drive, and select the "Format" option. This will erase all data on the drive.
The two methods provided will enable the formatting of a bootable USB drive and subsequently restore it to its original state, making it ready for use again.
Solution 3. Format bootable USB drive with Qiling Partition Master
Qiling Partition Master is a free software tool that allows users to fully manage their hard drive storage, formatting USB drives, memory cards, and other hard disk storage devices without losing original size.
To format a storage device using Qiling Partition Master on a Windows computer, simply download and install the software, then follow the steps to easily complete the formatting process.
Step 1. Open Qiling Partition Master. Connect the your USB drive to PC.
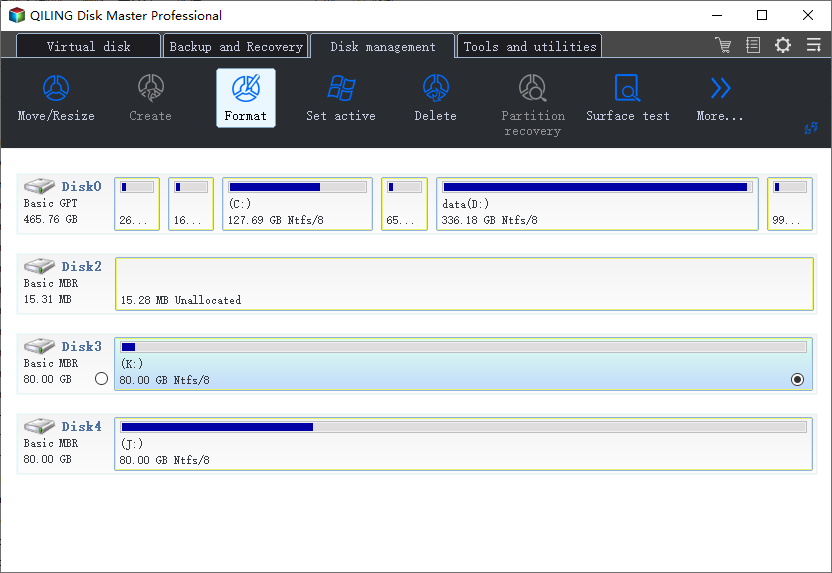
Step 2. To format a partition on an external hard drive, USB, or SD card, select the desired partition in the Disk management page, then click on it and choose the "Format" option.
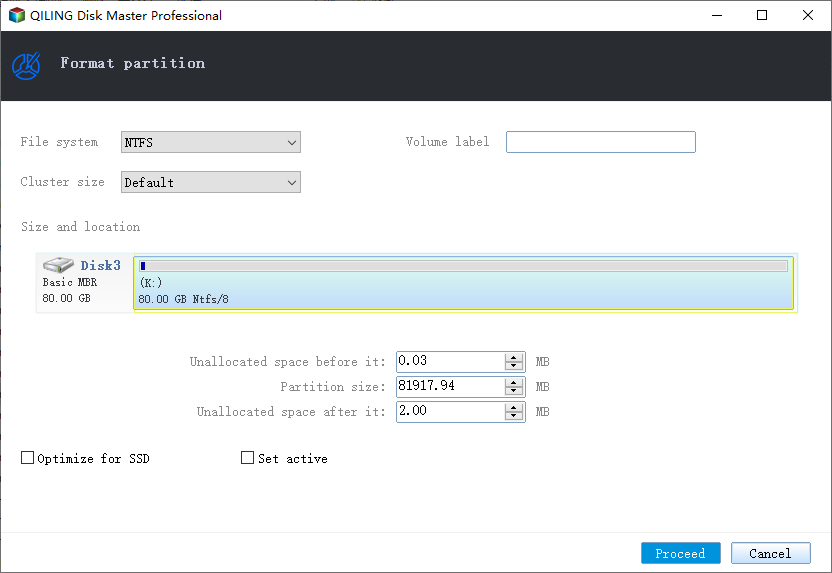
Step 3. To create a new partition on your computer, enter the desired Partition label, select the NTFS file system, and choose a suitable cluster size, then click the "Proceed" button.
Qiling Partition Master is a versatile disk management tool that can format external hard drives, USB drives, and SD cards to NTFS or other file systems quickly and effectively. In addition to formatting, it offers various other features, including resizing and moving partitions, merging partitions, converting between GPT and MBR, migrating operating systems, copying partitions, and more. Overall, it's a useful tool to download and use regularly to manage and optimize your computer's hard drive performance.
More Information: How to Make a Bootable USB Drive
Some users focus on two main goals when making a bootable drive: resizing partitions and recovering a healthy Windows system after corruption or failure. The guide below is specifically for resizing partitions using Qiling Partition Master, while those looking to deploy the Windows system should refer to another guide on creating boot disks.
Step 1. To create a bootable disk of Qiling Partition Master, prepare a storage media such as a USB drive or CD/DVD disc, and correctly connect it to your computer.
Step 2. Launch Qiling Partition Master, find the "Create bootable media" feature and click on it.
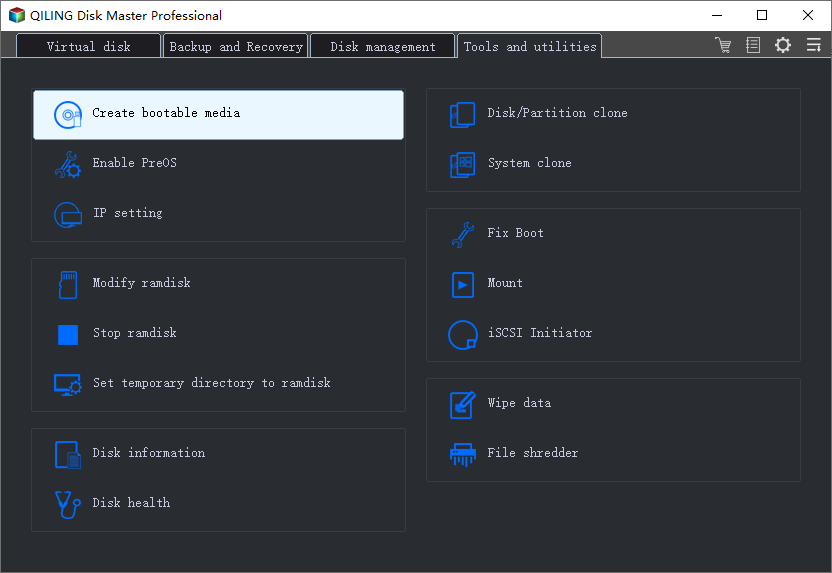
Step 3. You can choose to save the ISO file to a USB or CD/DVD when the drive is available. Alternatively, if you don't have a storage device handy, you can save the ISO file to a local drive and then burn it to a storage media later. Once you've made your choice, click the "Proceed" button to start the process.
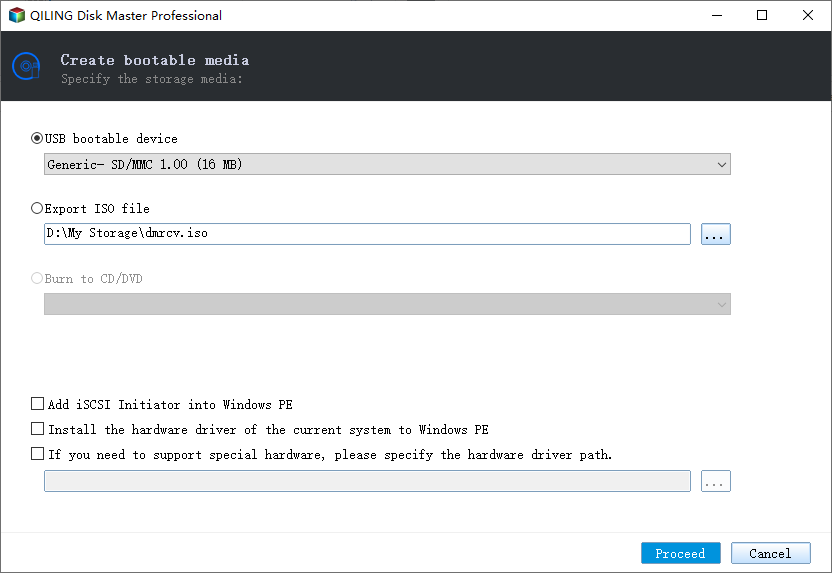
After the process is complete, you will have successfully created a Qiling Partition Master WinPE bootable disk. This bootable drive allows you to manage your hard disks and partitions even when your computer fails to boot normally.
To add the RAID driver in the WinPE environment, click the "Add Driver" option from the menu bar, which allows you to install the driver for your device, including RAID drives, that might not be recognized without the necessary drivers. This step is crucial for devices that rely on specific drivers to function properly under WinPE.
To Sum Up
There are three free and effective ways to format a USB drive to NTFS. Each method works well, but they differ in their approach: native Windows programs will erase data on the drive, while third-party tools like Qiling Partition Master can convert the file system without affecting data. These methods can help you achieve NTFS formatting on your USB drive without noticeable limits.
Windows Explorer and Disk Management may not be able to format a USB drive to FAT32, especially if the drive's capacity exceeds 32GB, due to a long-standing defect. To format a 64GB SD card to FAT32, you may need to use a third-party tool like Qiling Partition Master.
Related Articles
- How to Resize EFI System Partition on Windows 11/10/8/7
- Diskpart Has Encountered an Error Access Is Denied | How to Fix
- [Fixed] Windows Cannot be Installed to This Disk. The Selected Disk is of the GPT Partition Style
- How to Create Bootable Usb Windows 10
- How Do I Install a Second Hard Drive? Here Is the Complete Guide
- Qiling Partition Master 6.0 Crack 2022 | Get Qiling Partition Master Crack License Key