[How-to] Format Disk from MBR to GPT with DiskPart in Windows 11/10
The MBR (Master Boot Record) partition style has become outdated due to the increasing size of hard drives, as it can only support drives up to 2 TB. In contrast, the GPT (GUID Partition Table) partition style has become a popular alternative, offering unlimited storage space and the ability to create a maximum of 128 primary partitions.
Many Windows users who are currently using the Master Boot Record (MBR) partition style want to convert to the GUID Partition Table (GPT) style. Fortunately, Windows' built-in feature, DiskPart, can help users achieve this task by formatting their disk to GPT. In this article, we will guide you through the process of using DiskPart to convert your partition style to GPT.
Notes and Preparation:
1.Back up your disk. Format to GPT partition style might erase your data.
2.With DiskPart, you can only convert basic MBR disks without any partitions or volumes to GPT disks. Before converting a disk to a different format, it's essential to back up any data on existing partitions or volumes, then delete them to ensure a clean conversion process. This step is crucial to prevent potential data loss or corruption.
Method 1. How to Format to GPT with DiskPart
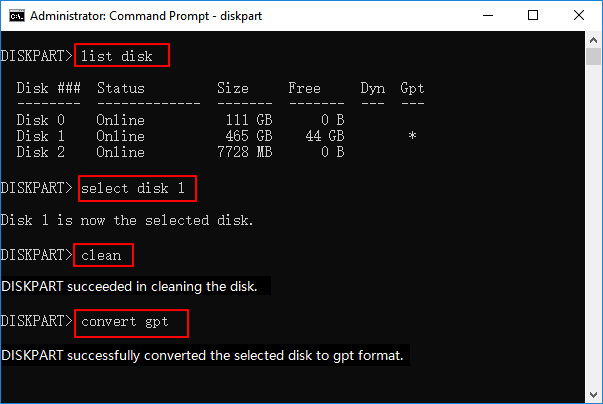
DiskPart is a Windows built-in utility that uses command lines to perform disk partitioning operations. You don't need to worry if you are a novice user, please follow our guide to entering the command lines one by one, you can successfully format to GPT on your own. Here are the detailed steps.
Step 1. Press the Windows + R keys at the same time. Enter cmd in the Run box and click OK.
Step 2. In the command prompt, type diskpart and press Enter.
Step 3. To list the available disks, type `lsblk` and press Enter. This will display a list of disks, including their size, type, and mount point, and assign them a number like `sda`, `sdb`, etc. If you only have one disk, it will be listed as `sda`.
Step 4. Select the disk you want to use and press Enter, and DiskPart will let you know that the target disk is selected.
Step 5. The command `diskutil clearDisk 0` will erase all the data on disk 0, including all partitions and volumes, effectively formatting the entire disk. This command should be used with caution as it will permanently delete all data on the disk.
Step 6. Type convert gpt and press Enter. Wait until the Command Prompt informs you that DiskPart has converted the selected disk to GPT format successfully.

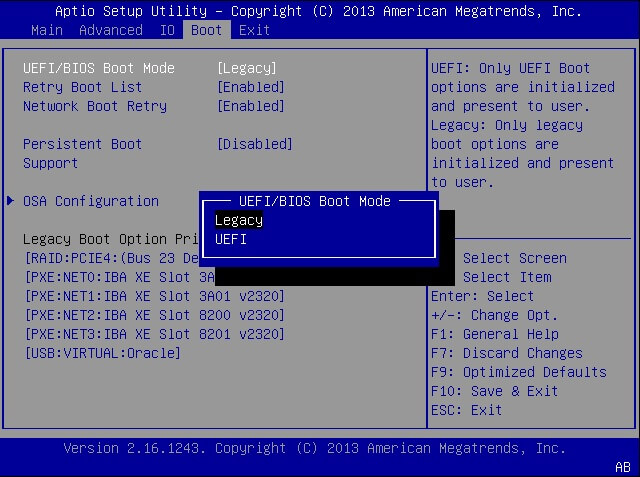
To convert a disk from MBR to GPT, you need to change the boot mode to UEFI in the BIOS. This involves accessing the BIOS settings, selecting the boot mode, and saving the changes. The exact steps may vary depending on your specific system and BIOS version, but generally, you can access the BIOS settings by pressing a key such as F2, F12, or Del during boot-up.
Step 1. Shut down your computer, and restart it.
Step 2. Keep pressing the F2 key until the BIOS Setup Utility screen appears.
Step 3. Select Boot, under the Boot tab, use the up and down arrows to choose UEFI mode, and press Enter.
Step 4. To save the changes and exit the screen, press F10.

Method 2. Format Disk to GPT with Qiling Partition Master
Some users find the process of converting from MBR to GPT using DiskPart to be too complicated, so it's recommended to use a third-party partition management tool instead.
Most of the third-Qiling Partition Master is a tool that simplifies the process of converting from MBR to GPT, and its software publishers highlight this feature as a selling point by providing advanced utilities. The main purpose of this tool is to make partition management easier and simpler, offering a range of advanced features.
- This tool enables you to convert between MBR and GPT partitions in a simple way, whether you need to convert from MBR to GPT or vice versa.
- Resize Partitions. Adjust the partition size according to your needs.
- Merge Partitions. Combine two small partitions into a large one.
- You can clone partitions, which includes the operating system, to create an exact replica of your current system on another drive. This can be useful for backing up your system, creating a duplicate for testing purposes, or even upgrading to a larger drive. The cloning process involves copying the entire partition, including the operating system, settings, and data, to the target drive, resulting in a mirror image of your original system.
You can download Qiling Partition Master and follow the guide to easily format your disk to GPT.
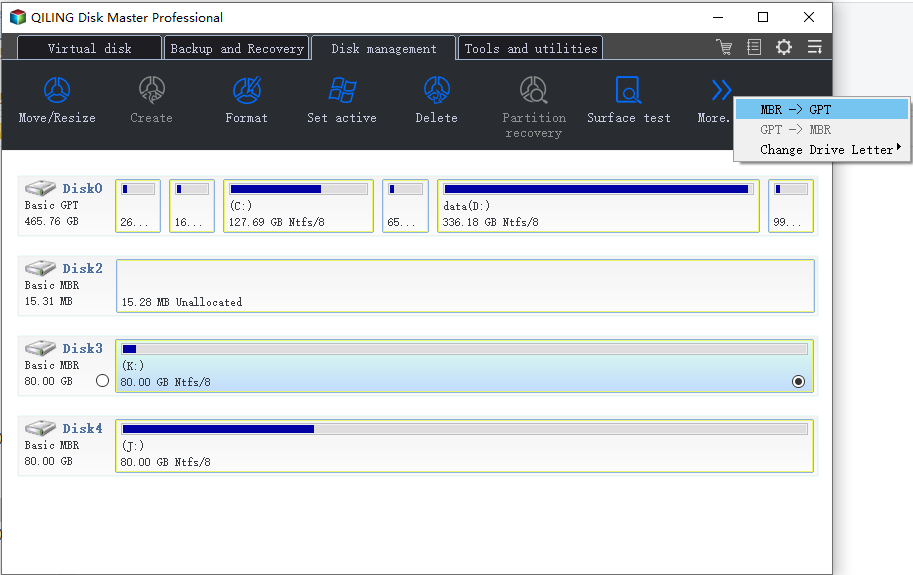
Step 1. Download and launch Qiling Partition Master on your Windows computer.
Step 2. Click the MBR disk that you want to convert.

Step 3. Click "More..." and click "MBR -> GPT" to convert partition.
Note: After converting your disk from MBR to GPT with Qiling Partition Master, you'll need to reboot your computer and switch the boot mode to UEFI.
The Bottom Line
You can format your disk to GPT partition style using Windows' built-in DiskPart tool or a simpler alternative like Qiling Partition Master. Regardless of the method you choose, remember to switch to UEFI boot mode after converting.
Related Articles
- 3 Best Windows 11 Disk Format Tool/Utility Free Download
- Transfer Windows 10 System Files to New HDD or SSD
- Top Partition Magic Freeware/Best Partition Software
- How to Convert GPT to MBR (Without Data Loss) with 3 GPT to MBR Converter
- 2022 Sony USB/Pen Drive Format Tool Is Online | Free Download
- How to Fix DPC Watchdog Violation Error in Windows 10
- How to Ghost a Hard Drive in 3 Steps
- Backup Computer to USB Flash Drive in Windows 10/8/7