How to Remove, Delete or Format GPT Disk Partition
What is GPT
GPT is a standard for the layout of the partition table on a physical hard disk, used in both EFI and some BIOS systems due to the limitations of MBR partition tables.
MBR has a size limit of 2TB for disks and partitions, whereas GPT allows for a much larger size of 9.4 ZB.
More details about GPT:
- Max size of GPT disk/partition: 9.4ZB (1ZB=1 billion terabytes)
- Consist of GPT disk:
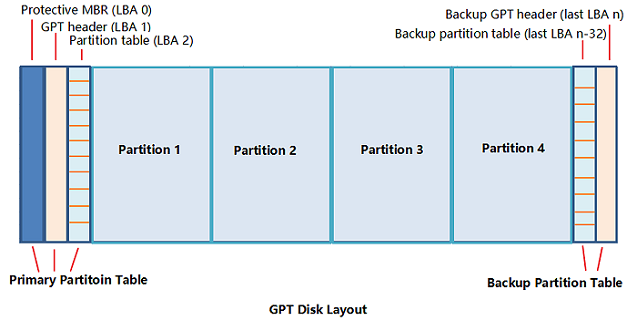
1). Primary Partition Table - For the system to load partition information and access existing partition data, it needs to read and interpret the Master Boot Record (MBR) and the Partition Table, which are stored in the first sector of the disk. This process involves reading the MBR, parsing the Partition Table, and loading the partition information into memory.
2). Normal Partition - the physical location for saving data and files;
3). Backup Partition Table - The Primary Partition Table, also known as the Master Boot Record (MBR), contains a backup of the GPT header and partition table. This backup is used for recovery purposes and is stored in the first sector of the disk.
- The operating system supports UEFI boot with Windows 8/8.1/10 and newer versions.
- Read and Write Support: Windows 10/8.1/8/7/Vista and XP(64bit only)
Why need to remove or delete GPT disk partition
People may need to remove or format GPT partition due to its limitations, such as not supporting OS boot on older Windows systems like Windows 7 (32bit) or Windows XP.
1. Remove GPT disk partition style to install Windows
2. Convert GPT disk to MBR disk by removing all partitions
3. To resolve low disk space issues or resize a GPT disk partition, delete the single GPT partition. This can be done by booting from a live USB, accessing the disk management tool, and selecting the GPT partition to delete.
4. To format a GPT partition and clear it or reset the file system, you can use the `parted` command-line tool. Here's a step-by-step guide:
If you need to remove or delete GPT disk partitions for specific reasons, you can follow the provided solutions to change or remove them. This may involve deleting all GPT disk partitions, and it's essential to check your needs and requirements before proceeding. Whether you're looking to partition your disk differently or simply remove existing partitions, the steps provided can guide you through the process.
Part 1. How to remove or delete GPT disk partition
To remove or delete a single or all GPT partitions, you can use the `parted` command in Linux. The basic syntax is `parted /dev/sdx` (replace `x` with the drive letter, e.
To remove GPT partitions, you have two options: using partition manager software or Disk Management. You can choose either method and follow the detailed steps to complete the task.
1. Connect to your server via SSH or console, depending on your server configuration.
Method 1. Use Qiling partition manager software
Qiling Partition Master is a partition manager that allows users to resize, copy, clone, remove, or delete GPT disk partitions, among other functions.
Here are the steps to remove the GPT disk partition with Qiling Partition Master in one paragraph:
# 1. Remove single GPT disk partition
Step 1. Launch Qiling Partition Master on your computer, choose the partition you want to delete and click "Delete" in the "Disk management" page.
To completely erase data on a selected partition, ensure that you've backed up all important data on that partition. This process will completely remove all data, including files, folders, and operating system files, from the selected partition.
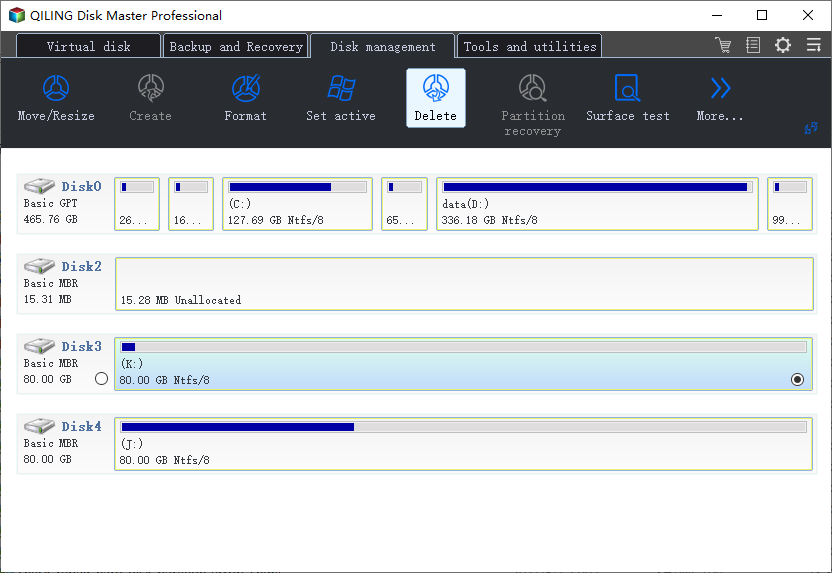
Step 2. Click "Proceed" to confirm the deletion.
# 2. Remove all GPT disk partitions
Step 1. Launch Qiling Partition Master. Choose the GPT partition in the disk, and click "Delete".
Step 2. To delete all partitions on a GPT disk, select the other GPT partition on the disk and click "Delete". Repeat this process to delete all partitions on the GPT disk.
Method 2. Delete GPT partition using Disk Management
Step 1. Open Disk Management, right-click a PGT partition and click "Delete Volume".
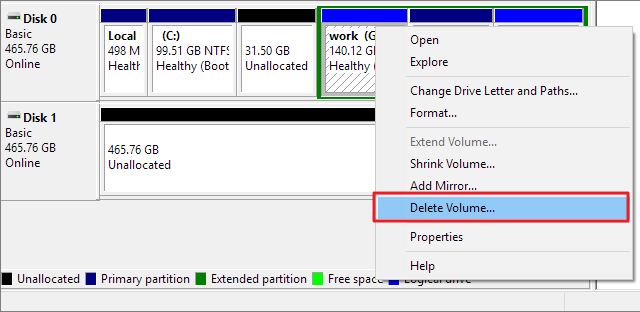
Step 2. Select "Yes" to execute the operation and wait for the process to finish.
To delete all the GPT partitions, repeat the process to delete other existing GPT partitions on your disk.
Part 2. Remove GPT disk partition style
To convert a GPT disk to MBR, remove the GPT disk partition style, or install Windows, you can use the built-in Disk Management tool in Windows or a third-party partition manager like EaseUS Partition Master. The process typically involves initializing the disk with a new partition style, deleting any existing GPT partitions, and then creating a new MBR partition table.
When you get an error message saying "The selected disk is of GPT partition style. Windows cannot be installed on this disk", you'll need to convert the disk's partition style from GPT to MBR.
There are three ways to convert a GPT disk to MBR: using Qiling Partition Master, Disk Management, or DiskPart CMD command. The first option is the easiest, making the conversion process simpler.
To remove the GPT partition style from your disk, follow these steps using any method: Identify the disk you want to modify, then delete the GPT partition table. This will remove the GPT partition style from the disk, allowing you to re-partition the disk using a different method, such as MBR (Master Boot Record).
Method 1. Convert GPT to MBR in Qiling Partition Master without data loss
The disk conversion feature in Qiling Partition Master allows Windows users to easily change the partition style from GPT to MBR or vice versa with just a few clicks.
No data loss or partition loss issue will occur.
Step 1. Install and open Qiling Partition Master on your Windows computer.
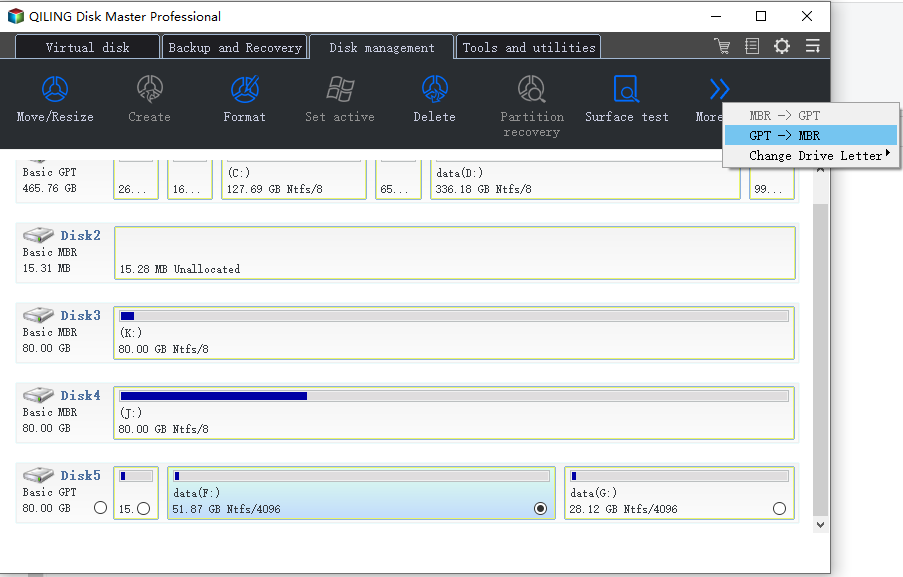
Step 2. To convert a GPT disk to MBR, select the disk you want to convert, click "More...", and then choose "GPT -> MBR" from the options. This will initiate the conversion process.
Method 2. Delete all partitions and convert to MBR in Disk Management
To remove a GPT disk partition style and convert it to MBR, first delete all existing partitions on the disk, then convert the disk to MBR using disk management.
If you're experiencing data loss on a GPT partition, it's essential to back up any valuable data to an external hard drive before proceeding. This step ensures that your important files are safe and can be recovered if needed.
Here are the steps:
Step 1. Open Disk Management, right-click partitions on GPT disk, and select "Delete Volume".
Step 2. Click "OK" to confirm.
To delete all partitions on the GPT disk, you can repeat the process of selecting the disk, clicking "Delete" and confirming the deletion. This will remove all existing partitions on the disk, effectively wiping it clean.
Step 3. After deleting all partitions, right-click the GPT disk and select "Convert to MBR".
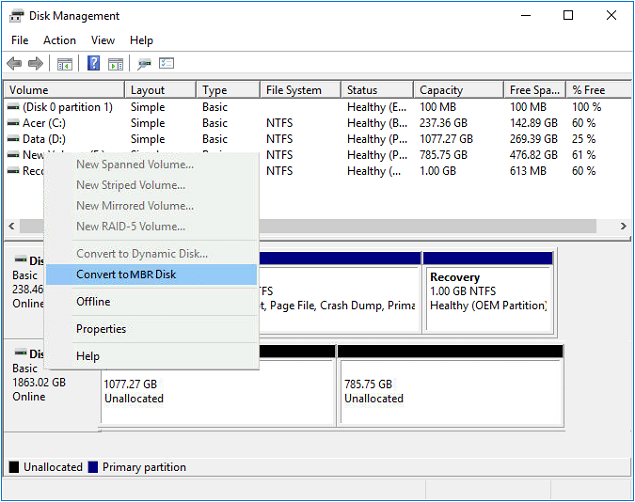
After the MBR disk conversion, you can create new partitions or install the Windows system on the converted MBR disk.
Method 3. Convert GPT to MBR in Diskpart Command
Converting GPT to MBR in Diskpart can be a complex process for the average person.
If you're a beginner, it's recommended to start with the first two methods. However, if you're comfortable using Diskpart, be cautious when executing the commands, as they can be more complex and require careful handling.
1. Open the Disk Management tool by pressing the Windows key + R, typing "diskmgmt.
Step 1. Open Command Prompt as Administrator, and type diskpart, and hit Enter. Click "Yes" to open Diskpart.
Step 2. Type the following command lines one by one and press "Enter" each time.
- list disk
- 1. Boot your computer from a Windows installation media (USB or CD/DVD).
- clean
- convert mbr
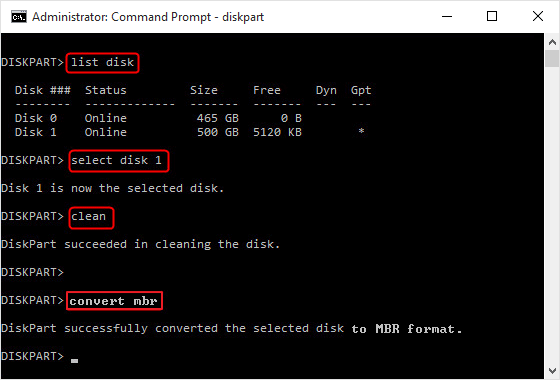
Step 3. After this, type exit to close the diskpart window.
Your disk is now formatted with a Master Boot Record (MBR) partition style, which allows you to install classic old Windows systems or perform other tasks on the disk.
Part 3. Format GPT Partition (4 Ways)
The process of formatting a GPT partition is similar to formatting a normal MBR partition. You have four ways to do so.
1. Using File Explorer via right-clicking format
Open File Explorer > Right-To format a target partition, click on it, select "Format" from the options, check the box for "Quick Format" to speed up the process, choose NTFS as the file system, and then click "Start" to initiate the formatting.
2. Using Disk Management with Format Volume option
Open Disk Management > Right-To format a target partition, select it and click "Format Volume". Set the new drive letter and file system as NTFS, then click "Next" and "Finish".
3. Using Qiling Partition Master with its format partition feature
To format a volume using Qiling Partition Master, select the target volume, click "Format", choose NTFS as the file system, and then click "Proceed".
4. Using Diskpart with format fs=ntfs quick command
To format a partition using Diskpart, open Diskpart, list the volumes, select the target volume by its number, and then format it using the NTFS file system with the "quick" option. The commands to perform this action are: list volume, select volume 2 (replace 2 with the actual partition number), format fs=ntfs quick, and exit.
Conclusion
This page provides solutions for users to remove single or all GPT partitions on a Windows disk, convert a GPT disk to MBR, and format GPT partitions. It offers helpful tips and methods to address these issues, allowing users to manage their disk partitions effectively.
Partition manager software - For those looking to manage their disk partitions, there are several practical options available, including Qiling Partition Master, Disk Management, and Diskpart command. These tools provide a range of functionalities to help users create, delete, resize, and format partitions, making them ideal for various disk management tasks.
If you need an advanced tool to manage GPT disks, such as resizing GPT partitions, partitioning a GPT hard drive, or converting GPT, Qiling Partition Master is a top recommendation.
Also Read: How to Partition GPT Disk.
FAQs about GPT Disk Partition
I've rewritten the paragraph to provide a concise and informative answer to the top 4 frequently asked questions about GPT disk)
1. How do I remove GPT protective partition?
To resolve the "protective" issue on a GPT partition and make it usable again, two workarounds can be employed.
Option 1. Diskpart command-line utility
- Open Diskpart.exe, which can be accessed by referring to the "Remove GPT Protective Partition" part for instructions on how to open it.
- Type list disk and press Enter.
- Type select disk * and press Enter.
- Type clean and press Enter.
- Type convert mbr and press Enter.
Option 2. Third-Converting a GPT (GUID Partition Table) to MBR (Master Boot Record) can be done using software like Qiling Partition Master, which allows you to access and manage GPT protective partitions without losing data. For more details, refer to the guide on Accessing GPT Protective Partition.
2. How do I change GPT partition to BIOS?
The primary reason people want to change their GPT partition to BIOS is because they can't directly switch the GPT boot mode with the Windows system running on.
To change GPT UEFI to BIOS, switch the system disk's partition style from GPT to MBR. This will allow the system to boot in BIOS mode.
You can either use Windows installation media with CMD or a reliable disk conversion in bootable USB with Qiling Partition Master for assistance.
The process of converting a GPT disk to MBR without an OS is complex and involves booting from a Linux distribution, mounting the GPT disk, and using a command-line tool like `gdisk` or `parted` to convert the disk. The tool will prompt for confirmation, and once confirmed, the disk will be converted to MBR, allowing the user to boot from the converted disk and install an OS.
3. How do I change a GPT partition to NTFS?
To change the GPT partition to NTFS, you can either use the built-in Windows feature called "Convert to NTFS" or use a third-party partition manager software. The "Convert to NTFS" feature can be accessed through the Disk Management console, where you can select the GPT partition and initiate the conversion process.
Use File Explorer to right-click on the GPT partition, select "Format" and choose NTFS as the file system. Alternatively, use Disk Management to select the partition, right-click, and choose "Format" with NTFS. You can also use Diskpart in Command Prompt to format the partition with NTFS by typing "format partition:ntfs".
To convert a FAT32 partition to NTFS without losing data, you can use Qiling Partition Master, a powerful partition manager that allows you to resize, move, merge, and convert partitions with ease. With Qiling Partition Master, you can safely convert your FAT32 partition to NTFS, ensuring that all your files and data remain intact. This tool is a reliable and efficient solution for upgrading your file system to NTFS, providing a seamless experience for users.
4. How do I fix the selected disk is of GPT partition style?
The issue of "The selected disk is of GPT partition style" often occurs on GPT disks that don't support BIOS boot mode while installing Windows, and can be resolved by converting the disk to MBR.
For a detailed guide, you may refer to The Selected Disk is of The GPT Partition Style in Windows 10/8/7 for further help.
Related Articles
- How to Fix Windows Was Unable to Complete the Format in Windows 11
- MBR to GPT: How to Convert MBR to GPT in Windows 11/10/8/7 [2021 New]
- 2021 Tutorial: How to Resize C Drive in Windows 10/8/7
- How to Partition SD Card for Android
- Download System Clone Software to Clone OS in 2 Procedures
- How to Ghost a Hard Drive in 3 Steps