How Do I Fix Windows 7 Backup Taking Forever Issue? Check the How-To Guide Here
Creating regular backups is a crucial method to prevent data loss and ensure Windows system security. It allows you to recover files in case of unexpected errors, providing a safety net for your important data.
The Windows Backup and Restore system often gets stuck while creating a system image or backing up data, resulting in a frozen system with no progress, even after a long wait. This can be frustrating, and you may also encounter additional issues.
- System image taking forever
- Windows backup stuck creating a system image
- Windows 7 backup is stuck at 97% or 57%
If you're experiencing issues with Windows 7 backups taking forever, don't worry! This guide is here to help you fix the problem with five different methods, and also introduces a free tool to resolve the issue.
Why Does Windows 7 Backup Take Forever or So Long
Windows 7 backup issues are common, with many users experiencing problems. The backup or restore process typically takes around 30 to 40 minutes, depending on the data or system size. However, when it gets stuck for an extended period, various causes can lead to errors, resulting in a failed backup.
If you're curious about where Windows backups are stored, we've got the answer for you. To find out more, we suggest checking out the article below, which provides detailed information on the topic.

Windows 10 backup files are stored in a location that can be accessed by the user. The default location for backup files is the "Backup" folder in the user's profile directory. This folder is usually located at "C:\Users\
After the backup process is finished, the backup files are typically stored on an external device, such as an external hard drive, USB drive, or cloud storage service, depending on the type of backup and the user's preferences. The backup files may also be stored on the same device as the original files, but this is not recommended as it can lead to data loss if the device is damaged or corrupted. The backup files are usually stored in a folder or directory designated for backups, and may be compressed or encrypted for added security and convenience.

Here are some common reasons why a task might be frozen even when you try to restore or back up:
- Bad disk sectors
- Insufficient Hard drive space
- The oversized old backup
- System crash
- Corrupted files or folders
- Virus or Malware affected data
To fix Windows 7 Backup issues, follow the coming sections.
Quick Fix Windows 7 Backup Taking Forever - Use Backup Software
If you're experiencing issues with Windows Backup, there are several troubleshooting steps you can take, but they can be time-consuming and may not be straightforward for those without experience with Windows settings. A more efficient and user-friendly alternative is to use a free backup software like Qiling Backup for Windows 7.
The advanced and flexible method of backing up files, including operating systems and applications, saves users' time and effort by offering various backup options, such as automatic, incremental, and differential backup. This makes it easy for anyone, even a newbie, to back up everything like a pro.
Qiling Backup allows you to back up and restore computer images to other computers with different external storage drives, making it easy to transfer data to a computer with limited storage capacity.
This tool allows you to boot a crashed Windows computer, quickly recover from disasters, and clone system backups, disk partitions, upgrades, or transfers without hassle, making it a worthwhile investment, especially when system restore isn't working.
If you're engaged, you can follow these steps to get the most out of this app. It's worth downloading and using.
Step 1. Launch Qiling Backup on your computer, and click System Backup on the home screen to start the backup task.

Step 2. On Windows, the operating system information and all system-related files and partitions will be automatically selected, so no manual selection is required. Next, choose a location to save the system image backup by clicking on the illustrated area.

Step 3. The backup location can be a local drive, external hard drive, network, cloud, or NAS, and it's recommended to use an external physical drive or cloud to preserve system backup files.

Step 4. The software allows for customizing settings, such as enabling automatic backups on a daily, weekly, monthly, or event-based schedule, and creating differential and incremental backups. This can be accessed through the "Options" button. Once selected, clicking "Proceed" initiates the Windows system backup process, which is then displayed on the left side in a card style as a completed task.

Fix Windows 7 Backup Taking Forever or Stuck at Creating System Image
Windows 7 users often face frustrating situations when their backups take forever or hang indefinitely. Despite numerous discussions on this issue, few solutions are truly helpful. To address this problem, we've compiled a list of the top 5 solutions to fix the Windows 7 backup taking forever issue.
- 1. Disable Antivirus Firewall Temporarily
- 2. Turn Backup Services to Automatic
- 3. Disable Running Programs
- 4. Deleted Old Windows Backup1
- 5. Check Disk Error
1. Disable Antivirus or Firewall Temporarily
To create a system image backup, you need to temporarily disable your computer's antivirus or firewall. This is because they can freeze the backup process at any time, leaving you with an incomplete backup. Once the backup is complete, it's essential to re-enable the firewall or antivirus as soon as possible, as they play a critical role in protecting your system and files from security threats.
2. Turn Backup Services to Automatic
Step 1: To open the Run dialog box, you can either go to the Search bar and type "Run" or press the Windows key + R on your keyboard.
Step 2: Open the app and type msc in the Run dialog box, then click OK or press Enter to open the Services window.
Step 3: Now, find Volume Shadow Copy and Window Backup.

Step 4: Check if the two services are started and set them to automatic by going to properties, then clicking "Start" and selecting "Startup type".
3. Disable Running Programs
To create a Windows 7 backup effortlessly, disable all running programs before startup in System Configuration. This won't affect the operating system's functioning and will allow easy access to and backup of all files.
4. Deleted Old Windows Backup
To get quick results, you can delete old Windows 7 backup files. To do this, follow these steps:
Step 1: To access the Control Panel, go to the Search bar, type "Control Panel" and open it.
Step 2: Under the System and Security, click Backup and Restore.
Step 3: Click Manage Space.

Step 4: To delete a backup image, click on the View backups option. Then, select an old backup image that you no longer need.

Note* To avoid losing your old system image backup, move it to a new location before creating a new system image backup. This will prevent the new backup from overwriting the old one and causing errors.
5. Check Disk Error
To check for errors on your system disk, perform a check disk (chkdsk) in case the Windows backup program is stuck while creating a system image. Start by opening the Command Prompt as an administrator, then type 'chkdsk C:' (replace 'C' with the actual drive letter of your system disk) and press Enter. If you're prompted to schedule the disk check for the next boot, choose to run the check immediately.
Step 1: To open the command prompt, go to the search bar on your computer, type "command prompt" and press Enter. This will open the command prompt window.
Step 2: To automatically run the disk check and fix any errors on the C: drive, type or copy/paste the command chkdsk C: /f /r and press Enter.

Note* Windows 7 backup getting stuck at 97% can be resolved by replacing C: with the drive letter of your destination disk storage.
How to Backup Windows 7 after Fixing Backup Taking Forever Issue
To resolve the issue of Windows 7 taking forever, follow the methods mentioned above. Once the problem is fixed, you can use the inbuilt backup and restore function in Windows 7 to back up your system. To do so, follow these steps: [insert steps here].
Step 1: To access the control panel, go to the search bar, type "control panel", and click the app to open it.
Step 2: In the System and Security section, click on "Backup and Restore."
Step 3: Choose "Set up backup" and select an internal or external drive to store the backup, then click "next".
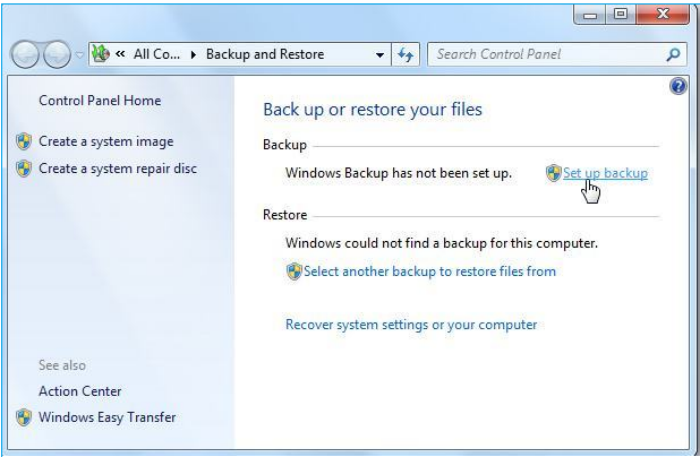
Note* We suggest using an external drive to back up your data and make it accessible from anywhere.
After selecting the backup storage location, Windows recommends backing up all files in Documents, Images, Music, and Videos. However, you can also customize the backup to include or exclude specific files and directories, depending on your needs.
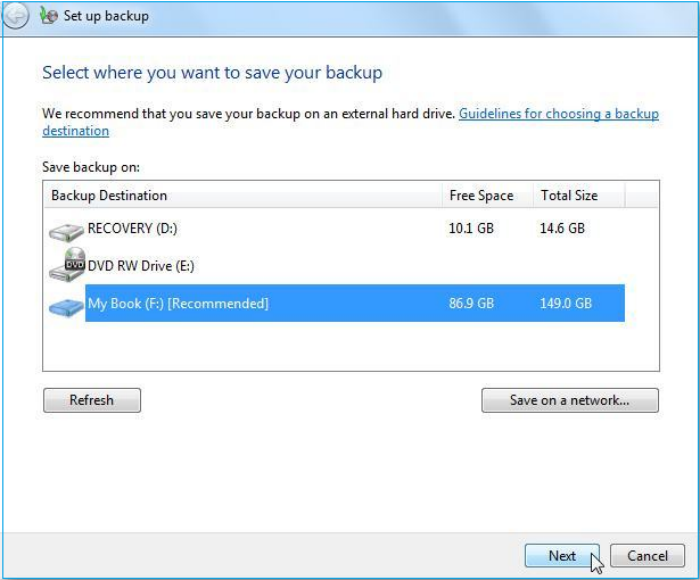
Step 4: In the next window, click "Let me choose" and press Next.
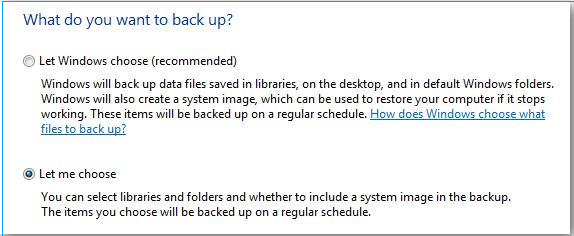
Step 5: Select the files you want and make sure to check the box that says "Include a system image of local drives".
Step 6: Review your settings, select Save Settings and Run a backup.
Step 7: To schedule a future backup, select the date and time you want the backup to run. Then, check the box labeled "Run backup on a schedule" and click "OK".
Note* If you don't want to schedule a backup, unselect the checkbox.
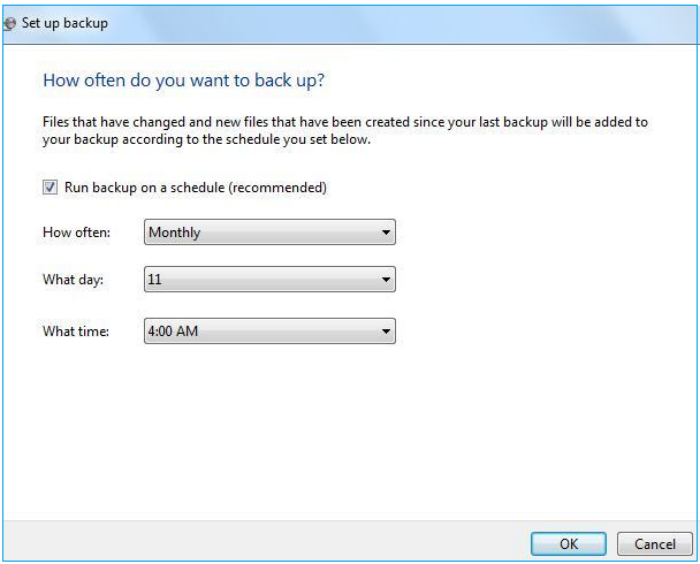
Step 8: Save the settings and start the backup process to begin the backup process.
Step 9: To check the ongoing process, press the View Details button.

Note* I'll wait until the process finishes to avoid any data loss.
Conclusion
Data loss can occur unexpectedly due to system failures or errors, making regular backups essential to prevent losing crucial information. Instead of relying on Windows' built-in recovery features, which can be time-consuming, consider using a free and quick third-party backup tool like Qiling Backup. Alternatively, select any method from the list and start backing up your essential data to avoid potential data loss.
For more information, please follow our FAQ section.
FAQs About Windows 7 Backup Taking Forever
Windows 7 Backup taking forever issues can be frustrating, but there are some quick fixes to try. If your backup is taking a long time, try running the System File Checker (SFC) to scan and replace any corrupted system files.
1. How long should a Windows 7 backup take?
A normal Windows 7 backup typically takes 20-40 minutes, depending on system size or data amount, but may hang in the initial stage due to errors.
2. Windows backup stuck creating a system image, how to fix it?
To resolve the issue, you can try deleting old backup loads and run the command chkdsk C: /f /r in the command prompt to check and fix disk errors. This may help resolve the problem.
3. Is Windows 7 backup any good?
Windows 7 backup feature allows you to create a system image and backup your files, ensuring your data is safe in case of unexpected system crashes or hardware failures.
4. Can I use my computer while backing up?
You can use the computer while backing up, but it's generally recommended to keep the system undisturbed during the process to ensure a smooth and uninterrupted backup. This allows the backup software to run without any potential conflicts or interruptions, increasing the chances of a successful backup.
Related Articles
- How to Backup Specific Folders Windows 10 (Quick & Easy)
- Toshiba External Hard Drive Backup Software for Windows 11/10/8/7
- How to Move/Clone Windows 10 Hard Drive to A New Computer Easily
- How to Backup USB to OneDrive [Bidirectional Way]