Windows 10/11 System Restore Is Taking a Long Time? Causes and Fixes Are Here
System Restore is frequently regarded as the most proper troubleshooting technique when a significant error occurs and alternative remedies don't seem to be working. But we have come across many people complaining that the Windows 10/11 system restore is taking a long time.
There is no need to worry, though. This post will help and walk you through the working solutions that aren't too time-consuming to successfully get rid of the Windows 10/11 system restore taking a long time error.
However, before we start, you should know this.
System Restore takes a maximum of an hour to restore. If it has only been a few minutes after restoring the system, I suggest you give the procedure at least an hour to run undisturbed.
However, if it still fails, the system files, the restore point, or background applications incompatible with System Restore are the most likely culprits when Windows System Restore is stuck.
Why Does Windows 10/11 System Restore Take a Long Time
It is normal as it depends on the amount of data and PC configuration. Technically speaking, a System Restore could take up to two hours. Stopping a System Restore once it has been started puts your system at considerable risk of damage. So, it is essential to note that the number of files stored in your hard drive affects how long it takes to restore Windows 10 or 11. Other reasons for the extended time taken for System Restore are given as follows.
System restore gets interrupted
Interruptions like the System Restore freezing up, or Windows 10/11 Reset taking a long time can make the user feel obliged to force the system to shut down. It can result in not being able to boot the system back. Internal procedures are present in both System Restore and Windows 11/10 Reset. Some of these are important, and failing to perform them could leave Windows unusable.
Hard drive is full
System Restore operates by creating a copy of everything it saves in a pre-designated location on the hard drive. When this space is full, the oldest restore points are deleted to make way for new ones. It can happen every time a restore is created or when it's running low on the amount of storage allocated to System Restore.
If your primary storage is running low on storage space, System restore will not have enough temporary space to manage everything. Too much data on your hard drive might slow down your computer and cause the system to freeze and crash.
The following article may help you if you want to learn more about hard drive cloning:

How to Clone Hard Drive in Windows 11 (How to) Step-by-step Guide
Clone hard drive windows 11 effortlessly with this instruction book. Click now for a step-by-step guide on how to clone a hard drive in Windows 11.

Old backup is too big
System Restore takes up a substantial amount of storage on your hard drive. So, you might want to delete some of your old backed-up data, plus you might want to reduce the amount of data the process creates when the space on your device is low. Create a System Restore Point before significantly modifying your Windows 10/11 system.
System crash
The restoration of the system files or registry backup may not be complete if the system crashes during the ongoing process. It might again lead to longer hours of Windows taking time for System Restore.
How Do I Know If System Restore Is Stuck or Not
Sometimes you may meet such issue of the System Restore not working. Or One of the more frequent issues that may arise during the system restore process is when one tries to interrupt the process, causing the System Restore to get stuck. Let the process do its job and not interrupt it is always essential.
How long does the restoration process take? It usually takes 30 to 45 minutes for the process to complete. If it takes more than the given time frame, refer to the solutions below to fasten the System Restore process.
- Method 1: Implement System Restore in Safe Mode
- Method 2: Implement Startup Repair
- Method 3: Run SFC
Method 1: Implement System Restore in Safe Mode
The first thing to do if your system is stuck on the starting screen or file recovery is to wait, particularly if the restore point holds a lot of data (So it is necessary to know how to backup files in safe mode Windows 10 early). If Windows 10 System Restore hangs for longer than an hour, try forcing a shutdown. Restart your computer and you are back in the account, boot the computer in Safe mode, and then perform a restore.

- Press the Windows logo key + R.
- Type msconfig in the Open box and then select OK.
- Select the Boot tab.
- Under Boot options, check the Safe bootcheckbox.
- Apply and Restart.
Method 2: Implement Startup Repair
The boot manager's malfunction is one of the potential causes. You can easily fix it in this situation using Startup Repair. Go to Advanced Recovery, select Startup Repair under Choose an option > Troubleshoot > Advanced Options > Startup Repair. If this doesn't solve the problem, try the next one.

Method 3: Run SFC
The Windows System File Check (SFC.exe) program allows you to check for system file corruption. Any corrupted files identified will attempt to be restored. There may be some damaged files if System Restore takes way longer than expected.

Fix Windows 10/11 System Restore Taking a Long Time Issue
Below are the solutions to resolve Windows 10/11 System Restore taking a long time. Before starting, you must first run any Antivirus software in your system to eliminate any active viruses and malware. There are four solutions mentioned below, and one of these solutions is sure to help you resolve the issue immediately.
- 1. Use Windows Backup and Restore Software
- 2. Perform System Restore in Safe Mode
- 3. Run Startup Repair
- 4. Run SFC Scan and Try Another Restore Point
1. Use Windows Backup and Restore Software
To help you back up and restore software, you can download Qiling Backup Home for free for 30 days. It is a dependable Windows backup and system restore software that supports backup and restore OS on all versions of Windows, including Windows 11 and Windows 10.
Qiling Backup generates a protected and encrypted partition known as Security Zone for users who have stored backed-up files in the local drive. Malware or viruses will be unable to access it when it is formed. Therefore, you can still preserve backed-up files and restore data from them even if your system is attacked.
Through its simple interface, Qiling Backup enables you to back up either specific files or your entire computer. Select the backup you want to make to get started, and the application will handle the rest.
Since System Restores can fail at times, it would be best that you can take a backup using Qiling Backup and then try System Restore.
The following steps help you use it well:
Step 1. Launch Qiling Backup on your computer, and click System Backup on the home screen.

Step 3. Your Windows operating system information and all system related files and partitions will be automatically selected so you don't need to do any manual selection at this step. Next, you'll need to choose a location to save the system image backup by clicking the illustrated area.

Step 4. The backup location can be another local drive on your computer, an external hard drive, network, cloud or NAS. Generally, we recommend you use an external physical drive or cloud to preserve the system backup files.

Step 5. Customiztion settings like enabling an automatic backup schedule in daily, weekly, monthly, or upon an event, and making a differential and incremental backup are available in the Options button if you're interested. Click "Proceed", and the Windows system backup process will begin. The completed backup task will display on the left side in a card style.

2. Perform System Restore in Safe Mode
You can make a backup of your computer's System Files, Registry Files, and System Settings using the System Restore feature in Windows. You can apply this saved "System Restore Point" to reverse any recent modifications that might have caused issues with your system.
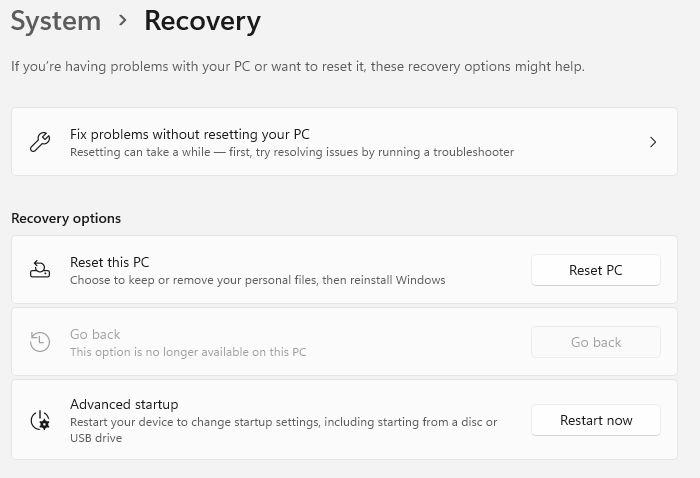
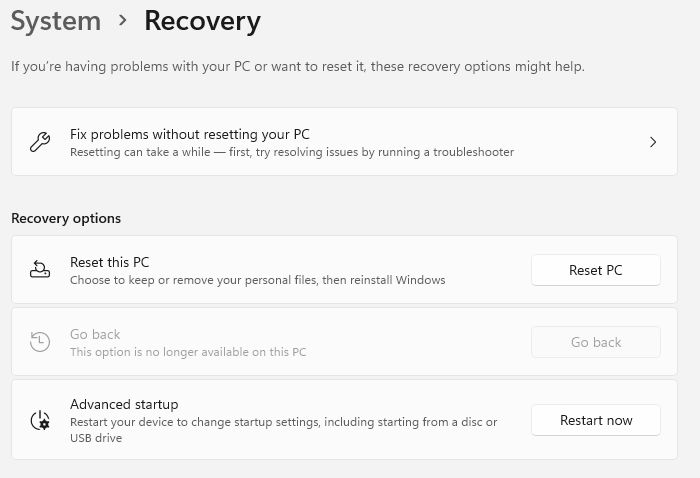
Step 1: Go to Settings (Win + I) > Update & Security or Windows Update. Click on Recovery, and then click on Restart Now next to the Advanced Startup button.

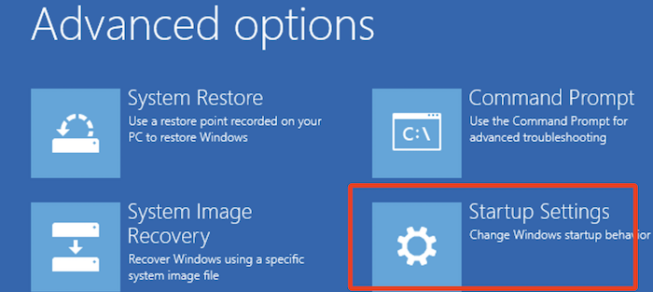
Step 2: After the computer restarts, go to Troubleshoot > Advanced options > Startup Settings and click on the Restart button. Press the F4 key while the computer restarts. It will take the PC into Safe Mode.

Step 3: Go to Settings > System and pick the About tab on the left pane once the computer has started in Safe Mode. Scroll down to Related Settings in the right-pane and click the System Protection option.

Step 4: Click on the Next button, select the Restore Point you want to choose, and click on the Next button.
Now, wait for the Restore Process to finish. You will receive a pop-up notification once the restoration process is finished letting you know that your system has been restored. The System Restore Process will undo recent changes that must have led to the issues on your computer and return it to its previous state.
3. Run Startup Repair
The Startup Repair tool in Windows 10/11 can correct issues with files that are required to boot the operating system on a functional desktop. You can still use this utility to repair your Windows 10/11 installation, even if it is defective.
Step 1: Press Win+I on the keyboard to open the Settings app.
Step 2: Find Update & Security and choose the Recovery tab.

Step 3: Click Restart Now under Advanced Startup.
Step 4: Go to Troubleshoot>Advanced Options>Startup Repair.
4. Run SFC Scan and Try Another Restore Point
System File Checker (SFC) is a helpful tool for scanning and fixing protected system files. It is the simplest and quickest method for evaluating your computer's stability, spotting installation and update issues, and, when possible, locating replacements for lost or damaged files. SFC runs on Windows 7, 8, 10, or 11, but it is always better to keep your system updated. Run SFC and see whether the problem gets solved.
Step 1: Boot into Advanced Recover using a bootable system. You need to do it only when the PC is not bootable anymore.
Step 2: Go to Choose an option > Troubleshoot > Advanced Options > Command Prompt.
Step 3: Select an account, then type the password.
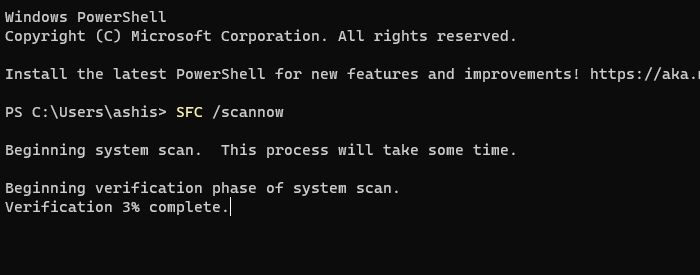
Step 4: In the pop-out box, type the command sfc /scannow to search for missing or damaged system files on Windows 10/11.

Step 5: Go back to Advanced Options, and run System Restore when the verification is complete to see if any delay is still there in restoring files.
Conclusion
Before you begin the system restore process, ensure you back up all the data in case any system error occurs with the Qiling Backup tool. Try the given solutions in the article; if one fails, try the next one. It should help you make the system restoration much smoother and quicker.
FAQs About Windows System Restore Taking a Long Time Issue
These frequently asked questions pop up during a slow System Restore process. You can check out these answers if you have any doubts.
1. What Happens If I Interrupt System Restore in Windows 10?
The system files or registry backup recovery will not be completed if you interrupt the process. It can result in a partially complete process and may result in data corruption, boot record corruption, and many issues.
2. What Do I Do If System Restore Fails in Windows 10?
- Verify the functionality of Volume Shadow Copy and Virtual Disk on the desktop.
- Check for any corruptions and run an uncheck disk on the hard drive.
- Start the System File Checker. To determine whether any corrupted system files may be the root of this problem, a System File Checker (SFC) scan is performed.
3. How to Stop System Restore Windows 10?
Hold the Power Button down for 5 to 10 seconds. You can perform a hard shutdown. Data or application loss could result from the restoration being interrupted.
If you want to reset Windows 10, you can choose to keep your files and Windows programs, but the reset procedure will remove any third-party apps you have installed.
4. What to Do If Windows 10 System Restore Stuck on Restarting?
Select Troubleshoot on the Choose an option screen. You can use Safe Mode after that. Select Restart under Advanced Options > Startup Settings. Select 5 or F5 to restart your computer in Safe Mode with Networking after it has restarted. Try to do a System Restore once the computer has booted in Safe Mode with Networking.
Related Articles
- How to Backup Files to Cloud (Google/Dropbox Are Included)
- How to Create WinPE Emergency Bootable Disk in Windows 10/8/7 [2022 New]
- Windows To Go Creator for Windows 10/8/7
- Windows 10 Backup Not Working? Top Solutions to Make Windows Backup Work