Can't Install macOS Sonoma? Fixed in 10 Proven Ways (2023)
In this article, you'll learn:
- Causes: Why Can't Install macOS Sonoma
- Methods: macOS Sonoma Not Installing Fixes
- Recover Data from Mac That Won't Update to Sonoma 🔥
- Can't Install macOS Sonoma FAQs
Mac users can now download and install the macOS Sonoma beta for free, as Apple has modified the Apple Developer Program to make it more stable and bug-free. This comes ahead of the official release in late September or October, which will bring exciting features and enhancements to Mac users.
If you want to experience the latest features of macOS Sonoma, you can install the developer beta with a free Apple Developer account. However, be aware that you may not be able to install it if your Mac has low storage space or other issues. If you're unable to install it, this article can help you identify the reasons and provides 10 best solutions to resolve the error.
Download macOS 14 Sonoma Beta on Mac, MacBook, iMac
macOS 14 Beta is Apple's upcoming 2023 macOS version, designed for Mac models, and it's generating excitement among users.
Causes: Why Can't Install macOS Sonoma
Wondering why you can't install macOS Sonoma? There may be a few probable reasons for the installation issues, including four main reasons that macOS Sonoma can't be installed on your compatible MacBook.
🚀Reason 1. Low Storage Space
The "can't install macOS Sonoma" error might be caused by insufficient storage space, where the available free disk storage on your Mac's HDD is less than the macOS installer requires.
⚔️Reason 2. Software Incompatibility
Apple's latest macOS Sonoma upgrade will not be compatible with the 2017 MacBook Pro, 2017 iMac, and 2017 12-inch MacBook.
🍎Reason 3. Not Registering as an Apple Developer
To install macOS Sonoma, you need to register with an Apple ID, as it's currently available for beta developers only.
😨Reason 4. No Backup
Upgrading to the latest macOS version, macOS 14, may introduce unforeseen bugs. To avoid potential data loss, it's essential to back up your Mac before proceeding with the installation.
Methods: macOS Sonoma Not Installing Fixes
If you're unable to install macOS Sonoma, try the following 10 fixes to resolve the issue. However, before attempting these solutions, ensure you've taken steps to safeguard your data security.
- Restart the Mac
- Try a macOS Sonoma Clean Installation
- Turn Off FileVault or Firewall
- Reset NVRAM/PRAM or SMC
- Create a New macOS Sonoma USB Installer
- Use Personal WiFi or Internet Connection
- Check the Hardware and Software Compatibility
- Check the Mac Disk Storage Space
- Verify and Repair via Disk Utility
- Delete the Sonoma Installer App
Method 1. Restart the Mac
One of the most hassle-To restart your MacBook Air or Pro without using the power button, simply press and hold the Command (⌘) + Option (⌥) + Power buttons simultaneously. This will prompt a dialog box asking if you want to restart or shut down your Mac. Select the option to restart and let your MacBook continue running.
Step 1. Press the keyboard shortcuts, such as Control + Command + Power button or use the Touch ID sensor, to instantly lock your Mac. This will quickly secure your device and protect your personal data.
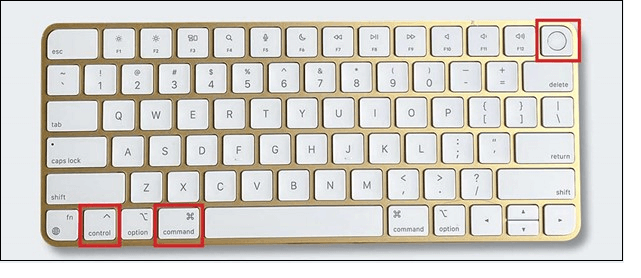
Step 2. The screen will take a few minutes to darken and then the chime will restart to play. Once this happens, you can release the keys.
If your MacBook won't turn on, try pressing the power button for 10 seconds. If this doesn't work, try pressing the power button and the Command (⌘) + Option (⌥) + P + R keys simultaneously and hold them for 10 seconds.
Method 2. Try a macOS Sonoma Clean Installation
To clean install macOS Sonoma on your MacBook, start by backing up all your files and data to an external drive or cloud storage. This will ensure you have a copy of everything in case something goes wrong during the installation process. Next, go to the Apple menu and select System Settings, then click on General, and finally select "Erase All Content and Settings" to wipe your MacBook clean. This will clear all files, apps, and settings, giving you a fresh start. Once your MacBook is erased, you can install macOS Sonoma from the App Store, and follow the on-screen instructions to complete the installation.
Step 1. To create a bootable macOS Sonoma USB and boot your Mac to the startup manager, follow these steps: create a bootable USB drive by downloading the macOS Sonoma installer and using the built-in Disk Utility app to create a bootable drive, or use a third-party tool like DiskMaker X. Once the USB drive is created, restart your Mac and immediately hold down the power button to force it to shut down.
Step 2. To force restart your Apple Silicon Mac, press and hold the power button until you see the startup options.
Step 3. After cleaning the macOS Sonoma bootable USB, select "install macOS 14 beta" from the startup options.
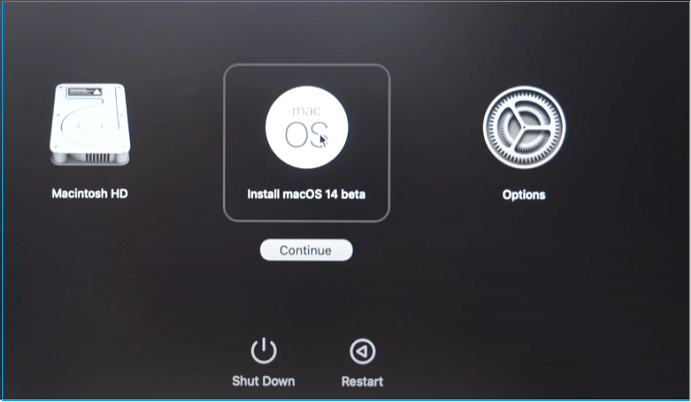
Step 4. Hit the continue button, and install it.
Step 5. 1. Select the drive you want to erase from the list.
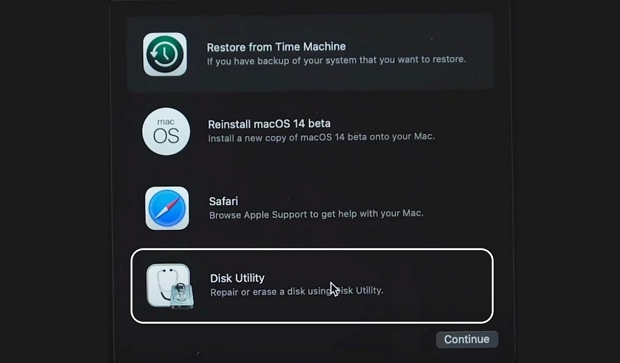
Step 6. If you're prompted with the "Erase Mac" notification, select the "Erase Mac" option that follows "Erase Mac and restart."
Step 7. Follow the on-screen procedures to continue.
Method 3. Turn Off FileVault or Firewall
If you've upgraded to macOS 14 Sonoma, you may need to disable the Firewall or FileVault to install the operating system. If you're familiar with your MacBook's settings, you can follow these steps to turn off the Firewall and proceed with the installation.
Step 1. To access system settings, click on the Apple logo located in the menu bar, and then select "System Settings" from the drop-down menu.
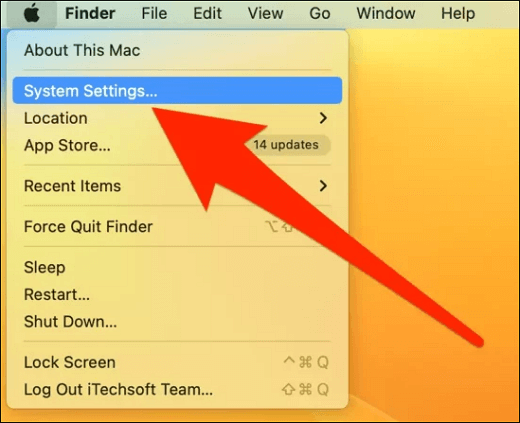
Step 2. Opt for Network, and then choose Firewall.
Step 3. Now, if it's toggled on, you may toggle it off.
To fix the issue of not being able to install macOS Sonoma, let's explore some additional solutions. If the problem persists, consider sharing this passage on Facebook, Twitter, or other social media platforms to help others who may be experiencing the same issue.
Method 4. Reset NVRAM/PRAM or SMC
To reset NVRAM on your MacBook, follow these steps: As the latest MacBooks no longer use PRAM, they now use NVRAM to store dozens of details. If you're using an Intel Mac, simply restart your computer, hold down the Command + Option + P + R keys, and release them when the computer restarts. This will reset your NVRAM.
Step 1. Shut down your MacBook.
Step 2. Immediately after powering on your computer, press the keys Command + Option + P + R simultaneously. This sequence will reset the System Management Controller (SMC) on your Mac, which can help resolve issues related to your computer's power management and battery calibration.
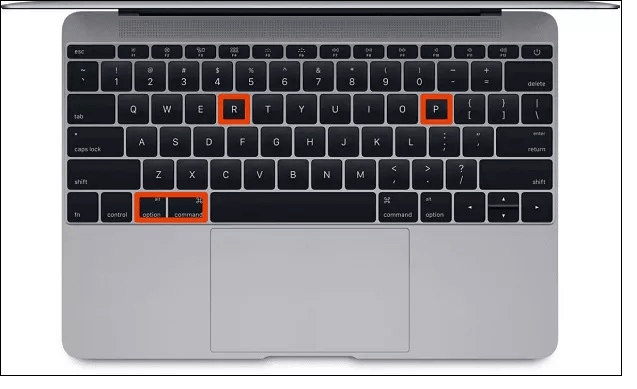
Step 3. Press the keys for approximately 20 seconds, release them, and let your MacBook continue booting up as usual.
Step 4. Check the "Startup Disk", "date & time", and display of system preferences.
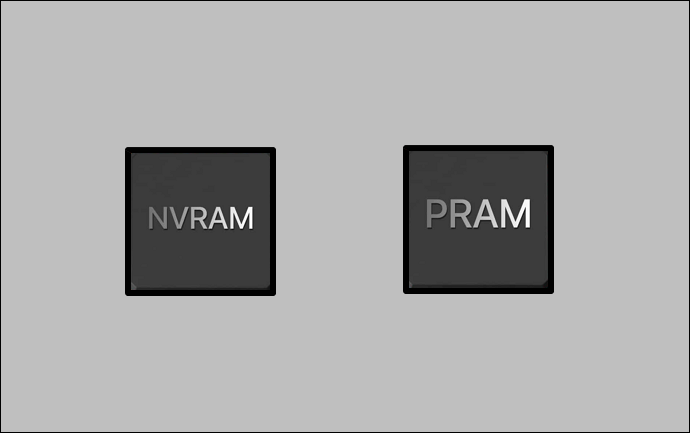
NVRAM, or Non-Volatile RAM, is a small amount of memory on a Mac that stores certain settings and preferences, such as the time and date, display resolution, and sound settings. If you're experiencing issues with your Mac's display or sound settings, resetting the NVRAM may resolve the problem.
NVRAM (Non-Volatile Random Access Memory) helps keep data secure even when the power is off by storing settings and information that remain constant between power on and off in all computer devices.
Method 5. Create a New macOS Sonoma USB Installer
Creating a brand-new macOS Sonoma USB installer involves three key steps. Firstly, you need to download the macOS Sonoma installer file from the official Apple website.
Step 1. Download the macOS Sonoma installer
To download the macOS Sonoma beta from Apple's website, follow these steps:
- Download the massive 13GB pkg file.
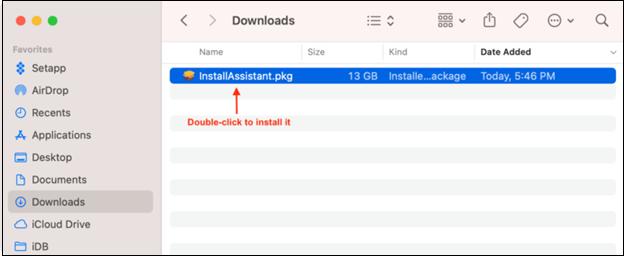
- Double-click on the file to finish the elementary installation.
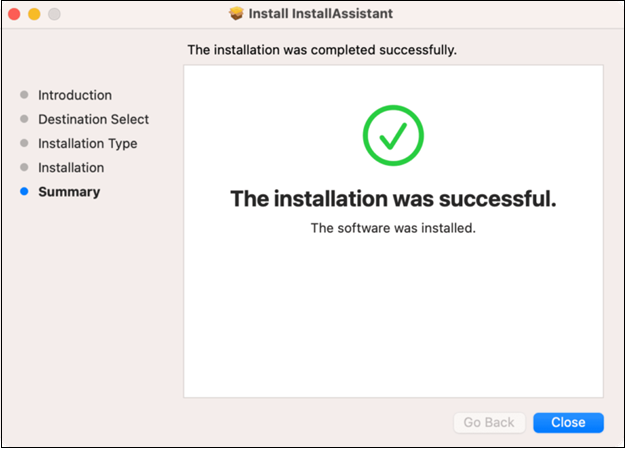
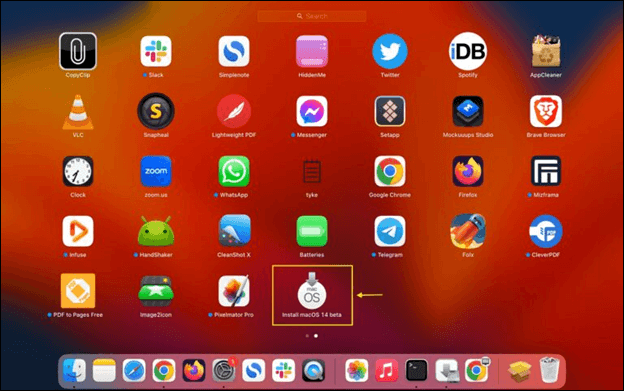
- After completing the installation, open your Mac's Launchpad, where you'll find the macOS 14 Sonoma installer.
Step 2. Set the USB flash disc to Mac OS Advanced format
Follow the steps below:
- Attach your USB flash drive to your Mac.
- hoose this thumb drive in "Disk Utility" by opening it.
- Select "Erase".
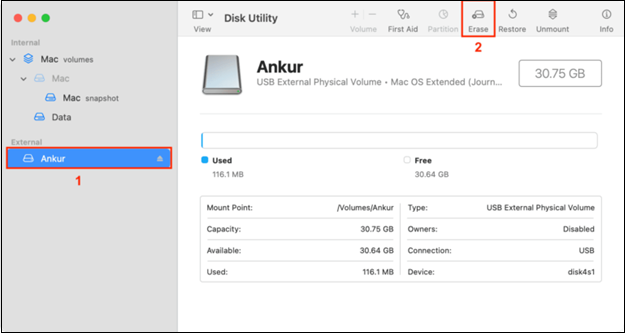
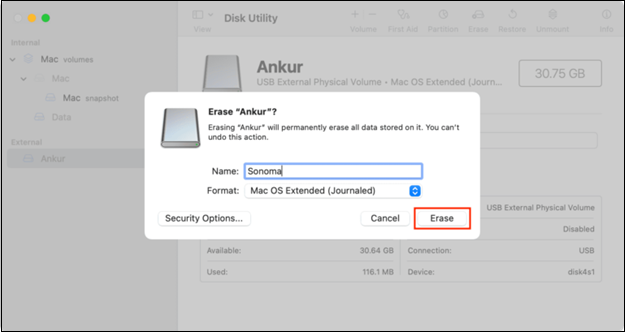
- The project name is Sonoma, which makes it easy to remember and use in Terminal commands without needing to edit or copy and paste.
- To format the drive, select Mac OS Extended (Journaled) in the Format box and choose GUID Partition Map in the Scheme dropdown.
- Select the "Erase" button, and don't try erasing it.
Step 3. Employ Terminal to create a macOS Sonoma bootable installer
- The terminal needs to be opened on your Mac.
- The command to install macOS Sonoma Beta is: sudo /Applications/Install\ macOS\ 14\ Beta.app/Contents/Resources/createinstallmedia --volume /Volumes/Sonoma. To execute this, simply copy and paste the command into the Terminal app, then press the enter button.
- Input your MacBook's password, and hit the enter button.
- You may now observe, 'We must remove the volume at… 's consent in order to keep going. In Terminal, enter once more after typing Y.
- Hit the OK button, and Terminal will erase the disk, make the disk bootable, and more. This process will completely erase the disk, so make sure you have backed up any important files or data.
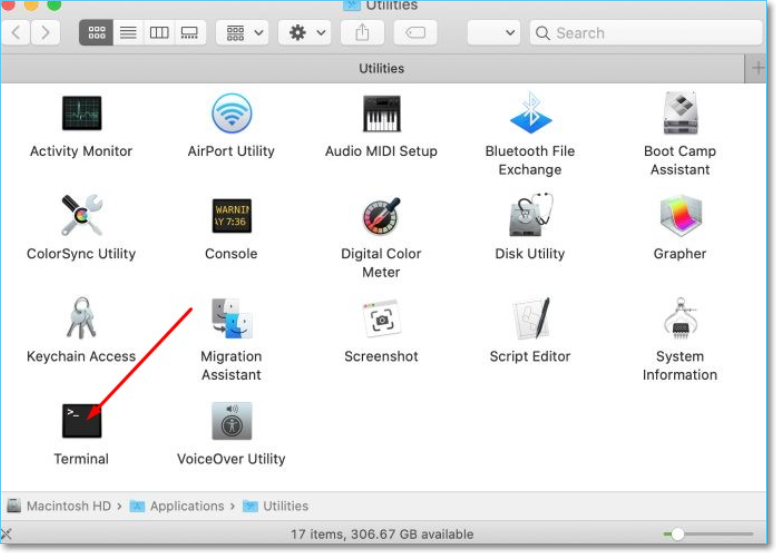
On a Mac, you can open the Terminal app by searching for it in Spotlight, using the Launchpad, or by navigating to Applications/Utilities. Once open, you can use basic commands like 'ls' to list files and directories, 'cd' to change directories, and 'mkdir' to create new folders.
To open the Terminal, you can use Spotlight by pressing Command + Space, typing "Terminal," and selecting the result. Alternatively, you can find it in the Applications/Utilities folder. Once open, you can type commands in the Terminal window to interact with your Mac. You can also use the Terminal to run scripts, edit files, and access system settings. Simply type a command, press Enter, and the Terminal will execute it.
Method 6. Use Personal WiFi or Internet Connection
You're experiencing issues installing macOS Sonoma, possibly due to Wi-Fi problems. To troubleshoot, try booting your Mac in safe mode, which can help resolve the macOS 14 Wi-Fi menu working issue.
Step 1. To initiate the recovery process, scroll to the upper-left corner of the screen and select the "Recovery Assistant" option. This will guide you through the steps to recover your device.
Step 2. Hit the "Erase Mac" button.
Step 3. Mac will take a little time to reboot.
Step 4. After a reboot, if the recovery panel is displayed, check the upper right corner to see if the Wi-Fi option has been restored.
Step 5. Reinstall macOS 14 after connecting to your Wi-Fi network.
Step 6. Set up your Mac usually once the macOS is installed.
Method 7. Check the Hardware and Software Compatibility
If your MacBook is not compatible with macOS 14, you can't install it. To verify compatibility, check your MacBook model by going to "Settings" > "General" > "About". If your MacBook is compatible, you can install the macOS 14 Sonoma beta on Macs such as MacBook Air (2022 and later), MacBook Pro (2023 and later), iMac (2024 and later), Mac Studio (2023 and later), and Mac Pro (2024 and later).
| ✅Mac Studio from 2022 and later |
| ✅MacBook Air from 2018 and later |
| ✅Mac Mini from 2018 and later |
| ✅iMac from 2019 and later |
| ✅Mac Pro from 2019 and later |
| ✅iMac Pro from 2017 |
| ✅MacBook Pro from 2018 and later |
Method 8. Check the Mac Disk Storage Space
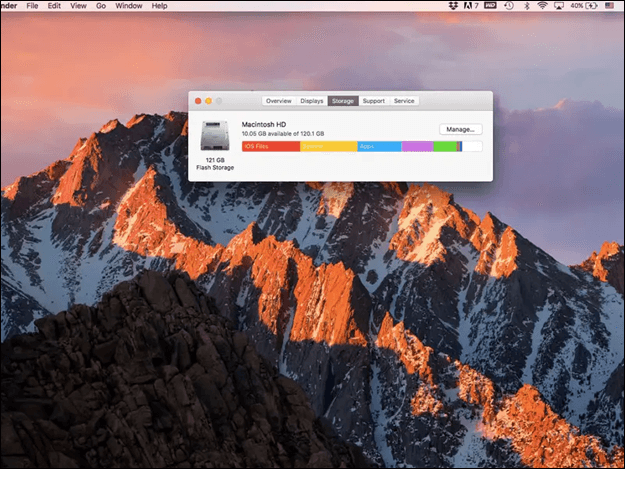
To find out Mac's disk storage space, follow these steps: Open the "About This Mac" window by clicking the Apple logo in the top left corner of the screen, then select "About This Mac" from the dropdown menu. In the "About This Mac
Step 1. To access the Apple logo, click on it, which is located at the top left corner of your screen. This will open the Apple menu, where you can find various system settings and options, such as System Preferences, Restart, Shut Down, and more.
Step 2. Select "About This Mac."
Step 3. To view storage usage, go to the "Storage" tab. This will display a stacked bar graph showing how much of the total storage has been used by different types of data.
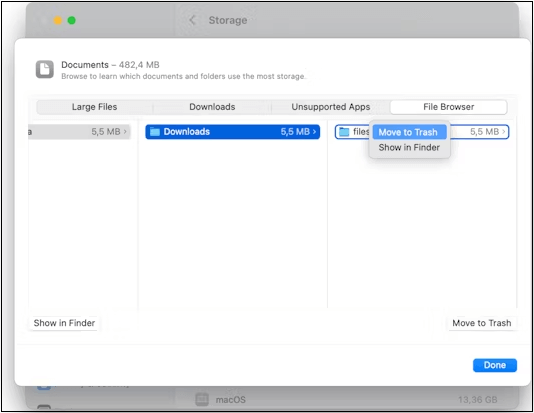
Mac Startup Disk Full: 6 Effective Solutions
A startup drive is a one-On a Mac, the default installation location for the operating system and other applications is the "System" volume, which is typically stored on the main hard disk. This is where the OS X operating system and its components, as well as other applications and their data, are installed by default. The System volume is usually located on the main hard disk, and it contains all the necessary files and folders for the operating system and applications to function properly.
Method 9. Verify and Repair via Disk Utility
To check and repair a disk using the Disk Utility in macOS, follow these steps. First, open the Disk Utility by searching for it in Spotlight or by navigating to Applications/Utilities. Select the disk you want to check and repair from the list on the left, then click on the 'First Aid' button at the top.
Step 1. Run first aid
- Run First Aid on each volume and container on the hard drive individually before running it on the storage unit to check and fix issues on the disc.
- Open the disk utility from "Finder" > "Applications" > "Utilities".
- Select "view" > "show all devices".
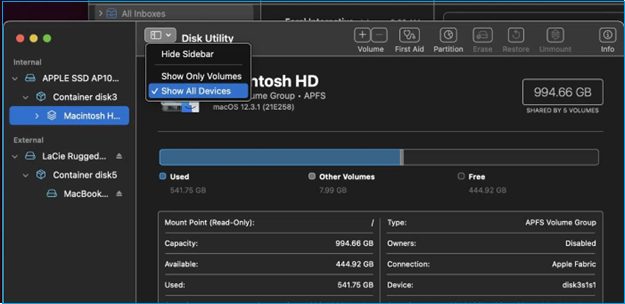
- Opt for the disk you're having issues with.
- Hit the First Aid, and hit the Run option.
Method 10. Delete the Sonoma Installer App
Deleting the Sonoma Installer application will help fix the "can't install macOS Sonoma" issue, allowing you to successfully downgrade to macOS Ventura and then upgrade to macOS 14. Sonoma.
Recover Data from Mac That Won't Update to Sonoma
Some users claim that a problem with their Mac's setup requires reinstalling macOS, which can lead to data loss, especially when trying to upgrade to Sonoma. Additionally, some Macs may not be able to update to Sonoma, resulting in data loss. In such cases, a specialized data recovery tool like Qiling data recovery software can help protect your data from being lost.
Deep Data Recovery is a software designed to recover information from file system errors, system failures, and unintentional file deletions. It has an intuitive interface that allows even inexperienced users to quickly retrieve deleted files. The software is designed to help users recover lost data due to various system-related issues.
- The software can extract various types of files from Mac devices, including music files, videos, emails, documents, and more, from storage types such as SSD, HDD, camera, and fusion drive.
- It helps recover emptied trash Mac regardless of the size.
- Files can be lost due to various reasons such as formatting, system crashes, virus attacks, repartitioning, and accidental deletion.
Download this professional data retrieval software now!
Step 1. Install and run Deep Data Recovery for Mac on another Mac computer, select the option "Unbootable Mac > Start" to initiate the recovery process.
Step 2. To create a bootable disc using a prepared USB drive, select the USB drive from the list of available drives, then click "Next" to begin the bootable disk creation process.
- Warning
- The creator will prompt to erase the drive to reallocate the space, then write bootable files to this drive, so please back up all USB files before processing "Eraser".
Step 3. The program creates a 2GB space on the USB and saves the boot files there, while leaving the remaining space available for storage.
Step 4. Once the repair process is complete, boot the corrupted Mac from the bootable disc and start the recovery process. It's recommended to restore the data to an external hard drive.
Step 5. After booting the Mac, launch Deep Data Recovery for Mac. Select the disk location, such as an internal HDD/SSD or a removable storage device, where you lost data and files, and the recovery tool will automatically scan for lost files.
Note: Before attempting data recovery, it's recommended to create a backup of your Mac to prevent further data loss. Once backed up, the software can recover data from the Mac backup, allowing you to reuse your computer for new data.

Final Words
Hopefully, the issue "can't install macOS Sonoma" has been solved with the help of any of the mentioned fixes. If not, you can delete the Beta version and downgrade to macOS Ventura. It's essential to back up your Mac before making significant changes, and if you do lose data, you can try using Qiling Data Recovery for Mac to quickly recover it.
Can't Install macOS Sonoma FAQs
Consider the below-mentioned FAQs to understand this topic better:
1. Can I downgrade from Sonoma to Ventura?
To install macOS Ventura, you need to download it from the App Store, build a macOS Ventura installer drive, and then install it in recovery mode, which will erase your Mac's partition.
2. How to install macOS Ventura on an unsupported Mac?
You may install macOS Ventura using OCLP.
- To format an external USB drive, go to Finder, click on Applications, then Utilities, and finally open the Disk Utility App.
- Next, install OCLP, aka OpenCore Legacy Patcher.
- To get started, download the macOS Ventura, and then create a bootable Mac Ventura USB drive. This will allow you to install the new operating system on your Mac.
- Finally, install it!
3. How do I install the Sonoma beta on Mac?
These are the steps to follow:
- Open the Apple menu, and select system settings.
- Opt for General, and hit Software Update.
- Hit the button, and select macOS Sonoma Developer Beta.
- Hit the done button.
- Select Upgrade now to commence the installation.
4. How do I fix macOS 14 installation failure?
To resolve macOS 14 installation failure, you can perform disk first aid, check the status of Apple servers, and use a wired connection to troubleshoot the issue.
Related Articles
- How to Solve There Is No Partition Selected in Diskpart [Best Ways]
- How Do SD Cards Work on Different Devices [Android/Camera/Switch/Laptop]
- How to Fix MacBook Pro/Air/iMac Won't Turn on with Black Screen [6 Solutions]
- How to Fix Overwatch Voice Chat Not Working on Windows 11/10