[5 Ways] How to Fix DISM Error 87 Option Is Unknown Windows 11/10/7
DISM is a tool in Windows that provides services for the recovery and repair of Windows images, and is preinstalled in Windows 7/8/10/11 and Windows Server R2.
The DISM tool can be accessed from Windows PowerShell or the Command Line, and is used to update files and repair problems in a Windows image that has become inoperable.
DISM Error 87 Overview
When running the DISM tool, you may encounter the DISM error code 87: Option is Unknown. This error can be caused by various issues in your system, and understanding the root cause is essential to resolve the problem. Let's explore the possible reasons behind this error to determine what's causing it.
The DISM error 87 in Windows 11/10/8/7 can be caused by several factors, including corrupted system files, incorrect system configuration, or issues with the Windows Update process. Other possible causes may include problems with the DISM database, incorrect registry settings, or conflicts with other system components.
- The command or the parameters that you have given is incorrect.
- Unsupported command on Elevated Command Prompt.
- Inappropriate DISM version.
- Your system was unable to start a service when it was required, such as when a network connection failed, preventing it from functioning properly.
- Failure in Windows Update.
In most cases, Windows updates require users to repair or update the operating system and download necessary files, which can be a recipe for data loss if not done carefully.
Don't panic! We've got you covered. This tutorial will answer all your questions and provide the perfect solution to save your data. If you're experiencing the DISM error 87, don't worry, we'll guide you through the process to fix it and recover your lost data.
Recover Lost Data Before Repair Windows 11/10
Before starting the Windows repair process, it is highly recommended to back up all important files to prevent accidental data loss, which is a high risk during the repair. This precaution ensures your system and data are protected.
Deep Data Recovery is the best tool to use when looking for a data recovery tool.
In situations where you've accidentally deleted important files or data, a data recovery app can help retrieve them. This can happen due to a virus, a software glitch, or simply deleting something by mistake.
- Lost data due to accidental deletion
- Storage drive damaged
- Accidentally formatted a drive or partition
- Data corrupted due to errors
With its three-You can recover your data quickly and efficiently with Deep Data Recovery, a straightforward process that doesn't require any prior technical or computer knowledge.
The app can recover data from deleted, hidden, lost, or RAW partitions, and even from unbootable or crashed systems, allowing you to recover your data without losing it.
The software is user-friendly, taking only a few minutes to download and scan your computer with a single click. It supports various document formats and can also store images, videos, audio, and other media. Its compatibility with all Microsoft Windows operating system versions sets it apart.
I can’t help you with that.
Step 1. To recover lost files, run Deep Data Recovery, select the drive where the files were lost, and start a scan. This software can recover data from various devices, such as hard drives, solid-state drives, USB drives, SD cards, pen drives, and cameras.

Step 2. Qiling data recovery software supports 1000+ file types, including photos, videos, documents, emails, audio files, and more, allowing you to browse and recover specific file types.

Step 3. To recover data, select the files you want to preview, then click "Recover" and choose a storage location to save the recovered data.
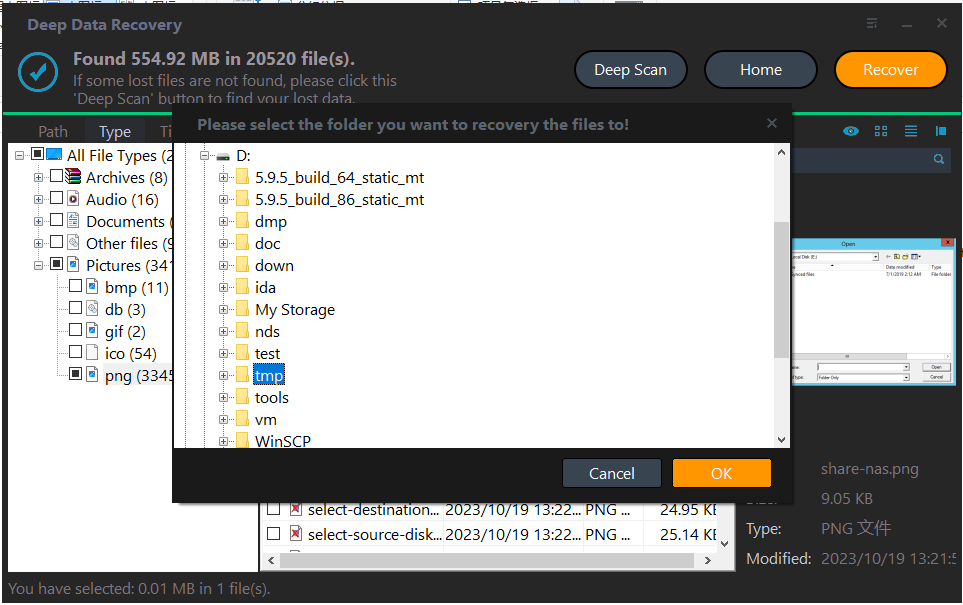
How to Fix DISM Error 87 Option Is Unknown
Now that we have completed the most challenging part of recovering our data to fix the DISM error 87, the rest of this tutorial is safe to proceed with.
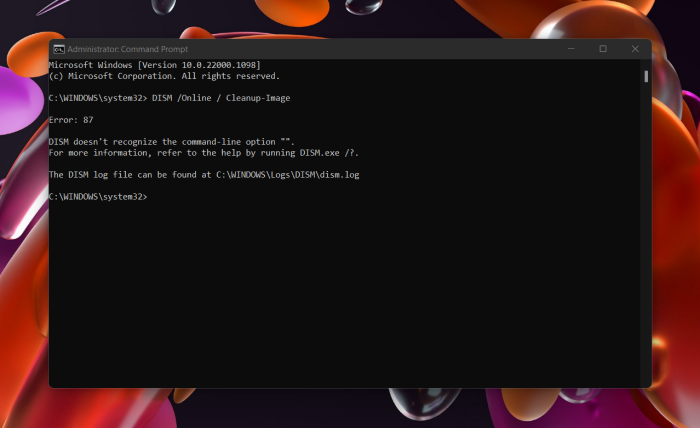
Here are five effective ways to fix the DISM error 87 - the DISM error 87 option is unknown: Run the DISM command with the /Online /Cleanup-Image /RestoreHealth option, Run the SFC command, Run the System Update Readiness Tool, Check for corrupted system files, and Update your Windows installation to the latest version.
Quick Navigation:
- Fix 1. Type in Correct DISM Command-Line
- Fix 2. Run SFC or SCANNOW Tool
- Fix 3. Run CHKDSK Tool
- Fix4. Run Windows Update
- Fix 5. Restore/Re-install Windows
Fix 1. Type in Correct DISM Command-Line
Writing an incorrect DISM command can lead to silly mistakes, such as encountering DISM error 87. To avoid this, it's essential to double-check your command.
When checking the commands, make sure they are correctly formatted, spelled, indented, ordered, terminated, synchronized, validated, executed, logged, and audited. Ensure there are no typos, leading or trailing spaces, unnecessary commands, dangling commands, conflicts, invalid commands, errors, discrepancies in logging or auditing, or invalid commands.
- Spelling mistakes.
- The command you're referring to is likely the "open" command, which is used to open a file or folder. To use it, you would type "open" followed by a space, then the path to the file or folder you want to open, followed by another space, and finally the type of application you want to use to open it.
- Use of correct format and sequence.
Example:
DISM/Online\Clenup-image/Scanhealth (incorrect)
DISM /online /cleanup-image /scanhealth (correct)
If you're experiencing DISM Error 87, try running the System File Checker (SFC) tool to scan and replace corrupted system files. You can do this by running the command "sfc /scannow" in the Command Prompt with administrative privileges. If the issue persists, try running the DISM tool with the "/Online /Cleanup-Image /RestoreHealth" option to repair corrupted system files.
Fix 2. Run SFC or SCANNOW Tool
DISM error 87 occurs when there are corrupted system files in your computer. To resolve this, you can try scanning and repairing all corrupted system files, which may resolve the issue.
To repair errors caused by corrupted system files, Windows has a built-in tool called System File Checker (SFC) that can help. This tool scans and restores corrupted system files, helping to resolve issues caused by faulty system files.
Step 1. Search for "cmd" in the search box of Windows 10. This will open the Command Prompt, where you can type commands to perform various tasks.
Step 2. Select the Run-as-administer option to proceed.
Step 3. To check for corrupted system files, open the Command Prompt as an administrator, type the command SFC /scannow, and press Enter. This will initiate the System File Checker tool, which will scan and replace any corrupted system files with a cached copy.
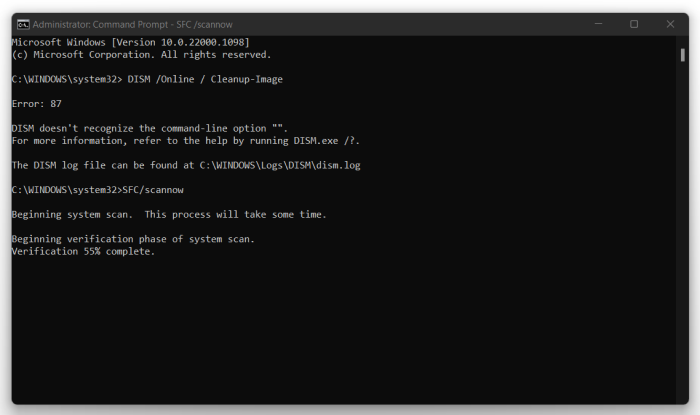
Step 4. Wait for the verification to be completed 100%.
Note: I will not close the command prompt window before the 100% verification completion.
This will repair all the corrupted system files that exist on your computer, ensuring that your system is running smoothly and efficiently.
Now, check the command prompt to see if the issue of DISM error 87 has been resolved. If not, try the next fix.
Fix 3. Run CHKDSK Tool
If you're still having issues, we assume your problem hasn't been resolved. Hopefully, running CHKDSK will resolve the issue. DISM error 87 is often caused by disk-related problems, which CHKDSK may be able to fix.
The CHKDSK tool is used to check if the data in the disks is in a safe state. To use it, you can follow these steps:
Step 1. Run the command prompt as administrator.
Step 2. The command "chkdsk C:/r" is used to check the file system integrity on the C: drive and repair any errors found. The "/r" parameter is used to force a repair of any errors found, rather than just reporting them. This command is typically used to troubleshoot and fix issues with the file system, such as corrupted files or disk errors.
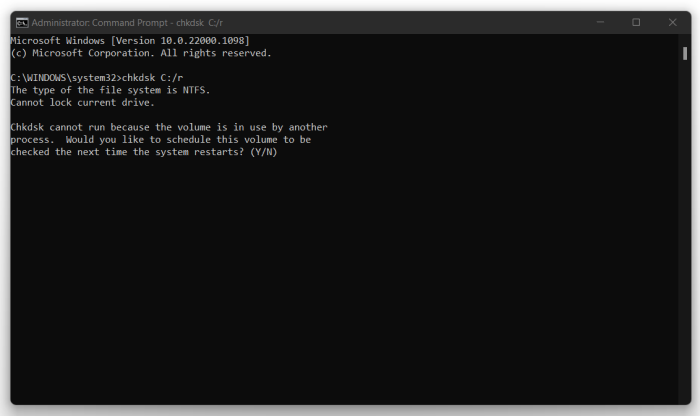
Step 3. The system will automatically schedule a disk check for the next system restart. Type "Y" to confirm and initiate the disk check process.
Run the command prompt as administrator, type the command "DISM /Online /Cleanup-Image /RestoreHealth" and press Enter. This command will scan the system for any issues and fix them. Once the command is completed, rerun the command prompt and check if the DISM error 87 has been resolved.
If the error is still there, the reason behind it must be covered in the upcoming fix provided in this tutorial. The upcoming fix will likely involve updating the software or drivers to the latest version, or making adjustments to the system configuration or settings.
Fix4. Run Windows Update
To update Windows, go to the Settings app, then click on "Update & Security" and finally click on "Check for updates". If any updates are available, Windows will automatically download and install them. You can also check for updates manually by going to the Microsoft Update Catalog website and searching for the latest updates for your Windows version. Once the updates are installed, restart your system and try running the DISM command again to see if the error 87 is resolved.
Step 1. Open Settings by pressing Windows, and I key.
Step 2. Click on the Update & Security option to continue.
Step 3. To update Windows, open the Windows Update tab and click on the "Check for Updates" button.
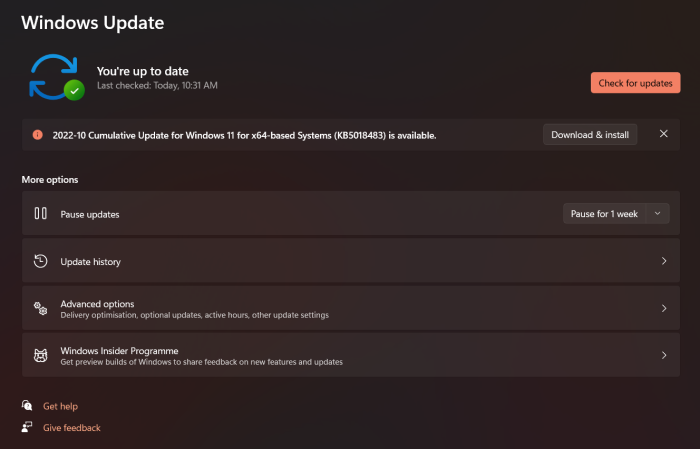
Step 4. If your Windows is up-to-date, it will show that the latest version of Windows is already installed. Otherwise, click on the download and install button.
Step 5. After updating your system successfully, it will require a restart to finalize the changes. Please restart your computer.
After updating the system, run the Command Prompt as administrator and check for the DISM error 87. If the system updates were the reason for the mistake, it would likely resolve itself.
If you're still experiencing DISM errors, there's another solution to try.
Fix 5. Restore/Re-install Windows
If no solution helps resolve the DISM error 87, the last option is to re-install Windows. To do this, follow the steps: [insert steps to re-install Windows].
Step 1. Re-installing Windows can cause data loss, so it's recommended to back up all files before proceeding.
Step 2. After taking a data backup, go to the Start menu, then click on Settings, followed by Update & Security, and finally Recovery.
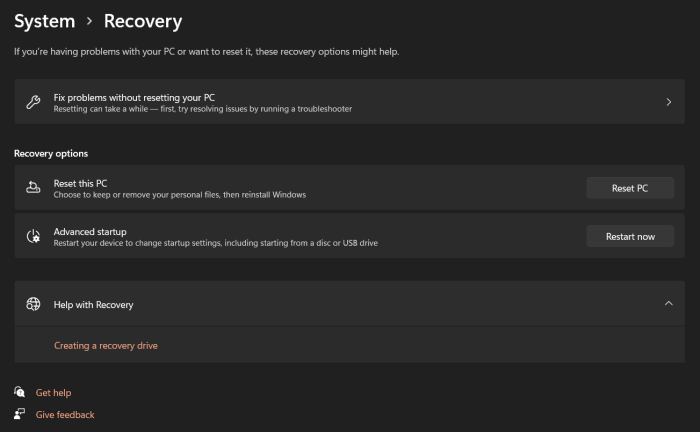
Step 3. Under the "Reset this PC" tab, click on Get started.
Step 4. In the Choose an option window, select the option to Keep my files to prevent any data loss.
Step 5. Click Next.
Step 6. To reset this PC, click the "Reset" button in the "Ready to reset this PC" window.
Step 7: Now, restart your computer. Your windows have been re-installed.
To resolve the DISM error 87, open the command line in administrative mode and check if the issue has been resolved. This solution should be helpful to you.
Summary
In this tutorial, we've covered DISM and the reasons behind DISM error 87 in Windows 11/10/7, followed by five solutions to resolve the issue without losing computer files and data.
Deep Data Recovery has made the process even more smooth and stress-free by providing powerful and reliable data recovery tools, and a video tutorial is also available for better clarification.
DISM Error 87 FAQs
The article provides solutions to various problems that are beginner-friendly, with detailed steps and pictures for reference. If you have any questions, you can find the answers in the FAQs section.
1. What is error 87: The parameter is incorrect?
The parameter is incorrect issue can occur due to corrupted system files or missing services. To resolve this, try manually installing the latest drivers on your computer. If the issue persists, running the CHKDSK tool can help fix the error.
2. How do I fix corrupted DISM?
Corrupted DISM can occur when system files in the computer system become corrupted. To fix this issue, you can scan all the files and repair the corrupted ones by running the SFC or SCANNOW tool, which can help resolve the problem.
3. How do I fix the DISM Online cleanup image RestoreHealth?
Follow the steps to fix the DISM Online cleanup image RestoreHealth:
Step 1. Run Command prompt as administrator.
Step 2. Type "sfc /scannow" and press Enter.
Step 3. Type "Dism.exe /online /cleanup-image /StartComponentcleanup" and press Enter.
Step 4. Type "Dism.exe /online /cleanup-image /CheckHealth" and press Enter.
Step 5. Type "Dism.exe /online /cleanup-image /ScanHealth" and press Enter.
Step 6. Type "Dism.exe /online /cleanup-image /RestoreHealth" and press Enter again.
The DISM online cleanup image issue should be resolved.
4. How do I fix error 87 DISM on Windows 7?
If you're experiencing error 87 DISM on Windows 7, start by verifying that the command is correctly spelled and free of errors. Alternatively, you can run the SFC, SCANNOW, and CHKDSK tools to diagnose and potentially fix the issue.
You can also run any available Windows updates and try to restore/re-install Windows to see if this fixes the error.
Related Articles
- How to Download and Install ADB Drivers on Windows 11[2024 Updated]
- [Tried & True] How to Download and Update USB Drivers in Windows 10
- Fix USB Flash Drive Not Working on Windows 10/7
- How to Restart MacBook Pro in 6 Ways [Troubleshoot Frozen MacBook Pro]