How to Mount a Disk on Mac [Step-by-Step Tutorial in 2023]
Do you want to expand the storage capacity of your Mac? In that case, using an external disk is a great idea. External drives are a cost-effective way to add more space to your device. That means you now have the means to get more space for media libraries, backup files, documents, etc.
In recent days, the usage of external storage devices has increased exponentially. Mac users use external disks to get more space and enhance the system's performance. However, you need to mount a disk on Mac before using it.

You might have the question of why there is a need to mount the external disk. Mounting the external drive means the system offers a mount point to the drive to read and gain access to information.
If the external hard drive not mounting on Mac, you cannot use the external hard drive. It is an essential step that allows the system to access it. Read on to learn how to mount a disk on Mac.
Preparation Before Mount a Disk on Mac
Is Mac storage not updating after deleting? If so, consider using external disks to get more storage on Mac! Several things need to be considered before you mount the disk on Mac, including:
- Check the disk for errors: Firstly, you need to see if there are any errors within the disk. A corrupted disk can disrupt the whole system, so open Disk Utility to check the disk first.
- Eject the disk if it's already mounted: If the external hard drive files not showing on Mac, you need to eject it. After it's done, you can connect it to the system again to fix the problem.
- Connect the disk to the Mac: The last step involves connecting the external disk to your Mac and mounting it. Ensure the external disk can be detected normally on Mac.
How to Mount a Disk on Mac [3 Tested Mothods]
After checking and ensuring the disk works normally, you can follow the 3 tested methods to mount a disk on Mac. Let's take a look:
1. Mount a Drive Using Disk Utility
One of the easiest ways is using Disk Utility to mount a disk on Mac. Here are the steps to follow:
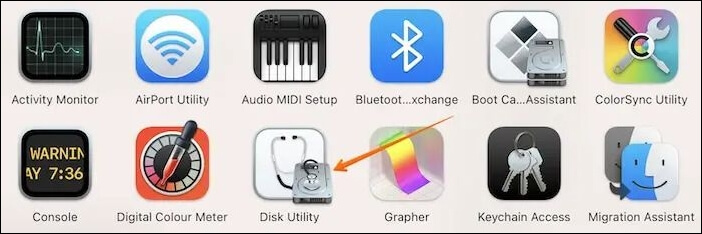
Step 1. Open "Disk Utility". You should follow "Applications>Utlities>Disk Utility" or boot Mac into Disk Utility.
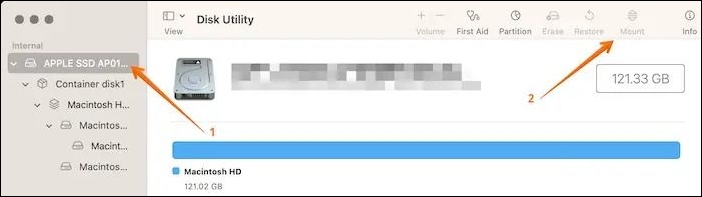
Step 2. Choose the volume you wish to mount.
Step 3. Select the "Mount" button.
When unmounting a disk on your Mac, many issues may occur, and one of the common problems is Mac error 69888.
Couldn't Unmount Disk 69888 on Mac | Top 6 Methods
If you encounter the error: couldn't unmount disk 69888 on your MacBook Pro/Air, it implies you're trying to partition, reformat, or delete a disk. Read more >>
2. Force Mount an External Drive Using Terminal Command
Did you know you can use the Terminal command to force mount a disk on Mac? Check out these steps you can follow:
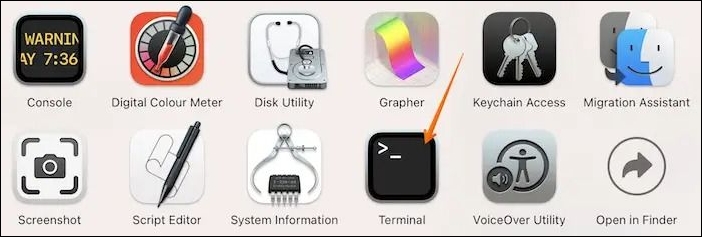
Step 1. Open Terminal. You need to follow "Applications>Utlities>Terminal".
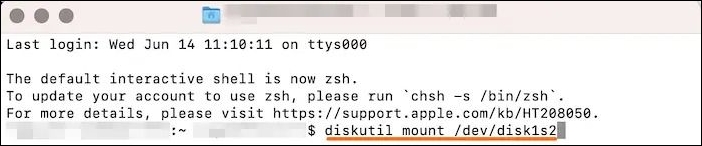
Step 2. Locate the drive you want to mount.
Step 3. Enter diskutil mount /dev/disk1s2.
Step 4. Close "Terminal".
Share this article on social media to help others learn how to mount a disk on Mac.
3. Using Finder to Mount a Disk on Mac
You can also use Mac Finder to mount a disk on Mac. Here are the steps to follow:
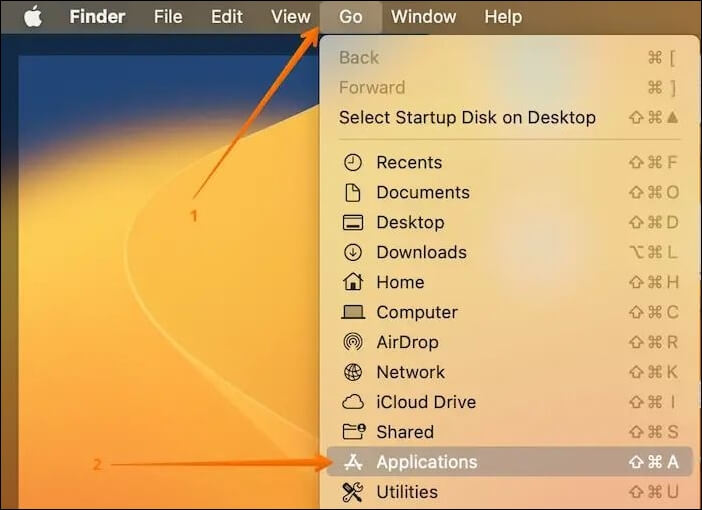
Step 1. Go to "Finder". Click on "Go" and choose "Applications" from the drop-down menu.
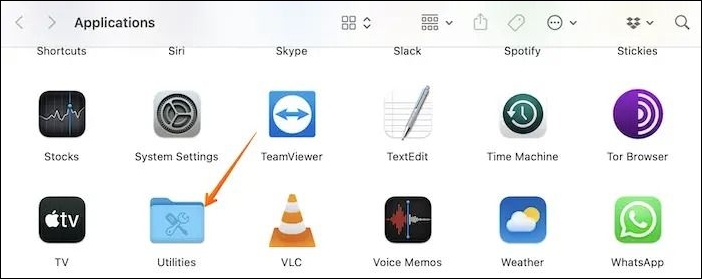
Step 2. Select "Utilities".
Step 3. Click on "Disk Utility".
Step 4. Opt for the external drive you want to mount.
Step 5. Select the "Mount" button.
If the hard drive you want to mount doesn't show up in Finder, you can refer to the proven ways in the article below, which works for internal/external hard drives.
Can't Mount Disk on Mac: Possible Causes
Various causes can lead to hard drives not mounting on Mac. Check these out here:
🚫Fault USB cable: Sometimes, lost or damaged USB cables can interfere with mounting the disk on a Mac. In that case, you can use another cable and see if the issue is resolved.
⚠️Damaged USB port: In some cases, damage to the USB port can lead to issues with the disk mounting. As a result USB flash drive not showing up on Mac. The ideal solution is to connect another external device and see if it mounts appropriately.
💽Corrupted disks: Viruses can corrupt disks, making it impossible for the system to gain access to it. In that case, repairing the disk or using another is the best solution.
😫Incompatible macOS version: It is essential to check if your macOS version doesn't support your disks. You must check and ensure the macOS version is compatible with external storage support.
⚙️Wrong settings: Disabling the settings or modification can make users unable to locate the external disk. You need to check the System Preferences/Settings and try to mount the disk again.
Can I Restore Data from Unmounted Drive on Mac
Have you experienced a hard disk failure? Are you anxious about data loss? We understand the fear and thus are eager to present the perfect solution. The Deep Data Recovery is a professional data recovery software. You can use this tool to recover external hard drives unmounted Mac.
The Deep Data Recovery for Mac is a reliable data recovery tool that helps users restore data. Irrespective of the data type, audio, video, image, documents, etc., can be retrieved. Besides, It supports data recovery from HDD, SSD, fusion drive, etc.
To use the Qiling Mac data recovery software, here are the steps to follow:
Step 1. Search for lost files
Correctly connect your external hard drive to your Mac. Launch Deep Data Recovery for Mac, and select the external hard drive. Then, click "Search for lost files" to find lost/deleted files on your external devices.
Note: Before data recovery, you'd better click "Disk Backup" from the left sidebar to create a backup of your external hard drive to avoid further data loss. After backing up the external hard drive, the software can recover data from your external hard drive's backup, and you can remove the external hard drive and use it again.

Step 2. Filter and find lost files
After the scan, all file types will be presented in the left panel. Select the file type to find wanted files on your external devices.

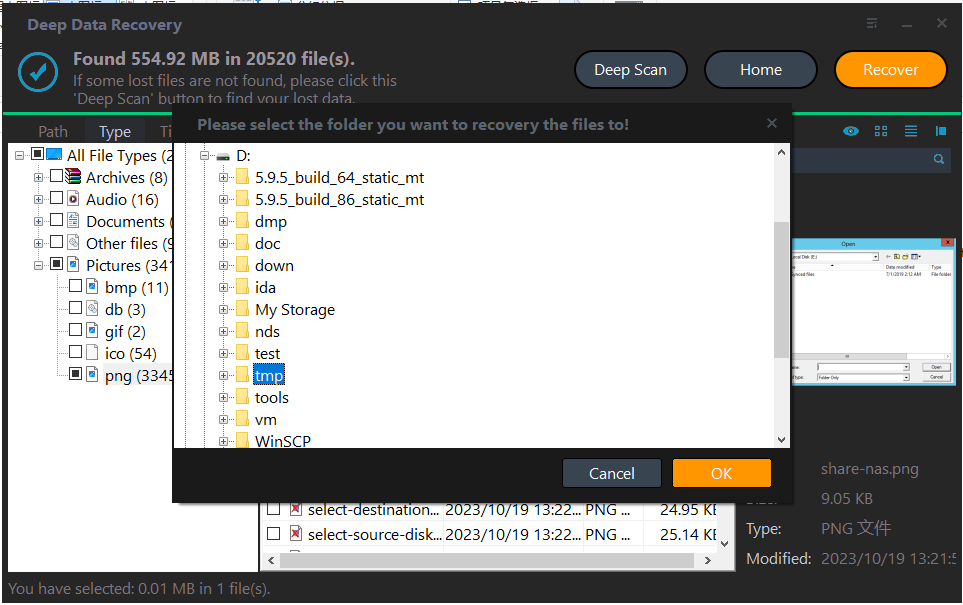
Step 3. Preview and recover
Click the file and preview it. Then, select the files you want to recover and click the "Recover" button. You can save your data to local and cloud drives.
Conclusion
Are you finding it difficult to mount a disk on Mac? There are three different ways you can do so. These include using Disk Utility, Finder, and the Terminal command.
However, data loss can also occur while mounting the Mac disk. Here, using professional data recovery software is an excellent idea. Check out the Deep Data Recovery for Mac. It is a reliable and user-friendly tool that aids users in hassle-free data restoration. You can use it to retrieve different types of data.
How to Mount a Disk on Mac FAQs
To learn more about mounting a disk on Mac, know more about these questions and answers:
1. Can Mac read NTFS external drive?
Yes, NTFS external hard drive read only on Mac, which means you can read but can't write on NTFS hard drives on your Mac. Irrespective of the macOS version you use, you can read NTFS files.
2. How do I force a disk to mount on a Mac?
To force a disk to mount on a Mac, follow these steps below:
Step 1. Open "Terminal" and locate the drive you want to mount.
Step 2. Enter diskutil mount /dev/disk1s2 command in the Terminal app window.
3. Why can't I mount a disk on my Mac?
Various reasons can explain why the mounting is not possible on your Mac. These include faulty USB cables, damaged USB ports, wrong settings, damage to hard disks, etc.
4. What does it mean to mount a disk on MacBook?
Mounting a disk on MacBook means your Mac now has permission to read and gain access to information on the external disk. Now, you can use it as an extra storage device.
5. How do you mount a disk?
There are various ways you can mount a disk. The most popular method is to use Disk Utility. Launch the "Disk Utility" app and choose the volume you wish to mount. Select the "Mount" button.
Related Articles
- 4 Ways | How to Stop Windows 11 Update Pending Restart
- Any Tools to Check SD/MicroSD Cards Health? Sure!
- 2 Ways to Reinstall Windows 10 [Full Guide]
- How Sonoma Game Mode Boosts Your Mac Performance