How to Fix Raspberry Pi Not Booting [4 Efficient Solutions]
The Raspberry Pi is a single-board computer that can be used as a desktop, allowing people to access basic computing needs and learn to program at a low cost.
The Raspberry Pi is a bare computer that requires an operating system (OS) like Raspberry Pi (previously called Raspbian) to be installed in order to boot, but this process can sometimes be tricky and may result in the device not booting.
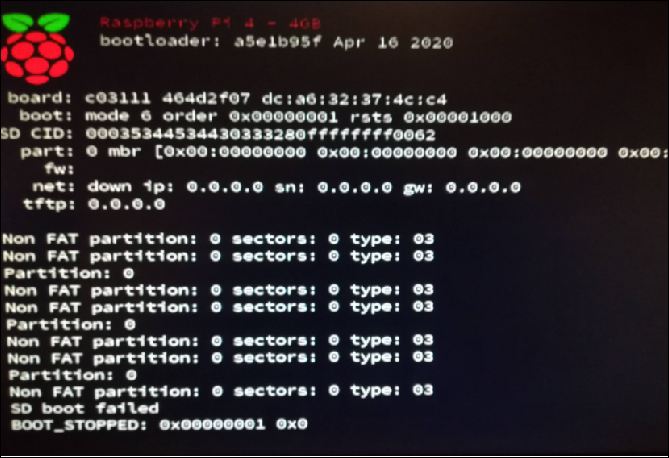
If your Raspberry Pi won't boot, don't worry! This article is here to help you troubleshoot the issue and get your device up and running. We'll explore the possible reasons behind the non-booting problem and provide you with practical solutions to fix it, so you can get back to enjoying your Raspberry Pi experience.
What Caused Raspberry Pi Not Booting Error
The Raspberry Pi 4 Model B can be a bit finicky, with some users experiencing booting issues, possibly due to various factors, making it a bit tricky to use.
The main cause of the issue can be determined by checking the activity LEDs, where a red light indicates power and a green light indicates SD card activity, with the most common reasons for issues being the SD card, power supply, and loose connections.
1. Bad power. If the red (PWR) LED is not on, it means your device is not connected to a power supply. To fix this, ensure you're using the correct cable for your device: a USB-C cable for Raspberry Pi 4 (5.1V at 3A) or a Micro USB cable for Raspberry Pi 3 (5.1V at 2.5A).
2. HDMI cable issues. If your Raspberry Pi isn't turning on, ensure the HDMI cable is securely connected to the correct port (HDMI 0) on the Pi.
3. Hardware problem. If your Raspberry Pi won't boot, check that the SD card is compatible and not damaged, and that all cables are securely connected. Ensure the hardware is in good working condition before powering on the device.
4. Incompatible operating system The OS you're using might be incompatible with your Raspberry Pi model, so double-check the OS on your SD card before proceeding.
5. Corrupted files on SD card. The SD card may be corrupted or the files on it are incompatible with the Raspberry Pi, causing the ACT LED to remain inactive and preventing the boot process.
If you've identified the error affecting your Pi board, you can quickly resolve the issue by following the steps outlined in the article. This will help you troubleshoot and fix the problem with ease.
How to Fix Raspberry Pi Not Booting Error
If your Raspberry Pi doesn't boot, try the following fixes to get around all errors and help it boot successfully: ensure the power supply is sufficient, check for loose connections, verify that the SD card is properly seated and accessible, and update the firmware if necessary. If the issue persists, try a different power supply, clean the pins and contacts, and check for any signs of physical damage.
- Fix 1. Check Power Supply and HDMI Cable
- Fix 2. Perform Boot Repair
- Fix 3. Format Raspberry Pi SD Card and Reinstall OS
- Fix 4. Check SD Card Errors and Fix It
- Fix 5. Check Hardware Problem
Try the methods one by one to fix your Raspberry Pi. First, check the power supply and ensure it's properly connected.
Fix 1. Check the Power Supply and HDMI Cable
To ensure your Raspberry Pi works properly, use the correct power supply and HDMI cable. The Raspberry Pi 4 specifically requires a USB-C cable that provides 5.1V at 3A, and the HDMI cable should be connected to the HDMI 0 port on the board.
1. Check the power cord and make sure it's securely plugged into both the device and the wall outlet.
Step 1. Use the official Raspberry Pi PSU to avoid compatibility issues, or if using a third-party power source, ensure it delivers 5.1V at 3A.
Step 2. If you're experiencing issues with your device's battery life, try swapping the USB-C or Micro USB cable with a new one to see if the problem persists. This simple test can help you determine if the issue lies with the cable, which can be a common culprit.
Step 3. Check if your HDMI cable is securely plugged into the HDMI 0 port and not loose, and consider replacing it with a new one to rule out any damage or issues with the cable itself.
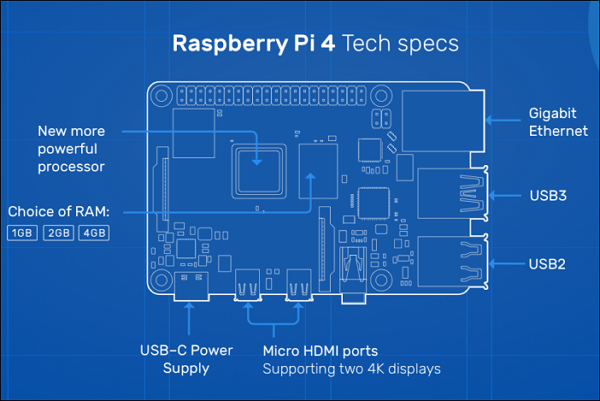
1. Check the power supply: Ensure the power supply unit (PSU) is functioning correctly and providing enough power to the system.
Fix 2. Perform a Boot Repair
Qiling Disk Master's "Boot Repair" feature can detect and repair various boot issues, including common problems like black, blue, and white screens, making it effortless for users to resolve these issues.
1. Download the Raspberry Pi Imager tool from the official Raspberry Pi website.
Step 1. The steps to create a bootable media using Qiling Disk Master are as follows: Connect the external drive/USB to your computer and launch Qiling Disk Master. Then, navigate to the "Bootable Media" section and click on the "Create bootable media" option. This will initiate the process of creating a bootable media on the external drive/USB.

Step 2. Insert a USB drive or CD/DVD and select it to create a Windows installation media. You can also burn the Windows ISO file to the storage media.
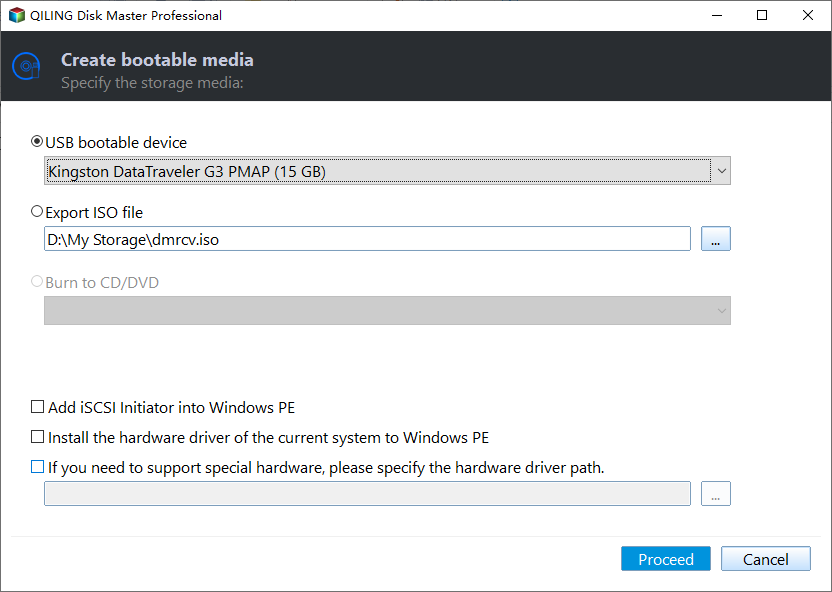
Step 3. Connect a bootable drive to a new computer, boot from it by pressing F2/Del to enter the BIOS, set the drive as the boot disk, and exit the BIOS by pressing F10.
Step 4. Boot the computer again and enter the WinPE interface. Then, open Qiling Disk Master, click "Tools and utilities", and select "Fix Boot".
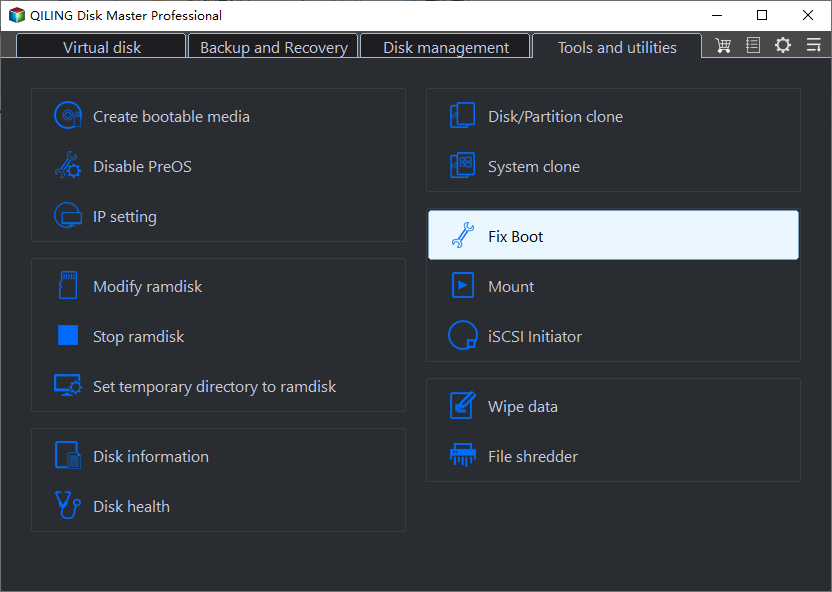
Step 5: Select the system you want to repair and click "Proceed".
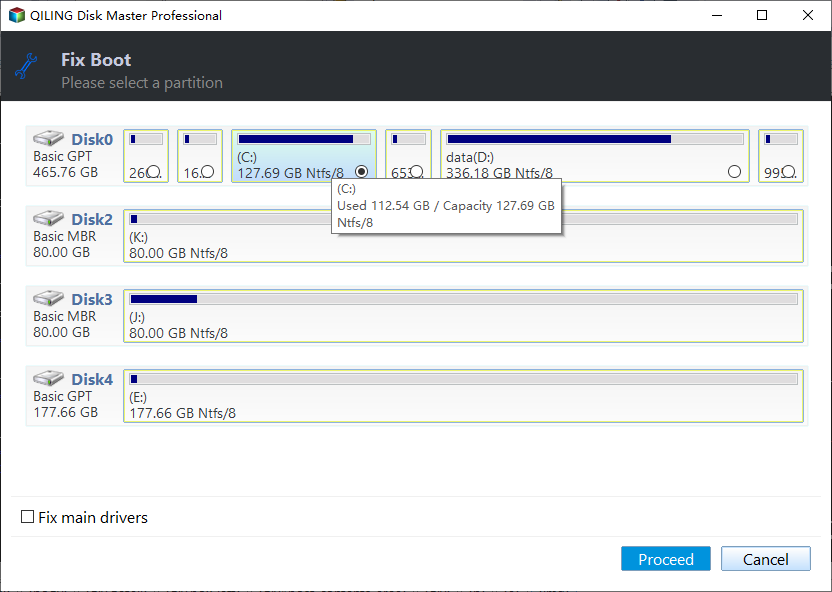
Step 6. Wait a moment, and you will receive an alert that the system has been successfully repaired. Click "Finish" to complete the boot repair process.
Fix 3. Format Raspberry Pi SD Card and Reinstall OS
Common errors when setting up your Raspberry Pi 4 include issues with the SD card, such as it not being formatted properly or having an incompatible operating system. To avoid this, ensure that your SD card is formatted in one of the three major formats compatible with the Pi: AT16, FAT32, or exFAT. This will allow you to successfully install the OS and get your Raspberry Pi up and running.
You can use a third-To prepare your SD card for your Raspberry Pi, you can use a party tool like Qiling Disk Master. This tool allows you to format your SD drive with any file system, such as FAT32 or exFAT, making it compatible with your Raspberry Pi. Additionally, Qiling Disk Master can also help you check and fix partitions on your SD card, resolving any partition issues that may be hindering its functionality.
To format your SD card, follow the steps below:
Step 1. Find your SD card, right-click the partition you want to format, and select "Format".
Step 2. Set a new partition label, file system, and cluster size to the selected partition.
Step 3. Click the "Proceed" to start formatting your SD card.
Step 4. Click "Yes" on the pop-up window to continue.
Qiling Disk Master is a top-notch SD card formatter that supports FAT32, making it easy for even beginners to master with this user-friendly tool.
Further Reading: What Is the Best Rasberry SD Card Format
Once you've formatted your SD card correctly, you can install a compatible operating system (OS) on your Raspberry Pi 4. The following are the compatible OS options for your device.
- Raspberry Pi OS (formerly Raspbian)
- Ubuntu for Raspberry Pi
- RISC OS
- LineageOS
- Chromium OS
- Windows 10 IoT
- LibreElec
- Manjaro
- Arch Linux and many others
Now, reinstall the OS by following the process below:
Step 1. Download, install, and run Raspberry Pi Imager on your computer:www.raspberrypi.com/software/
Step 2. You'll have two options - "Choose OS" and "Choose SD Card" - to select the operating system and storage device for your Raspberry Pi.
Step 3. Select the operating system you want to install on your device, such as Windows, Linux, or macOS, and choose the SD card where you want to install it.
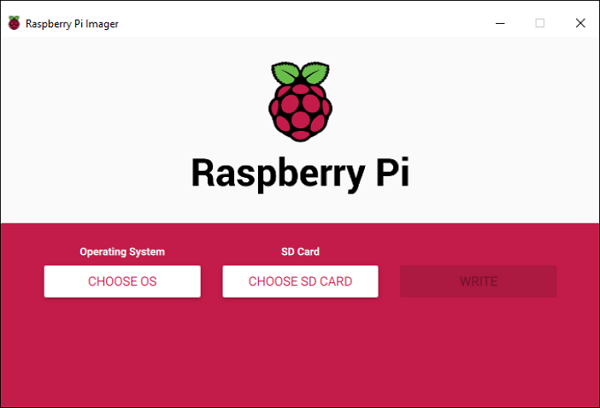
Step 4. Now, hit the "Write" button, and it will install the OS on your SD card, taking around 3-5 minutes to complete the installation process.
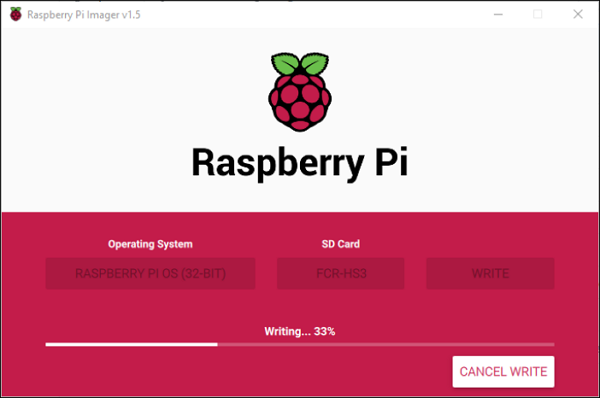
Step 5. To resolve the Raspberry Pi booting issue, ensure the microSD card is properly formatted, then insert it into the device, and power it on to verify the problem has been resolved.
Extended Reading: Install Raspberry Pi Operating System on SD Card
1) Check that your browser is updated to the latest version. 2) Check that your browser is set to allow cookies.
Fix 4. Check SD Card Errors and Fix It
If your SD card has random errors or issues that might prevent your Raspberry Pi from booting, you can use Qiling Disk Master to fix them. This tool can check the hard drive's health and identify bad sectors, providing a quick solution to resolve the problems.
The software uses the Check file system function to scan the SD card for errors, allowing you to quickly identify and fix file system errors and bad sectors, thereby resolving any issues with the SD card.
Step 1. Right-click the target partition that has a problem.
Step 2. Choose "Advanced" > "Check File System".
Step 3. Confirm if you want to hide the partition or not.
Step 4. In the Check File System window, select the "Fix the error on the disk" option to correct the file system error.
Step 5. Click "Proceed" to check errors on your partition.
Qiling Disk Master is a powerful tool that allows you to manage your Raspberry Pi SD card with ease. It offers a range of features that make it a valuable addition to your toolkit.
- Clone Raspberry Pi SD Card
- Raspberry Pi SD Card Benchmark
- Format SD Card for Raspberry Pi
- Fix corrupted Raspberry Pi SD card
This professional disk management tool can easily fix SD card errors, allowing you to access your data without any issues.
Use the fix below if this doesn't help you use your Raspberry Pi without booting errors.
Fix 5. Check Hardware Problem
Check for hardware errors and faulty accessories like monitors, keyboards, and mice that may be preventing your Raspberry Pi from booting up.
Ensure you unplug and replug everything to check for any errors. If issues persist, contact the manufacturer for further support and consider other solutions if damaged hardware is suspected.
Conclusion
Raspberry Pi not booting is a common issue, but it can be fixed quickly. One simple solution is to reinstall the OS, which resets everything to default and clears any bugs, allowing you to use your device without errors.
Formatting your SD card and fixing any underlying problems using a third-party tool like Qiling Disk Master is easy. You can download and install the software on your computer in minutes, which should help fix your Raspberry Pi errors.
FAQs About Raspberry Pi Not Booting
If you're still experiencing issues with your Raspberry Pi not booting, don't worry - the FAQs below have got you covered. They provide answers to common questions and concerns, offering a quick and easy solution to get your Pi up and running again.
1. Why is my Raspberry Pi's green light not flashing?
If the green light on your Raspberry Pi's ACT LED isn't flashing, it could be a sign that your SD card isn't being read, or the poly fuse (a resettable fuse) might have blown. To resolve this, you can try formatting your SD card and reinstalling the OS. Additionally, ensure your power supply is working correctly and reset the fuse if necessary. This should help you get your Raspberry Pi up and running again.
2. How to boot up Raspberry Pi?
1. Connect the Raspberry Pi to a monitor, keyboard, and power supply.
- Insert the micro SD card into the device and ensure that the operating system has been installed on it.
- Connect the mouse, keyboard, and display.
- Now, connect the network cable and the power cable.
- Turn on the power supply.
- Follow the on-screen instructions and set up your Raspberry Pi.
3. What causes BIOS boot failure?
If you're getting a BIOS boot failure on your Raspberry Pi, it's likely because there's no operating system installed, or the OS on your SD card is incompatible. Make sure to install the correct OS on your SD card before booting the Pi.
Related Articles
- [All Methods to Fix] Selected Boot Image Did Not Authenticate
- Monster Hunter Rise Save File Location [Detailed Information]
- Do You Have to Format A New SD Card? Latest Tips!
- How to Check SSD Health on Windows 10 via CMD [2023 New Guide]