Solve System Reserved Partition on Wrong Drive: Everything You Should Know
The System Reserved partition on the wrong drive occurs when the system partition and the system reserved partition are not on the same disk, which can be caused by a faulty installation process or a disk configuration issue, leading to system instability and errors. This can be resolved by relocating the System Reserved partition to the same disk as the system partition, typically by using the built-in Disk Management tool or a third-party partition manager.
What Is a System Reserved Partition
The reserved system partition is created to store boot files, and its type depends on the partitioning scheme used: Legacy BIOS and MBR for a Microsoft system reserved partition, and UEFI BIOS and GPT for an EFI system partition.
These two system partitions are reserved because they contain the boot files needed to load Windows, and their absence prevents the computer from starting.
Summarizing, there are two parts:
- Boot Manager and Boot Configuration Data
- The startup files used for BitLocker Drive Encryption
Why Is the System Reserved Partition on the Wrong Drive
When Windows is installed on a blank disc, it creates a unique partition called the System Reserved partition, which stores the Boot Configuration Database, Boot Manager Code, Windows Recovery Environment, and startup items that BitLocker requires.
The System Reserved partition is a small, hidden partition on a computer's hard drive that does not have a drive letter, making it only visible through Disk Management or similar programs. It shares the same disk as the system partition, usually the C: drive, and serves a specific purpose in the computer's operation.
Some users find that after installing Windows, the system partition and the reserved system partition are on different disks, which can happen if the PC has multiple hard drives. This issue arises during the installation process, and to resolve it, you can follow the steps outlined in the rest of the text to handle the Windows System Reserved partition on the incorrect drive.
How to Fix System Reserved Partition on Wrong Drive
You can move the System Reserved partition to another drive, and there are different methods to do so. This partition is usually located on the same drive as the operating system and contains essential system files. By relocating it, you can free up space on your primary drive and improve overall system performance.
Fix 1. Move System Reserved Partition via Qiling Disk Master
Fix 2. Move System Reserved Partition via Disk Management
Fix 1. Move System Reserved Partition via Qiling Disk Master
Qiling Disk Master is a professional disk management software that allows users to create, replicate, clone, delete, and move partitions, performing all types of operations possible with disks.
You can use the partition management program Qiling Disk Master to move the System Reserved partition to the same disk as the system drive. This can be done using the Clone feature of the software, which allows you to quickly move the system reserved partition to another drive.
Download it and follow the steps below to use it1
Step 1. To clone a partition, select "Clone" from the left menu and click on "Clone Partition" followed by "Next".
Step 2. Select the source partition and click "Next".
Step 3. Choose your the target partition and click "Next "to continue.
- When cloning a partition to an existing partition, it's essential to transfer or back up the data first to prevent it from being overwritten during the cloning process. This precaution ensures that your important files and data remain safe and intact.
- Check warning message and confirm "Yes".
Step 4. Click Start and wait for the clone to complete.
Fix 2. Move System Reserved Partition via Disk Management
It's possible to manually copy the system's reserved partition to the system drive, replacing the old partition, but this comes with risks and requires taking precautionary measures to avoid potential issues.
To avoid operation failures, create a system repair disk first and back up all essential data on the PC, then you can safely move the cloud and restore them.
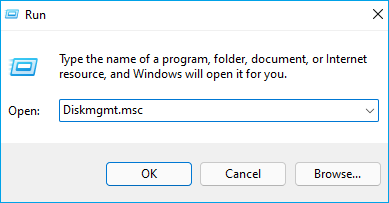
Step 1. Open Disk Management:
To open the Disk Management window, press the Windows key + R to open Run, type `diskmgmt.msc` into the Open box, and press OK. This will open the Disk Management window.
Step 2. Create New Simple Volume:
To place the System Reserved partition on a specific disk, locate the disk where you want to place it and look for an unallocated block. Right-click on the unallocated block and select the New Simple Volume option.
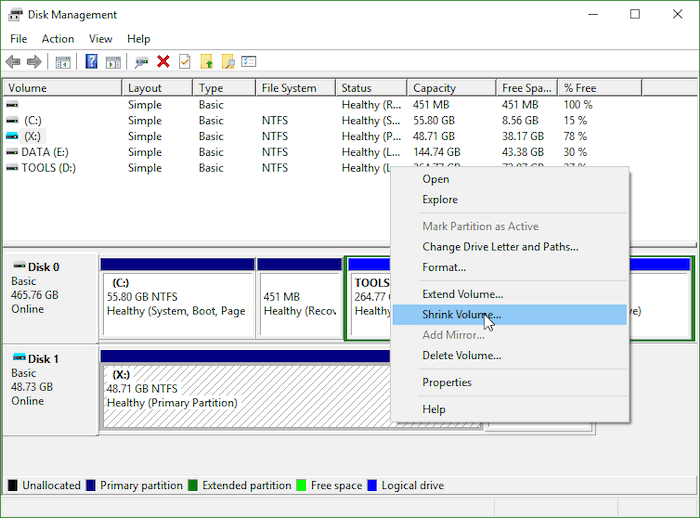
Note: If there isn't any free space, you can create some by deleting or decreasing the size of an existing partition by right-clicking on the drive you want to shrink and choosing the Shrink volume option.
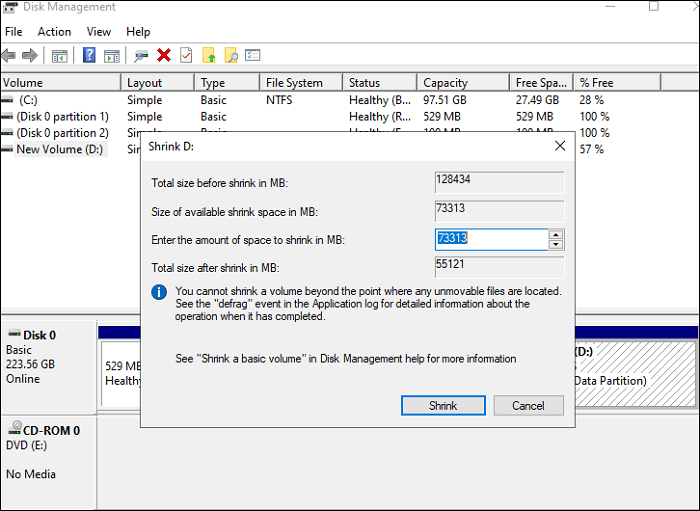
On the new window, enter the amount of space to shrink in MB, then press Shrink.
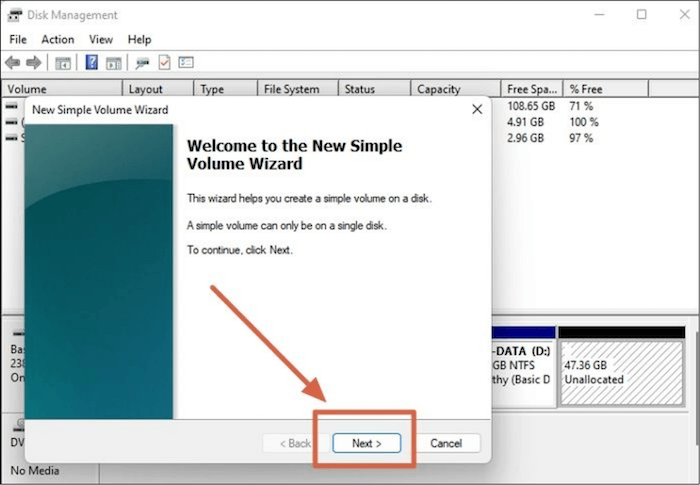
Step 3. Open New Simple Volume Wizard:
After clicking on New Simple Volume, the New Simple Volume Wizard window will open. Click the Next button.
Step 4. Assign Drive Letter
To create a new volume, click the "Next" button on the "Where do you want to place the drive letter?" window, select a drive letter from the dropdown menu, and click "Next". Then, click "Finish" to create the new volume.
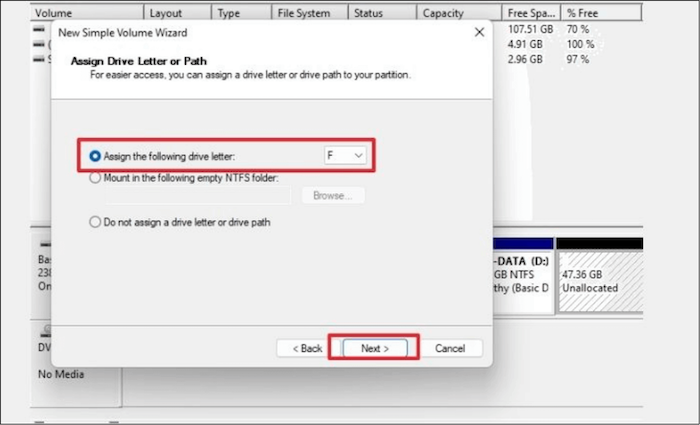
Step 5. Transfer the files to Boot
Transfer all data from the previous System Reserved partition to the new one. Ensure the new partition contains the Boot folder, bootmgr, and BOOTSECT.BAK. Then, make the new System Reserved partition bootable by removing its drive letter.
Step 6. On disc 1, remove the drive letter from the system-reserved partition and assign the newly created partition as System Reserved.
Step 7. 1. Delete the drive letter of the System Reserved partition by right-clicking on it in Disk Management and selecting 'Change Drive Letter and Paths.
Step 8. Restart the PC
If your computer can't boot up, try running the Startup Repair using a Windows system repair disk, but if it can boot up, you can safely delete the old System Reserved partition.
Conclusion
If you find that the System Reserved partition is on the wrong drive, you can transfer it to the desired drive using the techniques described in this article. This involves copying the system-reserved partition from the system drive and then deleting the original partition, effectively moving it to the new location.
To avoid operation failures or complications, it's recommended to create a system repair disk first. This is because the System Reserved Partition contains files essential for the system's booting process. While having the System Reserved Partition on the wrong drive is a common issue, it's generally not advisable to delete the initially reserved partition, as this could lead to further confusion and potentially cause more problems.
I hope you enjoyed the tutorial. Please leave your thoughts in the comments section and share the article with your friends if you found it helpful!
FAQ of System Reserved Partition on Wrong Drive
What is the System Reserved Partition on Wrong Drive? The System Reserved Partition on Wrong Drive is a partition that contains system files and is located on a drive other than the drive where the operating system is installed.
1. Can you move the system-reserved partition to another drive?
To move the system-reserved partition to another disk, use Backup and Restore to relocate it to a separate drive.
2. Why is the system reserved on a different drive?
If the system-A reserved partition is missing, which is necessary for booting Windows, so you need to relocate the system-reserved partition to another disk.
3. How do I move the system-reserved partition to a different partition?
You can quickly copy and move the system-reserved partition to another drive or disk with Qiling Disk Master Free.
Step 1. Copy files from another place, or even delete them.
Step 2. Launch Qiling Disk Master.
Step 3. Clone a partition, disk, or SD card to a smaller storage device using the Clone Partition feature. This feature allows you to copy data from a larger HDD to a smaller SSD, or clone an SD card, among other uses.
Related Articles
- How to Create macOS Ventura Bootable USB Installer [macOS Ventura Tips]
- How to Fix Hogwarts Legacy Not Saving [For Steam/PS5/Xbox Players]
- What Does Shrink Volume Do? How to Safely Shrink Volume?
- There Was an Error Connecting to the Apple ID Server on MacBook [Fixed👍]