How to Fix Windows 11 KB5026446 Update Error Efficiently
If you're experiencing issues with Windows 11 updates, such as the KB5026446 update failing to install or getting stuck downloading, it's likely due to a corrupted system file, outdated drivers, or a problem with the Windows Update service. To resolve this, try restarting your computer, running the System File Checker (SFC) tool, and checking for any outdated drivers. If the issue persists, you can also try disabling and re-enabling the Windows Update service, or resetting Windows Update components.
| ⚙️Complex Level | Low, step-by-step guide |
| ⏱️Duration | 5-10 minutes |
| 💻Applies to |
Windows 11 KB5026446 update error Windows 11 KB5026446 failed to install |
| ✏️Fixes |
|
| 🔨Causes |
System file corruption or disabled Windows Update can cause issues with Windows Defender. To resolve this, try running the System File Checker (SFC) tool or enabling Windows Update. If the issue persists, consider reinstalling Windows Defender. Additionally, ensure that Windows Update is enabled and running a full scan with the tool to repair any corrupted system files. If you're still experiencing issues, you may need to reinstall Windows Defender.
|
Why Windows 11 KB5026446 Update Error Appears
There are several reasons why Windows 11 won't update, including issues with the Windows Update service, corrupted system files, outdated drivers, and problems with the Microsoft account. Additionally, conflicts with other software or hardware, low disk space, and internet connection problems can also prevent Windows 11 from updating. Furthermore, some users may encounter errors during the update process, such as the "0x80070002" or "0x8007000d" errors.
- 🖥️System files on the PC are corrupted.
- 🔧Windows update might be turned off somehow.
- 🧩Third-party security software such as antivirus and firewall programs are interfering with the Windows update process.
- 💡If there's not enough storage space, slow internet speed, or network issues, it can cause problems with downloading and installing Windows, as well as Windows Updates not installing or downloads stalling.
Microsoft regularly releases Windows 11 updates to users, which include the latest bug fixes, new features, and security improvements. These updates are automatically downloaded and installed via Windows Update to keep the system safe and stable. However, some users may encounter errors with specific updates, such as the KB5026446 update, highlighting the importance of learning how to troubleshoot and fix these issues.
You may also like:
Windows 11 KB5026446 Update Error Fixes
Before trying to fix the error, restart your computer and check for updates, which will refresh the operating system, clear temporary glitches, and fix common problems. If the issue persists, we can proceed with the troubleshooting steps.
Fix 1. Run Windows Update Troubleshooter
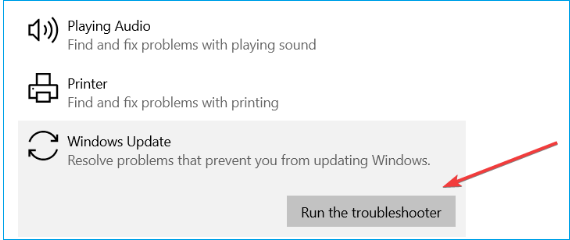
Running the Windows Update Troubleshooter, a built-in diagnostic tool developed by Microsoft, can automatically detect and fix issues with the Windows KB5026446 update on your computer. This tool can identify and resolve problems related to the update, ensuring a smooth and successful installation process. By running the troubleshooter, you can troubleshoot and resolve any issues with the update without manual intervention, saving you time and effort.
Step 1. Press Windows key + X and select Settings.
Step 2. Select the system in the left pane, and then select Troubleshooting in the right pane.
Step 3. To resolve the issue, go to the Additional Troubleshooters section and click the Run button next to Windows Update. This will initiate a scan and potentially resolve any issues preventing the Windows Update from functioning properly.
Read Also:
To fix Windows 11 update stuck at 100%, try restarting your PC, checking for updates in the Settings app, or using the Windows Update Troubleshooter. If the issue persists, disable any recently installed updates, reset Windows Update components, or run a System File Checker scan.
The Windows 11 update downloading process may get stuck at 100% when upgrading to Windows 11, but fortunately, this guide provides efficient and quick solutions to fix the Windows 11 stuck at 100% error.
Fix 2. Check Internet Connection
Ensure your PC has a stable internet connection to download Windows 11 update files from Microsoft servers. Restart your wireless router to resolve network issues, check the WiFi signal, or bring the laptop closer to the router. Also, verify that your Ethernet cable is properly connected.
To reset the network adapter on Windows 11, go to Settings > Network and Internet > Advanced network settings > Network reset, click the "Reset now" button, and then confirm with "Yes".
Fix 3. Free Up Storage Space on Your Computer
Windows update installations may get stuck or fail due to insufficient storage space on the system drive, requiring users to free up hard drive space to resolve the issue.
To free up space on your hard drive, we suggest using Qiling Disk Master. This tool allows you to utilize unallocated space from another drive to expand your system hard drive, providing the quickest way to gain sufficient disk space. You can download it to give it a try.
Here is how:
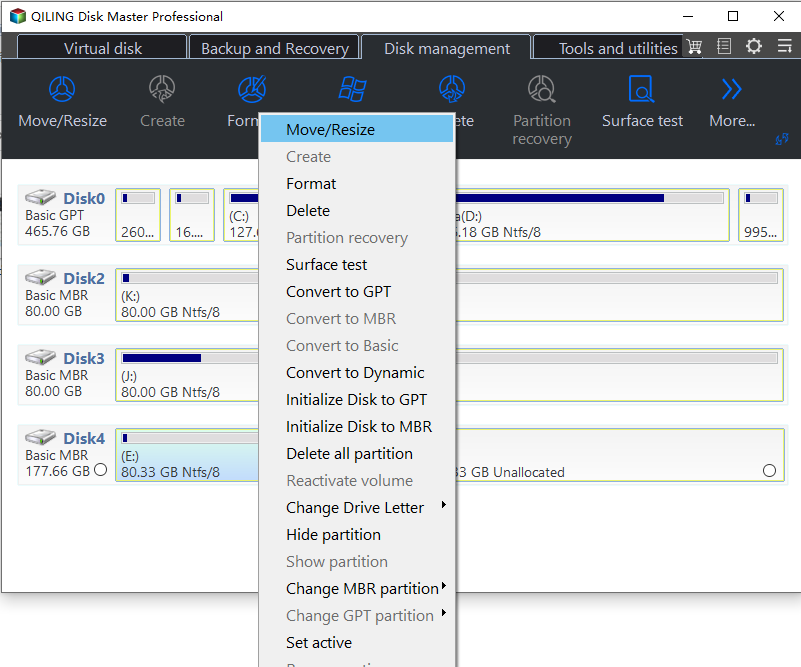
Step 1. Locate the Target Partition.
To resize a partition in Windows, go to Partition Manager, locate the target partition, and select "Resize/Move" from the options.
Step 2. Extend the Target Partition.
To expand a partition, drag the partition panel to the right or left, incorporating the unallocated space into your current partition.
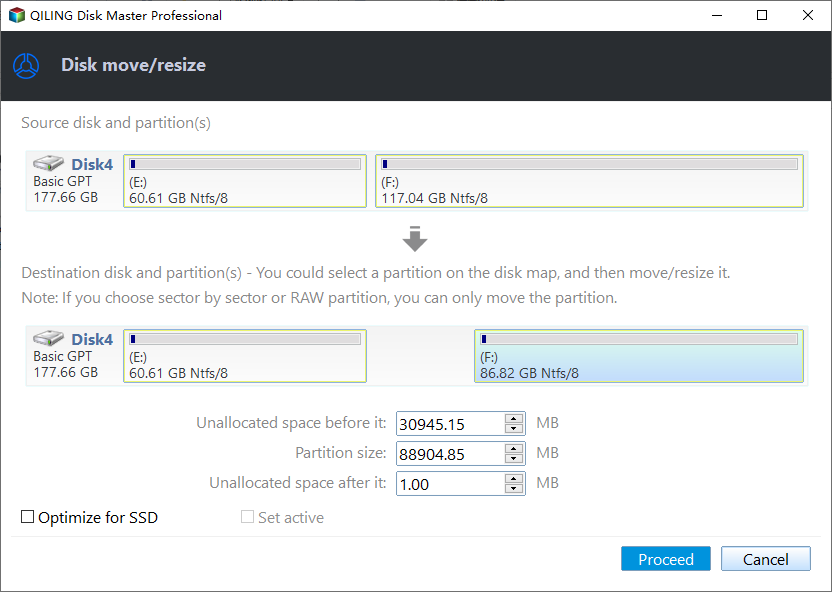
Step 3. Execute Operations to Extend Partition.
To rewrite the unallocated space, drag the dots of the target partition into the unallocated space.
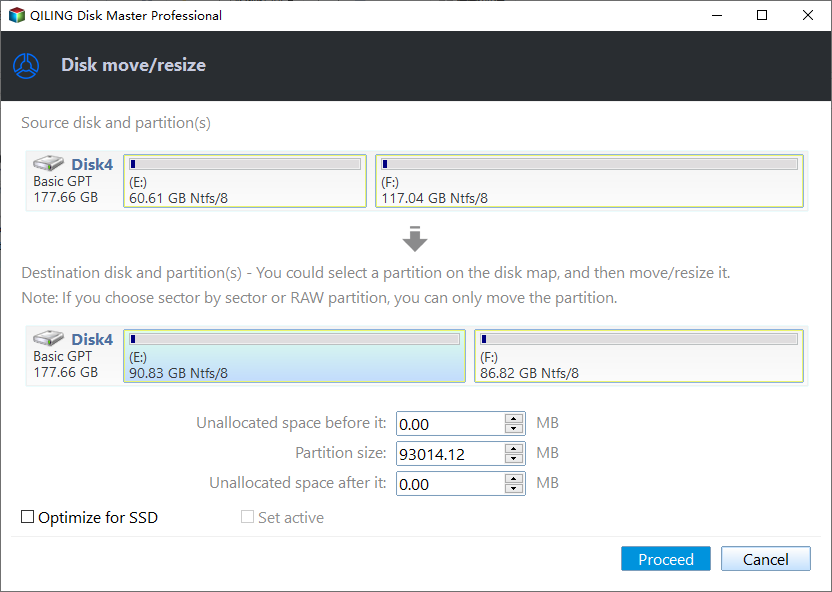
I don't understand what you're asking me to do. Can you please clarify or provide more context? I'll do my best to assist you.
This tool can help free up hard drive space by removing unnecessary files and data, such as deleting temporary files, emptying the recycle bin, and removing system logs, among other things.
- Extend C/D drive
- Allocate disk space
- Format a drive to get disk space
- To allocate disk space from the D drive to the C drive, you can use the built-in Disk Management tool in Windows. Go to Start > type "diskmgmt.
- And more
Fix 4. Repair System File
Corrupted system files on your Windows 11 computer may be preventing Windows Update from functioning properly. To resolve this issue, you can run the SFC (System File Checker) and DISM (Deployment Image Servicing and Management) commands to scan for and replace any corrupted files on your system. This process can help restore your PC's functionality and allow Windows Update to work correctly again.
Step 1. To run the Command Prompt as an administrator, press the Windows key, type "cmd" in the search bar, and click on the result to run it. This will open the Command Prompt with elevated privileges, allowing you to execute commands that require administrator access.
Step 2. Run the DISM restore health command DISM/Online/Cleanup-Image/RestoreHealth
Step 3. After completing a 100% scan command execution, run the System File Checker command sfc /scannow to scan and replace corrupted system files.
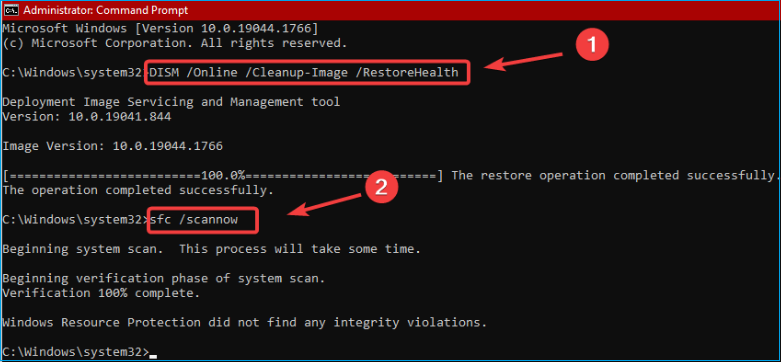
The command scans all protected system files, replacing corrupted ones with cached copies stored in the %WinDir%\System32\dllcache folder.
To fix system file issues, you can run the System File Checker (SFC) tool, which scans and repairs or replaces corrupted system files with the correct ones. This can be done by opening the Command Prompt as an administrator, typing the command "sfc /scannow," and pressing Enter.
Step 4. 1. Close all running applications, including any background programs.
If your hard drive is missing after a Windows 11 update, try booting in Safe Mode and checking the Disk Management console to see if the drive is listed. If not, check the Event Viewer for error messages related to the drive.
Fix 5. Clean Boot Windows 11
Clean boot mode allows Windows 11 to start without potential conflicts from startup software and services, making it easier to update the system. To clean boot your PC, you can follow these steps:
Step 1. Press Windows key + R, type msconfig, and click OK.
Step 2. Navigate to the Services tab in the System Configuration window.
Step 3. To disable all Microsoft services, select the box next to "Hide all Microsoft services" and click the "Disable All" button.
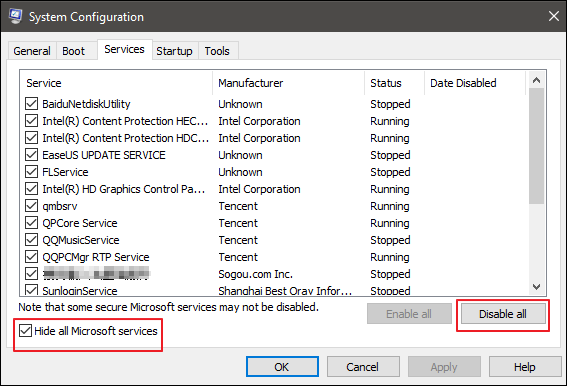
Step 4. To access the Task Manager, go to the Startup option and click on Task Manager.
Step 5. In the Startup tab, click on each entry and disable them one by one.
Step 6. Exit Task Manager and return to the Startup tab in the System Configuration window, then select OK.
Fix 6. Restart the Windows Update Service
To ensure a smooth Windows 11 update process, verify that the Windows Update service and its related services are running properly. If the update service fails to start or stops running, it may hinder the installation of Windows 11 updates.
Step 1. Press the Windows key + R, type services.msc in the Run box, and click OK to open the Windows Services console.
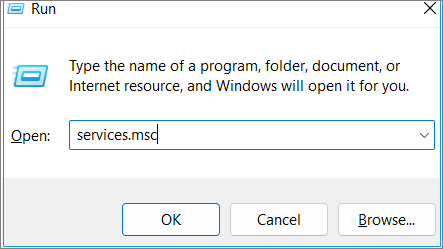
Step 2. Locate the Windows Update service, right-click it, and select Restart.
Step 3. If the service is not started, double-click the Windows update service to open its properties, which will allow you to start it.
Step 4. To change the startup type of a service to automatic, follow these steps: Select the service you want to modify, click on the "Startup type" dropdown menu, and choose "Automatic" from the options. Then, click on the "Start" button to apply the changes.
Step 5. To save the changes, click Apply and then OK.
Fix 7. Reset Windows Update Components
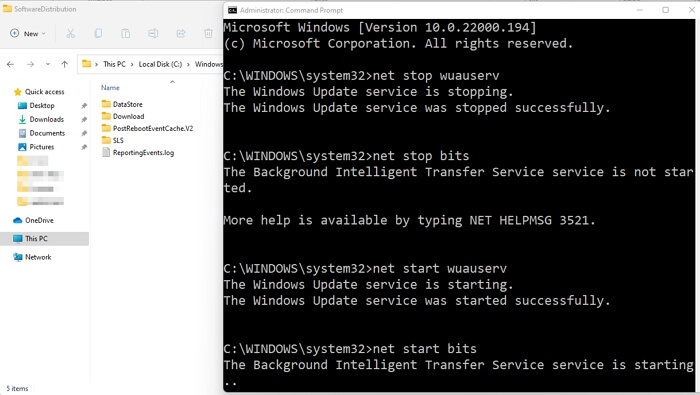
To fix the Windows update problem, you can reset the Windows update components on your PC. This can be done by running the Windows Update Troubleshooter, which can be found in the Control Panel under System and Security, or by running the command "net stop wuauserv" and then "net start wuauserv" in the Command Prompt. Alternatively, you can also reset the Windows Update components by running the command "wuauclt /updatenow" and then "wuauclt /reset".
Step 1. 1. Open Command Prompt (CMD) as administrator. 2.
- net stop bits
- net stop wuauserv
- net stop appidsvc
- net stop cryptsvc
The above command stops Windows Update and its related services.
Step 2. To access the SoftwareDistribution folder, press the Windows key + E to open File Explorer, then navigate to C:\Windows\SoftwareDistribution.
Open the Downloads folder and delete all files and folders inside it by selecting all (ctrl + A) and pressing Del.
These are updated cache files; Windows Update will download new files from Microsoft servers the next time you check for updates.
Step 3. To restart Windows Update and its related services, run the command: `net stop wuauserv & net start wuauserv` and then restart Windows Update and its related services by running the command: `net stop wuauserv & net start wuauserv` and then restart Windows Update and its related services by running the command: `net stop wuauserv & net start wuauserv`. This will restart the Windows Update and its related services.
- First, type net start bits
- Then, type net start wuauserv
- Next, enter net start appidsvc
- Finally, type net start cryptsvc
Step 4. To resolve the issue, restart your computer, go to the Windows Update settings, and try installing the update again. If the issue persists, you can also try running the Windows Update Troubleshooter to identify and fix any problems that might be preventing the update from installing.
Read Also: Windows 11 Requirements, Windows Update Reset Tool
Fix 8. Manually Download and Install Windows 11 Updates
To download the Windows Update offline installer packages, go to the Microsoft Update Catalog, search for the specific update you're trying to install, and download the package. Then, run the downloaded package to install the update directly. If you're still experiencing issues, you can try manually downloading and installing the update from the official Microsoft website.
Step 1. Press Windows key + X and select Settings.
Step 2. Go to Windows Update, click Check for Updates to find updates that are not installed, and note the KB numbers of the updates you find.
Step 3. Download Windows 11 KB5026446.
Step 4. Now open one of your browsers and navigate to the Microsoft Update Catalog, where you can search for and download updates for your Microsoft products.
Step 5. Search for the specific security update with the error, and click Download.
Step 6. To update your operating system, first check the official website of your operating system for any available updates. Once you have found the update, download it to your computer.
Sometimes third-To resolve Windows 11 update issues caused by third-party security software, turn off or remove conflicting security programs, including firewalls and antivirus applications, to see if the issue is resolved.
Conclusion
In this article, I list eight fixes for you to solve the Windows 11 KB5026446 update error. Among these errors, running the Windows Update troubleshooter is the fastest way to troubleshoot Windows 11 KB5026446 update installation issues. Also, you need to ensure free storage space on your C drive and internet connection speed to download updated files from Microsoft servers.
Running DISM Recovery Health and a System File Checker scan can help resolve issues with system files, potentially fixing the problem. If you have any ideas on this topic, feel free to share them with others.
Windows 11 KB5026446 Update Error FAQs
Windows 11 KB5026446 update can be a bit tricky, but don't worry, I've got you covered. If you encounter any issues during the updating process, here are some frequently asked questions and answers to help you navigate through it:
1. Why is there an error when I update the cumulative update for Windows 11?
The "Windows 11 cumulative update failed to download and install" issue can be caused by insufficient disk space on devices, corrupted system files, an unstable internet connection, or network problems.
2. How do I fix the Windows update error in Windows 11?
Here are some tips to help fix upgrade and installation errors:
- Remove external hardware
- Update Windows
- Uninstall non-Microsoft antivirus software
- Uninstall unnecessary software
- Free up disk space
3. How do I clear the Windows Update cache in Windows 11?
To delete the Windows cache using disk cleanup, follow these steps:
To clean up your computer, start by opening the Disk Cleanup app from the taskbar's search box. Once the app appears on the right side, click "Open" to start it. After that, select the drive you wish to clean up and click "OK".
Related Articles
- Which Is the Best Time Machine Disk Format [Fast & Full Guide]
- [Solved] System Image Recovery Not Showing
- [8 Fixes] How to Fix Windows 10 File Sharing Not Working After Update 1803/1809/1903
- [Detailed Guides] How to Backup WeChat in 5 Ways