How to Downgrade macOS Ventura to Monterey [with 3 Detailed Method]
| Workable Solutions | Step-by-step Troubleshooting |
|---|---|
| Method 1. Downgrade with Time Machine | 1. You need to connect your Time Machine drive to the Mac. 2. Restart the Mac PC...Full steps |
| Method 2. Downgrade with macOS Recovery | 1. Turn off your Mac from the Apple menu, then follow one of the provided inputs to continue.Full steps |
| Method 3. Downgrade with Bootable Installer | 1. Get the macOS Monterey installer now. Visit the Mac App Store, where you download and install the latest operating system for your Mac.Full steps |
Reasons for Downgrade macOS Ventura to Monterey
macOS Ventura and macOS Monterey are two different versions of Apple's operating system. macOS Ventura is the next-gen macOS, offering a seamless multitasking experience, while macOS Monterey, version 12 of macOS, is the 18th major release, allowing users to share experiences with friends and family during FaceTime.
If you've upgraded to macOS Ventura but find your Mac device isn't running smoothly or some software is incompatible, you may need to downgrade to macOS Monterey. This is because some software like Magnet and Dropbox haven't been adequately optimized for Ventura, making a downgrade crucial.
● The performance got more rotten
The latest macOS update, Ventura, has been plagued by glitches, resulting in slow MacBooks and frequent app crashes or hangs.
● Crosscheck your Mac first, then reinstall
Before downgrading from macOS Ventura to Monterey, it's recommended to perform a final checkup on your Mac and address any issues with your current setup to ensure a smooth downgrade process, which typically takes around an hour.
How to Downgrade macOS Ventura with Time Machine
To get old versions of macOS, you can use the Time Machine option to downgrade macOS Ventura to Monterey with a full-fledged backup of the previous macOS Monterey. This is considered the easiest method, which is available for users with a previous backup. However, downgrading to Monterey from Ventura is the most hassle-free thing to do with the previous macOS Monterey backup.
Step 1. Connect the Time Machine drive to your Mac using a USB cable. Ensure the drive is securely connected and recognized by the Mac.
Step 2. Restart the Mac PC.
Step 3. For Intel Macs, when the Apple logo appears, hold down Command + R.
For Silicon Macs, hold down the Power button until the startup screen appears, then go to Options > Continue.
Step 4. Choose the "Restore from this Time Machine Backup" option, then tap the "Continue" button.
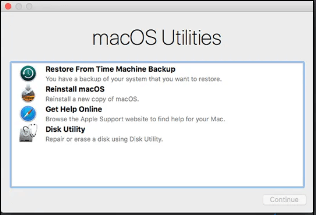
Step 5. Choose your Restore Source, and then hit the "Continue" button.
Step 6. Choose the desired backup to retrieve from.
Step 7. Carefully follow the reinstallation prompts and then retrieve your files from the backup drive.
Once macOS Monterey is installed on your MacBook, you can enjoy the latest and most reliable software on macOS 12.
How to Downgrade macOS Ventura with macOS Recovery
You can restore your Mac to its most up-to-date functioning state using the macOS recovery mode, which allows you to perform basic troubleshooting and retrieval activities, such as reinstalling the OS, verifying the disk, and transforming the startup security. To downgrade macOS Ventura, follow these steps.
Step 1. Turn off the Mac from the Apple menu.
Step 2. 1. Press the button on the power strip to turn it on, or
- To reinstall the updated macOS Ventura, press the Command + R keys simultaneously on your keyboard while booting up your Mac. This will initiate the macOS installation process, allowing you to reinstall the updated operating system.
- Hold Shift + Option + Command + R keys together to reinstall the updated macOS version that came with your Mac when you bought it.
- To upgrade to the latest supported macOS version, press the Option, Command, and R keys simultaneously. This will initiate an installation process for the most recent macOS upgrade.
- Type your password and hit the continue button.
- Follow the guidelines shown on the PC screen to uninstall macOS Ventura.
Inaugurate macOS retrieval mode to uninstall macOS Ventura
Step 1. When you need power, you can plug in the power cable to your Mac.
Step 2. To shut down your Apple device, press the Apple logo at the top left corner and swipe down to the "Shut Down" option, then select it.
Step 3. For an Apple Silicon Mac, press the power button and continue holding it until the startup options appear, then select macOS recovery.
For Intel-To turn on your Mac, hold the power button until it turns on. Then, press and hold the Command (⌘) and R keys simultaneously.
Step 4. Choose Disk Utility once the device is in Retrieval mode.

Step 5. To erase a Mac hard drive, start by clicking the Apple logo in the top left corner and selecting "About This Mac". Then, click on the "Storage" tab and click on "Manage" next to "Show Details". Click on the hard drive you want to erase and select "Erase" from the dropdown menu.
Step 6. Use the GUID partition map for the partition scheme and APFS for the file system format.
Step 7. Shut down the Disk Utility window.
Step 8. Hit the option of reinstalling macOS Monterey.
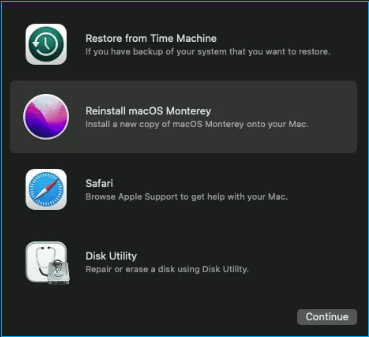
Step 9. Follow the wizard to finish the installation procedure.
Downgrade macOS Ventura to Monterey with Bootable Installer
To downgrade macOS Ventura to Monterey, you can use a Bootable Installer, allowing you to install macOS from USB. This method is still possible even if you didn't create a bootable installer prior to installing Ventura. You can build a bootable Monterey installer and follow the steps shown below to downgrade your operating system.
Step 1. Get the macOS Monterey installer now
- Visit the Mac App Store, search for Monterey, and download/install macOS Ventura.
- To download macOS Monterey, click Get.
- Search for the bootable installer in the Applications folder.
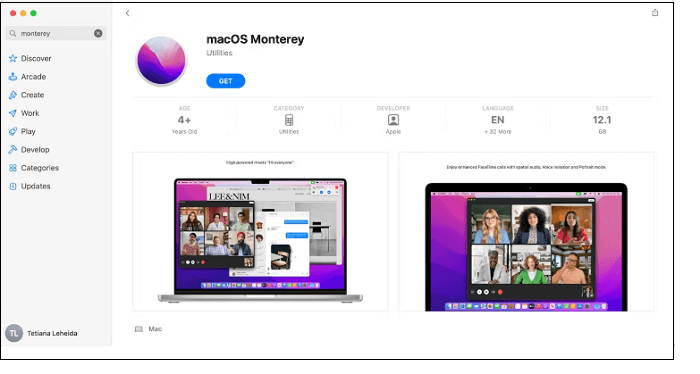
Step 2. Rename the drive
- Link your Mac to an external drive.
- To access the External section, you need to open Disk Utility and find the drive in the list of available devices.
- Choose Drive and hit erase.
- To set the Scheme to GUID Partition Map and the Format to Mac OS Extended, select the Scheme dropdown menu and choose GUID Partition Map. Then, select the Format dropdown menu and choose Mac OS Extended (in case it's available).
- Confirm your preference.
Step 3. Build a bootable installation drive
- On your macOS, open the Terminal.
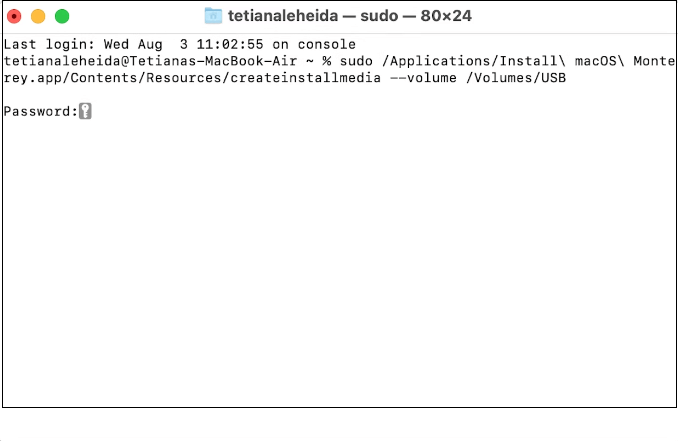
- sudo /Applications/Install\ macOS\ Monterey.app/Contents/Resources/createinstallmedia --volume /Volumes/USB - this command has to be pasted and hit enter.
- Provide a password and hit enter again.
- The Terminal is asking for permission to proceed. Press Y to confirm and continue.
- Hit the "Ok" button in case the Terminal needs your permission to check your external drive.
Step 4. Utilize the bootable installer to install macOS Monterey
To complete the downgrade process, you need to remove your startup drive, as some drives cannot be downgraded unless they are formatted. If you have important files on macOS Ventura, it's essential to create a backup before proceeding.
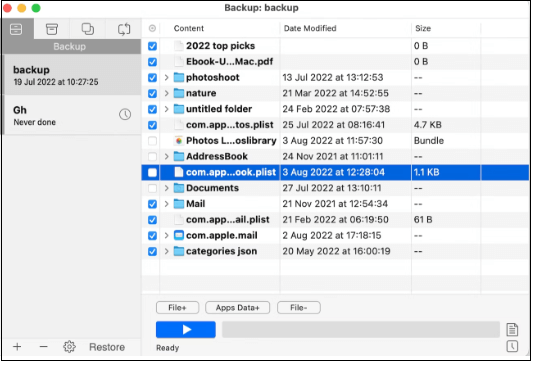
Install Monterey with the following steps:
Step 1. Link the bootable installer-equipped drive to your Mac.
Step 2. Enter Retrieval mode:
On an Intel Mac, press Command + R until the Apple logo appears.
On an Apple Silicon Mac, press the Power button until the Startup option appears on the screen, then select Options and choose Continue.
How to Recover Lost Data When Downgrading macOS Ventura
Downgrading macOS Ventura to Monterey may result in data loss, but this can be prevented with the right tools. Deep Data Recovery for Mac allows you to retrieve files from the hard drive, USB stick, SD Card, and even complete a Mac trash recovery, making it a useful tool for recovering lost files after the macOS Ventura update.
This high-Tech data retrieval software can retrieve lost data from any storage media, and it's particularly useful when downgrading from macOS Ventura to Monterey, allowing you to recover all lost data during the process, eliminating the need to worry about crucial files. To recover your files, you'll only need to follow three simple steps, and this tutorial can also be applied to recover deleted files on macOS Ventura.
Step 1. Select file types and click "Next" to start
To start Deep Data Recovery, launch the software on your Windows computer and select the file types you want to recover, then click "Next" to initiate the recovery process.

Step 2. Select the drive to be scanned
Select the drive you need to recover lost/deleted files from, and click the "Search for lost files" button in the main Deep Data Recovery window.

Step 3. Select your lost data/files
Deep Data Recovery for Mac will immediately scan your selected disk volume and display the scanning results on the left pane, allowing you to sort and find specific files if needed.

Step 4. Recover lost/deleted data
Once you have located the desired files, preview them and then click "Recover" to initiate the recovery process for your deleted or lost Mac files.
Conclusion
The macOS Ventura comes with numerous features and improvements, but it also has some errors and unknown glitches. However, there are three methods to downgrade macOS Ventura and get the best performance every time you use your macOS, which can be a helpful solution for those experiencing issues with the new operating system.
If you lose vital data while downgrading macOS Ventura to Monterey, it's recommended to use Deep Data Recovery for Mac to instantly retrieve the lost data. Download it now!
Downgrade macOS Ventura to Monterey FAQs
Here are some FAQs about downgrading macOS Ventura to Monterey in one paragraph:
What Mac is compatible with Monterey?
macOS Monterey is compatible with various MacBook models, including MacBook Air M2, 2022, M1, 2020, Retina, 13-inch, 2020, 2019, 2018, and MacBook Pro 13-inch, M2, 2022, 16-inch, 2021, 13-inch, 2020, among others.
How do I downgrade from Ventura to OSX?
Follow the three steps below:
- Switch off your Mac.
- To restart your PC and enter Internet Retrieval Mode, press the Shift + Option/Alt + Command + R keys simultaneously while restarting the computer.
- Opt for the Reinstall macOS option.
- Hit the Install option.
Will Monterey make my Mac slower?
Monterey has been reported to reduce macOS performance and speed, with users noting that the latest version, 12.3, has made the issue worse.
Can you downgrade a Mac that shipped with Catalina?
Although subsequent upgrades can be rolled back by downgrading to 10.15 Catalina, new Macs that come pre-installed with 10.15 Catalina cannot be downgraded to 10.14 or below. To back up your Mac, remove the startup disc and reinstall macOS.
Related Articles
- How to Backup OneNote in Windows 10 and How to Restore OneNote from Backup
- Fix Deleting Files Does Not Free Up Space Error in Windows 10/8/7
- Beginner's Guide on Linux File System Types [Detailed Explanation]
- How to Fix Galaxy S5 SD Card Corrupted? [Ultimate Guide]