How to Fix Macintosh HD Greyed Out in Disk Utility Without Data Loss [ 4 Solutions ]
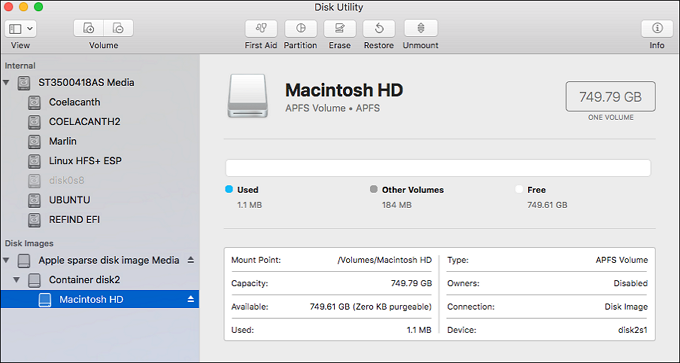
Mac users may encounter the issue of the Macintosh HD being greyed out in Disk Utility, which can be caused by various reasons. To fix this issue, users can try restarting their Mac, running a disk utility scan, or using the built-in Disk Utility app to repair permissions, reset the System Management Controller, or erase the drive. If none of these solutions work, users may need to seek further assistance from Apple support or a professional.
| Workable Solutions | Step-by-step Troubleshooting |
|---|---|
| Fix 1. Mount the Macintosh HD | The Macintosh HD may be greyed out in Disk Utility because it cannot be mounted automatically, likely due to a permissions issue or other system problem. This prevents Disk Utility from accessing the disk and displaying it in the list, resulting in the greyed-out appearance. To resolve this, you can try restarting your Mac, or attempting to mount the disk manually. If the issue persists, further troubleshooting may be necessary.Full steps |
| Fix 2. Repair in Recovery Mode | With Disk Utility's First Aid, you can fix the Macintosh HD that is greyed out by running the utility and selecting the greyed out Macintosh HD. Then, click on the "First Aid" button and follow the on-screen instructions to complete the process. This may resolve the issue and allow the Macintosh HD to be selected again. If the problem persists, you may need to reinstall macOS or seek further assistance from Apple Support.Full steps |
| Fix 3. Fix Macintosh in Terminal | If the Disk Utility cannot fix your Macintosh HD issue, you might try using Terminal to run a command that can attempt to repair the disk, such as "fsck" followed by the disk identifier. This command can be run from the Terminal app on your Mac, and it may be able to identify and repair any issues with the disk.Full steps |
| Fix 4. Format the Macintosh HD | If the techniques above fail to fix your Macintosh HD, a factory reset may be the only option left. This will erase all data on the drive, returning it to its original factory settings. This should be considered as a last resort, as all data on the drive will be lost. If you're experiencing issues with your Macintosh HD, it's recommended to try the techniques above before resorting to a factory reset.Full steps |
Macintosh HD Greyed Out in Disk Utility, Help!
A 2021 MacBook Air M1 user is experiencing issues with their Macintosh HD, which is greyed out in Disk Utility, and cannot be mounted, possibly related to a previous crash and overloaded RAM.
Anything might happen, such as the starting disk corrupting due to a power loss or system crash, rendering the Macintosh HD greyed out in Disk Utility, or the Mac not turning on with a black screen.

Why Is Macintosh HD Greyed Out in Disk Utility
The reason for this is that the operating system and system files are stored on the Macintosh HD drive, making it impossible to delete the drive itself. This is a built-in feature to prevent accidental deletion of essential system files, ensuring the stability and functionality of your MacBook.
The data in the Recovery HD drive is not deletable, erasable, or editable due to containing OS information, which is why it's grayed out, and this is caused by Apple's restrictions.
Reason 1. Damaged Disk
A corrupt disk is the main reason why an external hard drive (HD) won't mount and appears greyed out. Unfortunately, this means you won't be able to access the data stored on the corrupt disk.
Reason 2. Improper Hard Disk Formatting
Formatting an SD card or hard disk incorrectly or with an improper file system can lead to invalid media or disk not recognized issues, among other disk-related problems.
Reason 3. Power Disruption
Power disturbances while mounting a hard drive on a Mac PC can cause damage and lead to various errors or bugs.
If you delete or alter files in the Macintosh HD, your MacBook won't start up, and you'll need to reinstall the macOS operating system.
Recover Lost Files from the Macintosh HD That Is Greyed Out
Restoring your lost files is recommended before attempting to fix the greyed Macintosh HD, as the solutions to repair the error may involve disk repair, formatting, and OS reinstallation, which can result in permanent data loss.
To prevent data loss and recover lost data in Macintosh HD when needed, we suggest you download a data recovery software - Deep Data Recovery for Mac.
Deep Data Recovery for Mac
- You can use Disk Drill or EaseUS Data Recovery Wizard to recover data from a greyed Macintosh HD and corrupted external hard drive. These software tools can scan the drive for recoverable files and allow you to preview and recover them.
- You can recover files from a formatted external hard drive using various methods. One approach is to use Disk Utility, a built-in tool on Macs, to restore the drive to its original state and recover the files.
- The Macintosh HD experiences more logical faults and eventually becomes inaccessible, hindering data recovery efforts.
Using the powerful software, you can recover your files without needing any additional computer or device to download the files needed for file restoration. The steps are straightforward, allowing you to easily recover your files.
Step 1. Select file types and click "Next" to start
Launch Deep Data Recovery on your Windows computer, select the file types you want to recover, and click "Next" to begin the recovery process.

Step 2. Select the drive to be scanned
Select the drive you need to recover lost/deleted files from, and click the "Search for lost files" button.

Step 3. Select your lost data/files
Deep Data Recovery for Mac scans the selected disk volume, displaying the results in the left pane, allowing users to sort and find specific files.

Step 4. Recover lost/deleted data
Once you have located the desired files, preview them and then click "Recover" to initiate the recovery of your deleted or lost Mac files.
If your Mac won't boot up due to an error on the Macintosh HD, you can create a bootable installer on a USB drive to boot your Mac and recover data using Deep Data Recovery Bootable Media, which is a secure and effective way to retrieve crucial files.
How to Fix Macintosh HD Greyed Out in Disk Utility
Let's dive into fixing the issue of Macintosh HD being greyed out in Disk Utility and explore potential solutions. The greyed-out Macintosh HD in Disk Utility can be frustrating, but there are some troubleshooting steps you can take to resolve the issue.
Solution 1. Mount the Macintosh HD
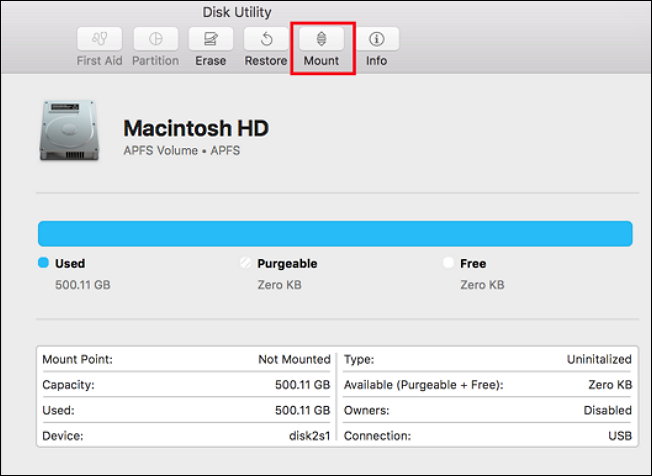
The Macintosh HD may occasionally be greyed out in Disk Utility because it cannot be mounted automatically. This can be resolved by manually mounting the drive.
- Hold the Command + R buttons on your Mac keyboard to boot into Recovery Mode.
- Launch Disk Utility.
- Choose the "Macintosh HD" and click the "Mount" button.

If Macintosh HD can't be mounted, the startup volume is likely corrupted and needs to be fixed. To resolve this issue, you can refer to the article on how to fix a corrupted hard drive on Mac.
Solution 2. Repair the Macintosh HD in Recovery Mode
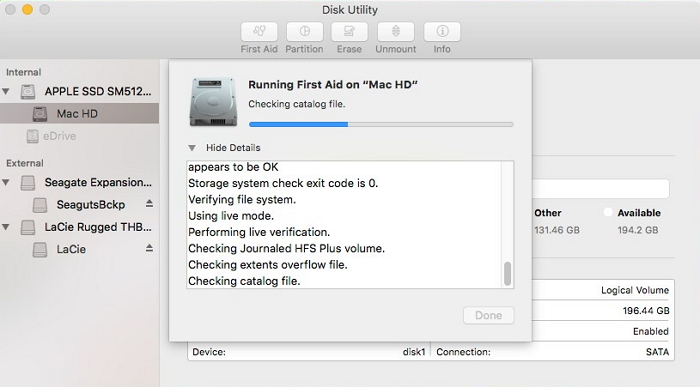
You can fix the greyed out Macintosh HD in Mac Recovery Mode using Disk Utility's First Aid. To do this, follow these steps:
- Press the Command + R buttons on your Mac to start it in Recovery Mode.
- When you see a spinning globe or the Apple logo, let go of the keys. This is the correct procedure to follow when turning on a Mac computer.
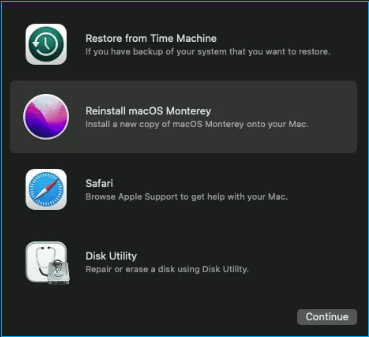
- Once your Mac is in recovery mode, you have four options for troubleshooting. You can choose "Disk Utility" to troubleshoot and fix any issues with your Mac's disk.
- From the left panel, select the Macintosh HD and then click "First Aid" in Disk Utility, then wait for the process to complete, which may take several minutes.

Solution 3. Fix Greyed Macintosh HD with Terminal
If the Disk Utility cannot fix your Macintosh HD issue, you might try using Terminal. In Terminal, you can run a command to repair permissions, which may resolve the problem.
- To start the Mac in Recovery Mode, turn it off, then turn it back on and immediately hold down the power button until the startup options appear. Choose "Utilities" from the menu and "Terminal" from the list of choices.
- To verify the Volume Identifier, enter the command `diskutil list` in the terminal window and examine the Volume Identifier in the displayed table. This will list all available volumes and confirm the Volume identifier.
- To repair a disk volume, you can use the `diskutil repairVolume` command. The command to repair the Macintosh HD volume would be `diskutil repairVolume /disk**`, where ** should be replaced with the actual volume identifier for Macintosh HD. This command will attempt to repair any issues with the disk volume, including permissions and other file system problems.
Solution 4. Format the Macintosh HD and Reinstall macOS
If all other methods fail to fix your Macintosh HD, which may still be displayed as greyed, a factory reset of macOS is your last resort. This process involves reformatting the disk, so make sure to recover any lost Mac files before proceeding.
- To format Macintosh HD and install macOS again, follow these steps: Start by booting your Mac in Recovery Mode by restarting it and immediately holding down the Command (⌘) + R keys. Once in Recovery Mode, select Disk Utility from the Utilities window and then select Macintosh HD from the list of available drives.
- When your Mac enters macOS Recovery mode by pressing Command and R, choose Disk Utility from the macOS Utilities menu.
- From the sidebar, choose Macintosh HD.
- From the top, click Erase and format the Mac startup disk instead of the Macintosh HD volume if your Mac is running macOS 10.15 or higher.
- To finish formatting, click Done.
- Go back to the macOS Utilities window, select Reinstall macOS, and follow the on-screen instructions.

If you encounter the Macintosh HD not mounted error, it's essential to back up your crucial data to the hard drive as soon as possible. If you don't, data recovery software can help you recover your data.
Final Thoughts
If your Mac starts up and the Macintosh HD is greyed out, it's likely due to a problem with the hard drive or other components. To troubleshoot, try the suggested fixes, which may resolve the issue and allow you to see Macintosh HD on your Mac again.
If you lose your data when resolving the Macintosh HD, you can recover it using the Deep Data Recovery for Mac.
Macintosh HD Greyed Out in Disk Utility FAQs
What happens when you try to access Macintosh HD in Disk Utility? Is it greyed out and you can't select it? What is the purpose of the Disk Utility app on a Mac?
1. What's the difference between Macintosh HD and Macintosh HD - Data?
The content of the files kept by Macintosh HD and Macintosh HD - Data volumes differ significantly. Macintosh HD volumes are mainly used for personal data, whereas Macintosh HD - Data volumes are used for Mac system files and scripts. Users can read and write to Macintosh HD - Data, but only read from Macintosh HD.
2. How do I fix Macintosh HD missing from the startup disk?
Solutions to fix choose startup disk mac empty:
- Repair startup disk in macOS Recovery
- Reappear startup disk in Disk Utility
- Reset NVRAM on your Mac
3. Why can't I mount Macintosh HD?
The volume "Macintosh HD" is greyed out or not visible in Disk Utility, likely due to corruption, and must be corrected before mounting. This issue can be resolved.
- System harm to files
- Corruption of the catalog file
- Failures of disk utilities
- Systemic issues
- Virus outbreaks
4. How do I unlock Macintosh HD?
If you start a Macintosh HD volume, you can unlock it using Disk Utility, making it accessible in the Finder. To do this, select the volume you want to mount in the Disk Utility app on your Mac and click the Mount button.
Related Articles
- How to Check RAM Health with Windows Memory Diagnostic Tool [Full Guide in 2023]
- How to Change DNS Settings [2023 New]
- How to Fix macOS 13 Ventura Installation Failed/Stuck/Frozen (2022 Tips)
- 5 Best S3 Backup Software [Can't Miss]