How to Format a WD Hard Drive for Mac [Best Solutions]
Have you tried using WD hard drives to back up your Mac computer or to expand your Mac's storage space? If so, you may find that the WD drive does not show up on your Mac. Formatting the WD hard drive can solve this problem. You come to the right place if you don't know how to format a WD hard drive for Mac.
How Do I Format a WD Hard Drive for Mac?
You can use the built-in tool of Mac: Disk Utility. Or you can use the terminal command to format WD hard drive for Mac. You may know how to format USB on Mac, but are confusing about formatting a WD hard drive. This article will give detailed steps to finish formatting WD hard drive. And this passage is also suitable for you to format a WD Black hard drive for Mac or make your WD Passport compatible with your Mac. If you are interested, continue to read.
But before we learn how to format a WD hard drive for Mac, there are some preparations that need to be done. You need to choose the most appropriate format for your WD hard drive.
What Is the Best Format to Format a WD Hard Drive for Mac?
WD hard drives are often in NTFS format, and some versions may also offer FAT32 and exFAT formats. You can also ask the store owner to give you an HFS+ formatted drive if you want to buy one that fits a Mac. And there are also APFS and Mac OS Journaled for Mac systems. So which file system format is the best for WD drives? You can follow the table below to find the best one.
| Comparison | APFS | HFS+ | exFAT | FAT32 | NTFS |
|---|---|---|---|---|---|
| File Size | Allow multiple copies | Limited native file support | No limitations | No more than 4GB | No limitations |
| Compatibility | Mac | Mac | Windows, Mac, Linux | Windows, Mac, Linux | Only Windows |
By comparing these five formats, we can get the conclusion that APFS is the best format to format a WD hard drive for Mac. It has many functions and it is speedy and reliable and allows multiple copies of a single file. And Disk Utility can support converting WD hard drive to APFS or HFS+ format.
But if you want to use the WD external hard drive, you can choose exFAT or FAT32. And exFAT is better than FAT32 because it has no limitations for file size.
After understanding what format you should provide for your WD hard drive, it's time to know how to format the WD hard drive for Mac.
How to Format a WD Hard Drive for Mac in MasOS: Step-by-Step Guide
Here are two free methods offered if you want to format your WD hard drive inside your Mac system. You can choose to use disk utility or terminal command to format a WD hard drive for Mac. You can follow the steps below to find the most suitable method.
Method 1. Format a WD Hard Drive for Mac with Disk Utility
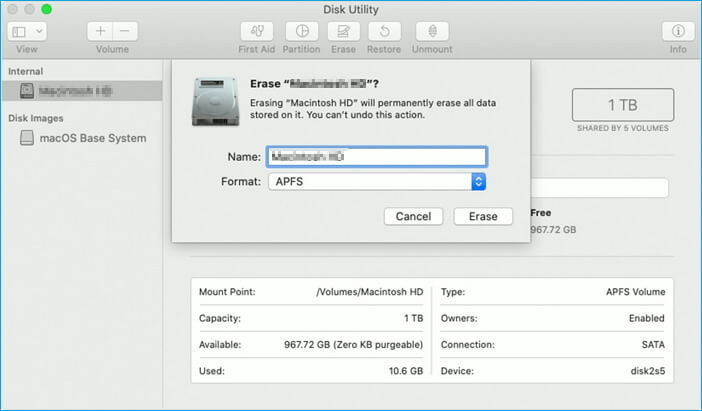
Disk Utility is a free disk management software with the Mac system. It can format the WD hard drive to apply to Mac. The steps are provided here to format your WD hard drive.
Step 1. Plug the WD hard drive into Mac.
Step 2. Open "Utilities" and find "Disk Utility."

Step 3. Choose the WD hard drive on the left side and click "Erase."

Step 4. Give a name to the WD drive and choose the "Scheme."
Step 5. Select "APFS" and click "Erase."

Step 6. Wait for Mac OS to erase the data on the drive.
Method 2. Format a WD Hard Drive for Mac with Terminal Command
The Terminal or command line works the same way as Disk Utility. It can also finish the format process easily. But using the terminal command is a little more complicated. You cannot make mistakes when typing the syntax. Here are the exact steps.
Step 1. Connect WD hard drive to Mac.
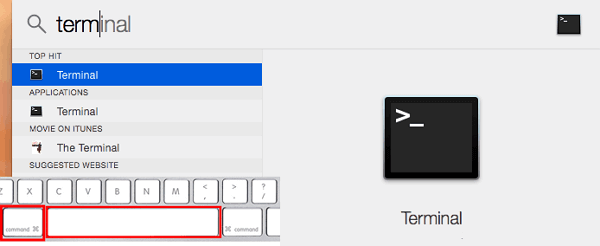
Step 2. Open "Utilities" and find "Terminal" on Mac.

Step 3. Type "diskutil list" to run the tool.

Step 4. Choose the hard drive that you want to format.
Step 5. Input the following command to format WD hard drive.
diskutil eraseDisk APFS MBRFormat /dev/disk2
- Notice:
-
"APFS" refers to the file system. You can change it to HFS+ or other formats.
"MBRFormat" refers to the name of your WD hard drive.
"/dev/disk2" refers to the location of the WD hard drive.
You can easily format WD hard drive in a Mac system by using Disk Utility and Terminal commands. If you are using a Windows system and you are going to format an external hard drive for Mac, how do you do? Don't worry. I will provide a simpler way next to format a WD external hard drive for Mac on Windows.
How Do I Format a WD External Hard Drive for Mac on Windows
Because the format of the WD hard drive is often NTFS, which is not suitable for Mac. So, you need to convert NTFS to FAT32 to apply on Mac. And you can use Qiling Partition Master Free to format WD external hard drive on Windows first, then use it on Mac. Here are the steps to format WD hard drive quickly.
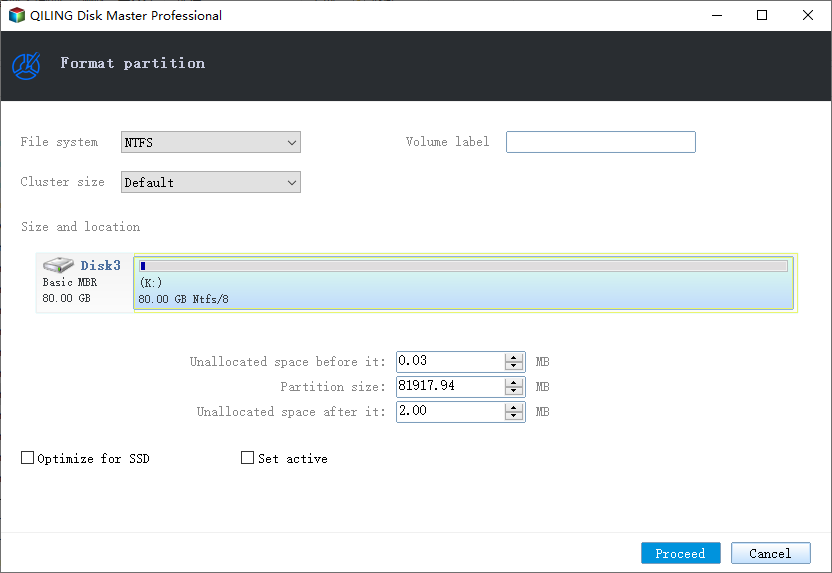
Step 1. Launch Qiling Partition Master, right-click the partition on your external hard drive/USB/SD card which you want to format and choose the "Format" option.

Step 2. Assign a new partition label, file system (NTFS/FAT32/EXT2/EXT3/EXT4/exFAT), and cluster size to the selected partition, then click "Proceed".

Step 3. In the Warning window, click "Yes" to start formatting your external hard drive/USB/SD card.
Except for formatting, Qiling Partition Master also has the following powerful functions:
- Format USB to boot
- Create or delete the partition
- Convert MBR to GPT
- Clone System or Partitions
- Copy OS and data to another HDD/SSD
You can see that Qiling Partition Master is a good disk management tool that allows managing disks securely and formatting them efficiently. If you need to format a disk, download it, and you can enjoy its benefits!
Conclusion
This article details how to format WD hard drives for Mac. You can format your WD hard drive as APFS or HFS+ on Mac. And you can also format your WD external hard drive as exFAT or FAT32 for both Windows and Mac. It also provides a very useful partitioning tool: Qiling Partition Master, which can meet your partitioning needs.
FAQs About How to Format a WD Hard Drive for Mac
This guide provides a detailed guide on how to format a WD hard drive for Mac. Here are some questions that people often care about.
1. What is the best format for an external hard drive on Mac?
APFS and Mac OS Extended (Journaled) format are the best formats for external hard drives on Mac. But if you want to use Windows and Mac simultaneously, you can choose exFAT or FAT32 format.
2. Why won't my WD Elements work on Mac?
You need to check if your WD external drive format matches your Mac. And then you need to format the external hard drive with Disk Utility. And there also exist other problem, such as the internal wring defect or the hard drive has formatting errors. You can change another cable or click to fix the WD passport not showing up on Mac with other solutions.
3. How do I make my WD Passport compatible with my Mac?
If your WD passport and Mac don't match, you need to format your hard drive with Disk Utility.
Step 1. Connect the WD passport to your Mac and open "Disk Utility."
Step 2. Access the drive and click on "Erase."
Step 3. Select the format you want. For example, select "Extended Mac OS (Journaled)."
Related Articles
- How to Format Internal Hard Drive Mac? [QuickStart]
- How to Fix Grayed Out Folders or Files on Mac
- How to Fix It: Your Hard Drive Is Full Battle Net
- [FIXED] Bluetooth Disappeared Windows 10 Issue