How to Fix a Disappearing Dock in macOS Ventura/Monterey/Big Sur
The ready-to-release macOS Ventura has already received expectations from many Mac users. Some users encounter various issues when trying to upgrade to macOS Ventura Beta. The Mac's Dock disappearing after the upgrade is a frequently mentioned issue. Some users claim that the Dock on their Mac repeatedly vanishes, requiring them to restart their laptops daily.
The Reasons Why Your Dock Disappeared on Mac
The Dock can be invisible on the screen by default. When your Mac Dock disappears from the Desktop, one of these things usually causes it:
System errors: Dock disappeared on Mac
The first reason is the error or incompatibility between the macOS and the software. For instance, the update to macOS Ventura has witnessed users' dissatisfaction with altering their settings automatically, so the Dock disappears accidentally.

Dock concealing setting by default
Knowing that the Dock won't appear if you're using full-screen mode is vital. You may also see if your Dock automatically hides by sliding your mouse over the bottom border of your screen and watching to see if it pops back up.

Dock disappears from the bugs of the software
Your Mac pre-installs some of the most frequently used programs in the Dock. Additionally, you can choose other programs appearing in the Dock. Thus, when your Dock disappears, think about your selected programs that may have bugs. The bugs might negatively impact the system running so that the Dock on Mac disappears.
Fix a Dock on Mac Disappeared in 6 Ways
The Dock provides a convenient way to reach your apps. So you could find it frustrating when the Dock on Mac is missing. Here's how to solve this problem.
Before starting the step-by-step guide, you can watch the following tutorial video about methods for fixing the Mac Dock disappeared.
- 0:09 - Customize Dock on Mac
- 0:30 - System Preference Dock
- 0:41 - Dock in Menu Bar
- 1:30 - Enable Magnification
- 1:46 - Adjusting the Height of the Dock
If you still have no idea to fix the problem, please read the literal step-by-step guide below.
Method 1. Restart the Mac to reappear the Mac Dock
Restarting your Mac is sometimes the first option when macOS gets stuck, which is upsetting. The Dock ought immediately to return to normal once your Mac has restarted. If it doesn't work, keep reading this article and resort to other methods below.
Method 2. Fix a disappearing Dock by restarting the Dock
Step 1. Click on your desktop screen until the top-left "Finder" menu appears.
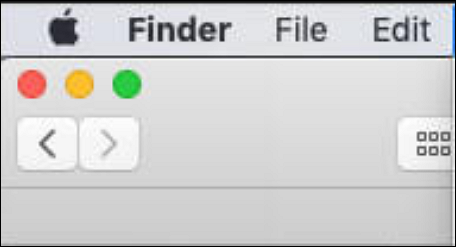
Step 2. Select "File." and choose "New Finder Window".
Step 3. Click the folder for "Utilities."
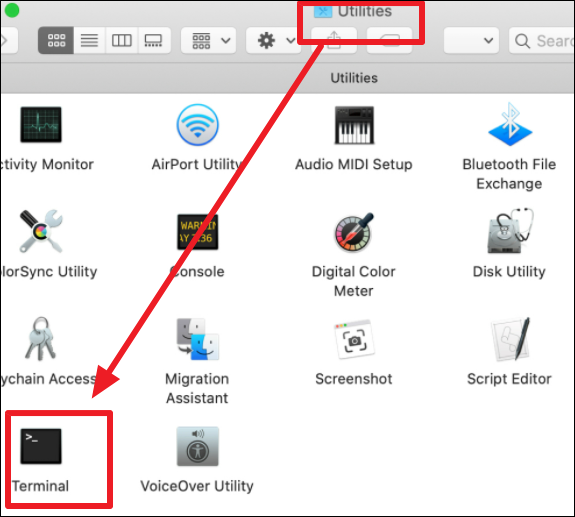
Step 4. Start the Terminal.
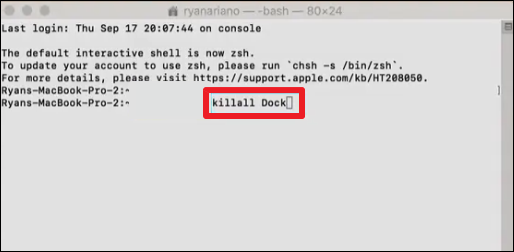
Step 5. Type "killall Dock" into the Terminal window to stop the Dock and restart it automatically.
Method 3. Fix a disappearing Dock on Mac in system preferences
By following these steps, you can set your Apple menu on Mac:
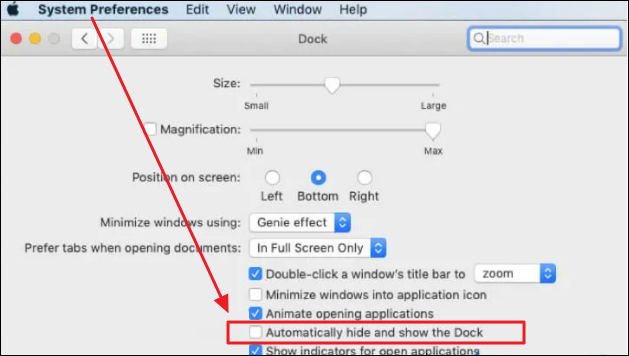
Step 1. Click the Apple logo on the top left of your Mac's Desktop and find the option: system preferences.
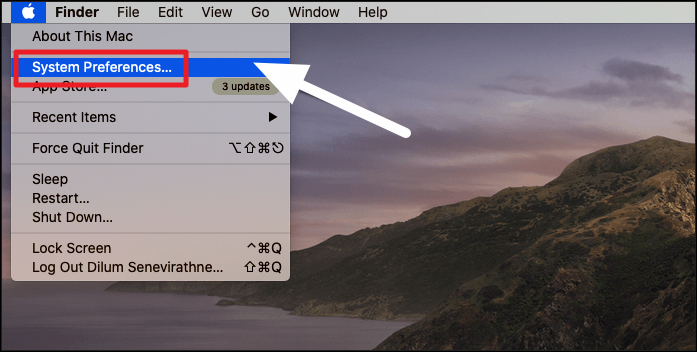
Step 2. Click Dock & Menu Bar.
Step 3. Deselect the "Automatically hide and show the Dock".
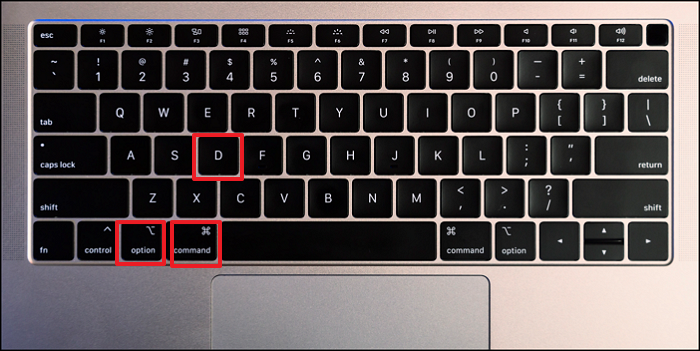
Method 4. Press the option keys to unhide the Dock
If you mistakenly press the hotkey for the setting, "Option - Command - D", you may activate the Mac Dock disappeared. Change the location to reappear the Dock by pressing "Option - Command - D" once again to put Mac Dock back and in its always-visible position.
Method 5. Resetting the fullscreen mode to restore Dock on Mac
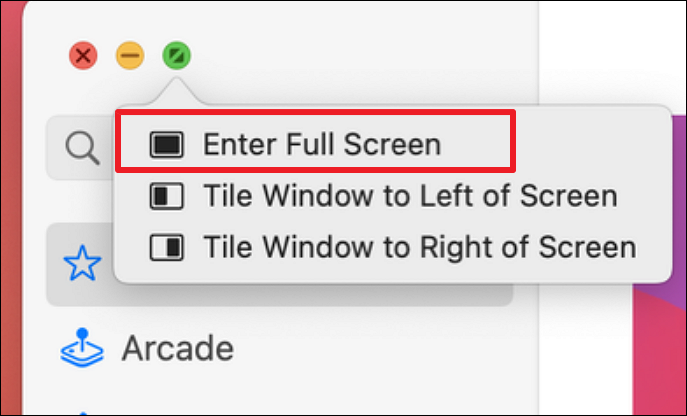
After applying these methods, if the Mac Dock still disappears, check to ensure Full-Screen mode is not active. Due to the currently open window, your Dock will be invisible when in Full-Screen mode.
Move your cursor to the top of your screen to quit full-screen mode. The "Close" and "Full-Screen" buttons and the top Navigation Bar will reappear to get the Dock back.
Method 6. Upgrade to the latest version of macOS
Every year, Apple produces macOS updates, the operating system that runs on your Mac. The yearly Apple Mac update frequently includes improvements, while the previous OS versions may suffer from bugs and errors. So, downloading macOS Ventura, the latest version, can be a great solution to fix the Mac Dock disappeared and make the programs on Mac much smoother.
Bonus Tips: How to Recover Deleted Files on Mac
Besides the Dock disappearance issue, other problems possibly impact your Mac after updating. For example, your macOS Ventura won't boot after updating. Then, it would help if you were careful about your data security because wrongly updated processes might cause your files and data loss. As for your Mac data recovery, here is a great helper: Deep Data Recovery for Mac.
Check the steps and learn how to use it to recover deleted files on macOS Ventura.
Step 1. Select file types
Launch Deep Data Recovery software. Select file types and click "Next" to start

Step 2. Select the drive to be scanned
In the main Deep Data Recovery window, there will be a list of the drives connected to your Mac. Select the drive you need to recover lost/deleted files from, and click the "Scan" button.

Step 3. Select your lost data/files
Deep Data Recovery for Mac will immediately scan your selected disk volume and display the scanning results on the left pane. You can sort the results to find the wanted files if you are looking for certain files.

Step 4. Recover lost/deleted data
Once you have found the desired files, preview the files and then click "Recover" to begin the recovery of your deleted/lost Mac files.
Final thoughts
Your Mac's Dock keeps disappearing is a common problem for Mac users. If you also have this problem, you can fix it using the techniques described on the page below. We sincerely hope these easy methods might assist you in making your Dock visible once more. Moreover, your Mac devices could run well to protect your data safely with the helpful tool - Deep Data Recovery for Mac.
Mac Dock Disappeared FAQs
Here, we included four questions that you may be interested in. Check and find the answers here.
1. How to keep the Mac Dock appearing on screen?
Open the Apple Logo > System Preferences > Dock or Dock & Menu Bar to keep your Mac Dock visible. Select the location on the screen where your Dock will appear, then uncheck the box that says 'Automatically hide and reveal the Dock.'
2. Why does my Dock keeps disappearing on Mac?
- 1. Click "Go" in the Finder menu bar while holding down the Option key.
- 2. Access the Library folder.
- 3. Select Preferences from the menu.
- 4. Locate the "com.apple.dock.plist" file.
- 5. Transfer the file to the Trash, then restart your computer.
3. How do I keep the Dock visible on Mac full screen?
You should leave full-screen mode if you want the Dock to stop disappearing because there is no way to make it always visible in full-screen mode.
4. Why is my Dock not working on Mac?
Your Dock may not operate for various reasons, including file corruption, program compatibility issues, and macOS problems.
Related Articles
- How to Fix Mac Stuck on Checking for Updates [macOS Ventura/Monterey/Big Sur]
- PC Not Working Properly? Try A Fresh Install Windows 10
- Fix macOS Sierra 10.12.1 Update Stuck or Fail to Download Error
- [Solved!] Your Device Is Missing Important Security and Quality Fixes