4 Ways to Open Microsoft Management Console [2023 Step-by-Step Guide]
What Is Microsoft Management Console?
The Microsoft Management Console (MMC) is a single interface that allows Windows users to control multiple services.
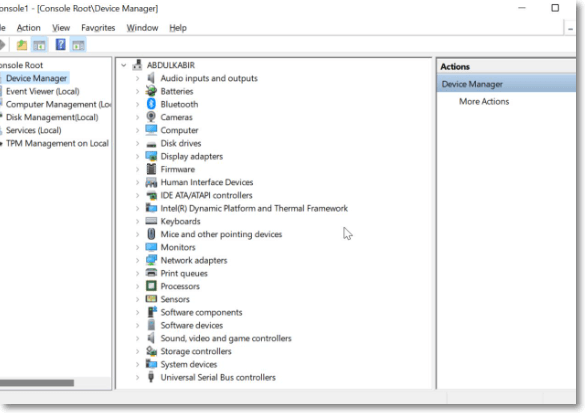
The Microsoft Management Console is a useful tool for managing a Windows computer, offering native compatibility with many administrative tools, including Device Manager, Event Viewer, and Disk Management. It allows you to access detailed information about system services, providing a more comprehensive view than the task manager.

The Services tool allows for the quick start and stop of major Windows services, providing a convenient way to manage them. However, advanced configuration of services is handled through the Services module in the Microsoft Management Console.
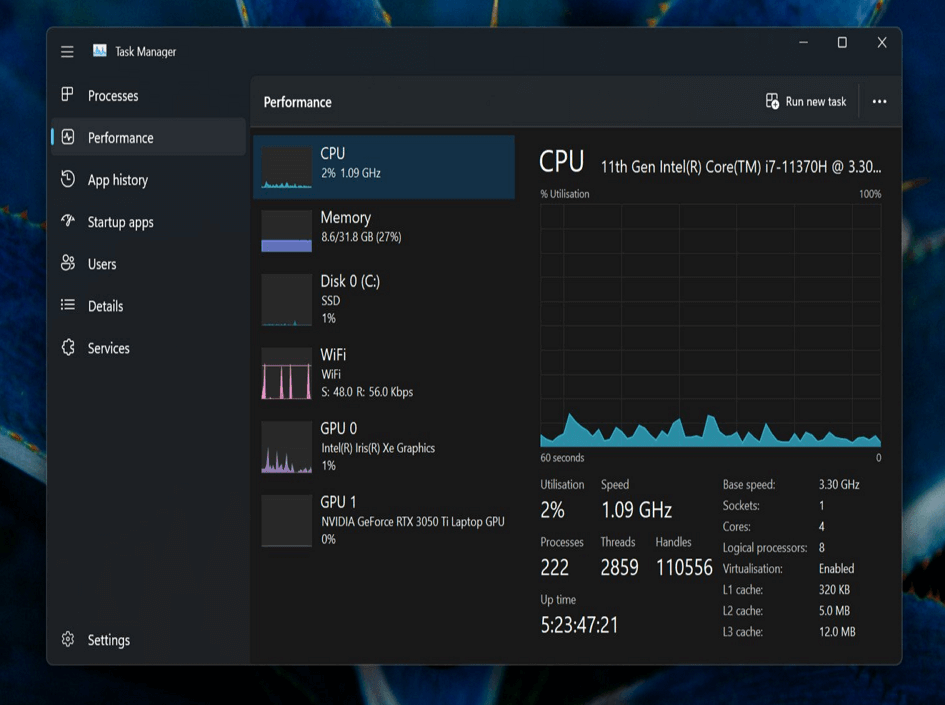
The console provides quick access to frequently used tools on a Windows PC, and can even be shared with others. It features a navigation pane, details pane, and action pane, making it easy to use the tools. Using and customizing the console, also known as the MMC, and adding tools, or snap-ins, is a relatively simple process.
4 Ways to Launch Microsoft Management Console
Here are four easy ways to launch the Microsoft Management Console (MMC) on your Windows computer:
- Fix 1. Launch the MMC Using the Windows Run Command
- Fix 2. Launch the MMC Using Command Prompt
- Fix 3. Launch the MMC Using Windows PowerShell
- Fix 4. Launch the MMC by Creating a Desktop Shortcut
Method 1. Launch the MMC Using the Windows Run Command
To open the Microsoft Management Console (MMC) on a Windows computer using Command Prompt, follow these steps: Open Command Prompt, type "mmc" and press Enter. This will open the MMC console. You can then add snap-ins to the console to manage various aspects of your Windows system, such as user accounts, device manager, and more.
Step 1. To open the Microsoft Management Console (MMC), press the Windows key + R to open the Run command, type 'mmc' into the text field, and then press Enter.

Step 2. On the resulting prompt, click on "Yes".
Step 3. The MMC window will open right afterward.
Method 2. Launch the MMC Using Command Prompt
To open the Microsoft Management Console using the Command Prompt, you can type the following command and press Enter: `mmc`.
Step 1. Click on the "Start" menu and type cmd.
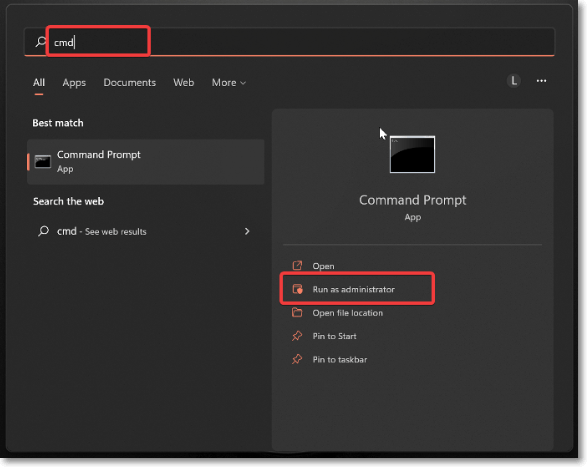
Step 2. To run Command Prompt as an administrator, first, navigate to the Start menu and search for Command Prompt. Under the result, select "Run as administrator" and tap on Yes on the resulting pop-up.
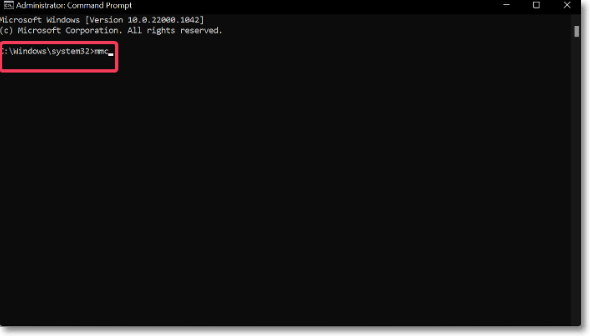
Step 3. To launch the Microsoft Management Console, type mmc in the Command Prompt window and hit Enter.
Method 3. Launch the MMC Using Windows PowerShell
You can also use Windows PowerShell to open the Microsoft Management Console (MMC).
Step 1. Open Windows Search and type Windows PowerShell.
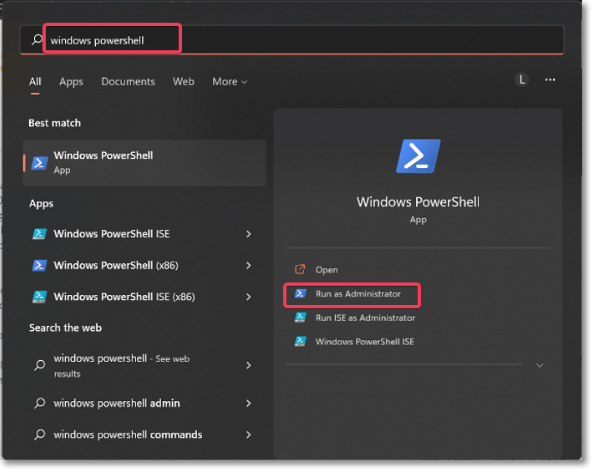
Step 2. To run the command "Get-ADUser" as an administrator, click on the "Run as administrator" option under Windows PowerShell. This will allow the command to access and retrieve information from Active Directory with elevated privileges.
Step 3. After the program opens, type "mmc" and tap on Enter. The Microsoft Management Console will be open right afterward.

Method 4. Launch the MMC by Creating a Desktop Shortcut
To quickly launch the Microsoft Management Console (MMC) on your Windows PC, you can create a desktop shortcut. This shortcut can be used to launch MMC with just a click, saving you time after it's been created. To create the shortcut, simply follow the steps below: [insert steps].
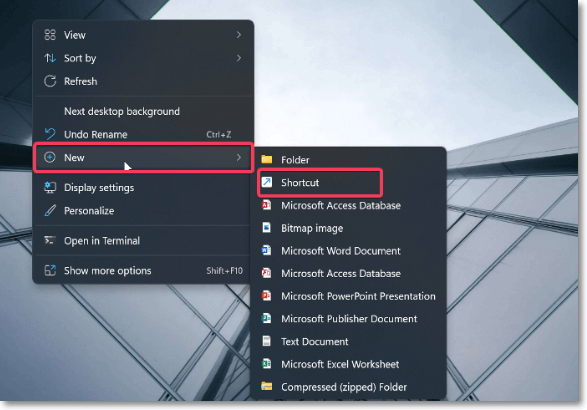
Step 1. Right-click on an empty space on the desktop, navigate to "New" and click on "Shortcut".
Step 2. C:\Program Files\Steam\steamapps\username\steamapps\username\steamapps\username\steamapps\username\steamapps\username\steamapps\username\steamapps\username\steamapps\username\steamapps\username\steamapps\username\steamapps\username\steamapps\username\steamapps\username\steamapps\username\steamapps\username\steamapps\username\steamapps\username\steamapps\username\steamapps\username\steamapps\username\steamapps\username\steamapps\username\steamapps\username\steamapps\username\steamapps\username\steamapps\username\steamapps\username\steamapps\username\steamapps\username\steamapps\username\steamapps\username\steamapps\username\steamapps\username\steamapps\username\steamapps\username\steamapps\username\steamapps\username\steamapps\username\steamapps\username\steamapps\username\steamapps\username\steamapps\username\steamapps\username\steamapps\username\steamapps\username\steamapps\username\steamapps\username\steamapps\username\steamapps\username\steamapps\username\steamapps\username\steamapps\username\steamapps\username\steamapps\username\steamapps\username\steamapps\username\steamapps\username\steamapps\username\steamapps\username\steamapps\username\steamapps\username\steamapps\username\steamapps\username\steamapps\username\steamapps\username\steamapps\username\steamapps\username\steamapps\username\steamapps\username\steamapps\username\steamapps\username\steamapps\username\steamapps\username\steamapps\username\steamapps\username\steamapps\username\steamapps\username\steamapps\username\steamapps\username\steamapps\username\steamapps\username\steamapps\username\steamapps\username\steamapps\username\steamapps\username\steamapps\username\steamapps\username\steamapps\username\steamapps\username\steamapps\username\steamapps\username\steamapps\username\steamapps\username\steamapps\username\steamapps\username\steamapps\username\steamapps\username\steamapps\username\steamapps\
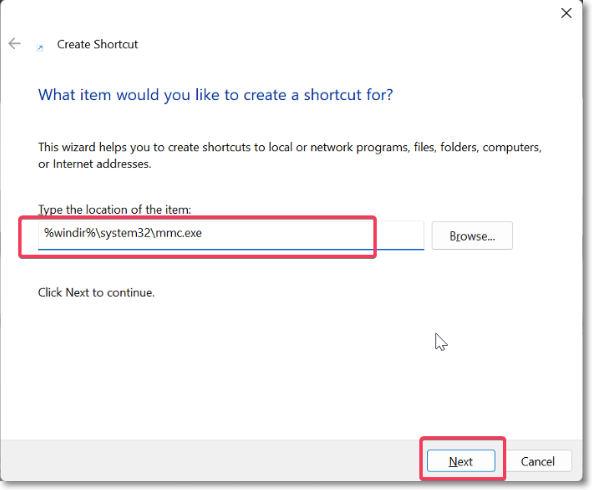
%windir%\system32\mmc.exe
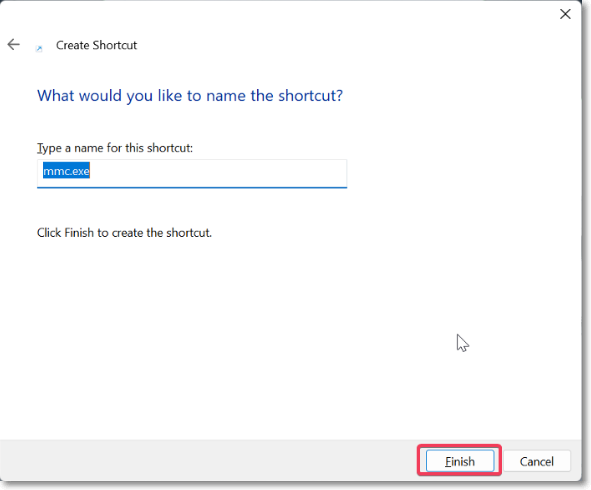
Step 3. Create a name for the shortcut and select "Finish".
Step 4. Now, you can open the MMC using the shortcut created.
How to Use Microsoft Management Console
The usage of MMC mainly include:
- How to Add the Snap-ins
- How to Remove a Snap-in
- How to Save MMC Configurations to the Windows Desktop
- How to Manage MMC Access
How to Add the Snap-ins
To add programs (snap-ins) to the Microsoft Management Console (MMC), you need to first set up the console, then add the necessary tools (snap-ins) to it, allowing you to manage and monitor your chosen applications on your Windows computer. This process involves launching the MMC, selecting the console type, adding the required snap-ins, and configuring the console to display the desired information, ultimately enabling you to use the MMC as a powerful tool for managing your system.
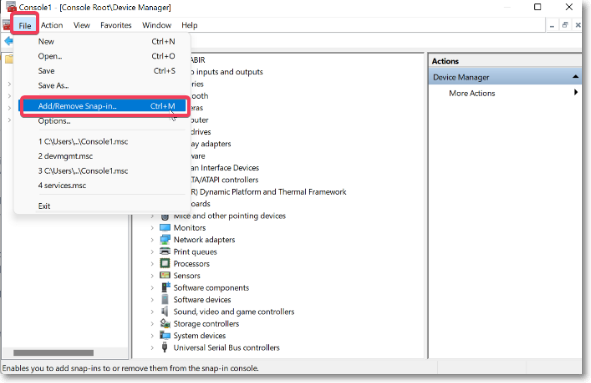
Step 1. To add a snap-in to the Microsoft Management Console (MMC), click on the "File" menu at the top-left corner of the MMC window and select "Add/Remove Snap-in…".
Step 2. To add a program to the Microsoft Management Console (MMC), tap the program you want to add under the "Available snap-ins" section, and then select "Add" in front of the app list. For some programs, you may receive on-screen prompts to add them to MMC; simply follow the prompts correctly based on the program you're adding.
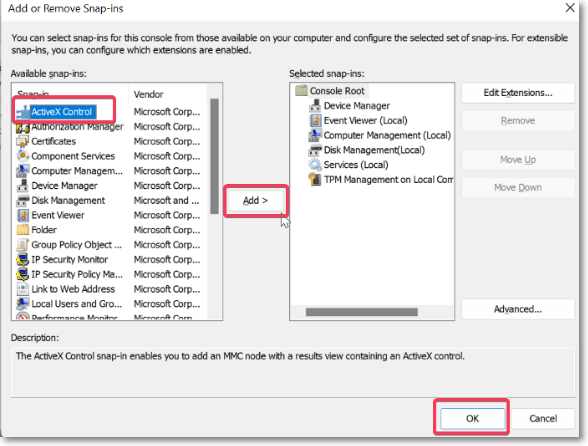
Step 3. Now, hit OK at the bottom of the window to add the selected programs to the Microsoft Management Console.
How to Remove a Snap-in
To remove a snap-in from the Microsoft Management Console, follow these steps:
Step 1. To add a new snap-in to the Microsoft Management Console (MMC), tap on the "File" menu at the top-left corner of the MMC homepage and select "Add/Remove Snap-in…".
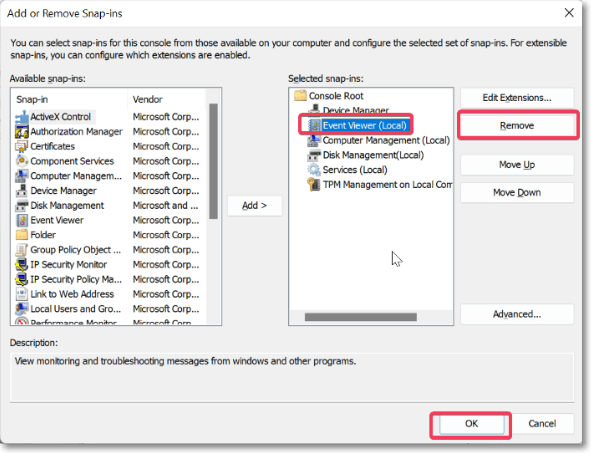
Step 2. To remove a selected snap-in, click on the snap-in you want to remove and select the "Remove" option from the context menu.
Step 3. The Windows Services Manager is a tool that allows you to manage and configure Windows services, which are background processes that run on your computer. To access the Windows Services Manager, you can click on the "Start" button, type "services.
How to Save MMC Configurations to the Windows Desktop
To save your MMC console configurations to the Windows desktop, right-click on the console title bar, select "Save As" from the context menu, choose a location such as your desktop, and give the file a name. This will save the console's configuration, including all added snap-ins, windows, and other settings, so you can easily access and run it again in the future.
Step 1. In the Microsoft Management Console window, click on "File".
Step 2. To save the console output, select the "Save As…" option and enter the desired name for the saved file.
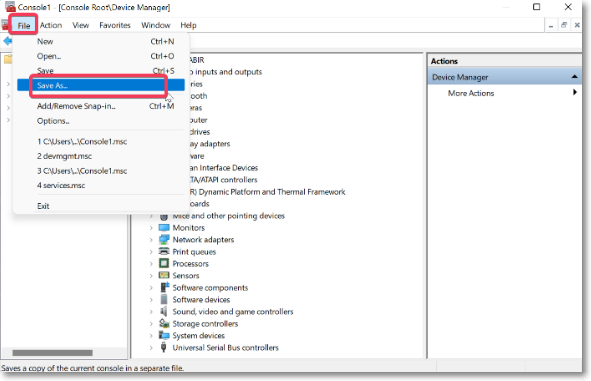
Step 3. To make the console available on your desktop, save it to the Desktop location when prompted. This will allow you to easily access it from the desktop page.
After successfully adding snap-To access the MMC, users can find the snap-ins on the left pane of the console's homepage. To use any snap-in, users simply left-click on it, and it will be opened in the details pane.
How to Manage MMC Access
To gain maximum control over the Microsoft Management Console, you can set the program's access option accordingly.
Step 1. Open the Microsoft Management Console (MMC) and click on the "File" option in the top-left corner of the window.
Step 2. Click on "Options".

Step 3. To choose your preferred game mode, select the option under "Console mode" in the dialogue box. Tap on the mode you prefer.
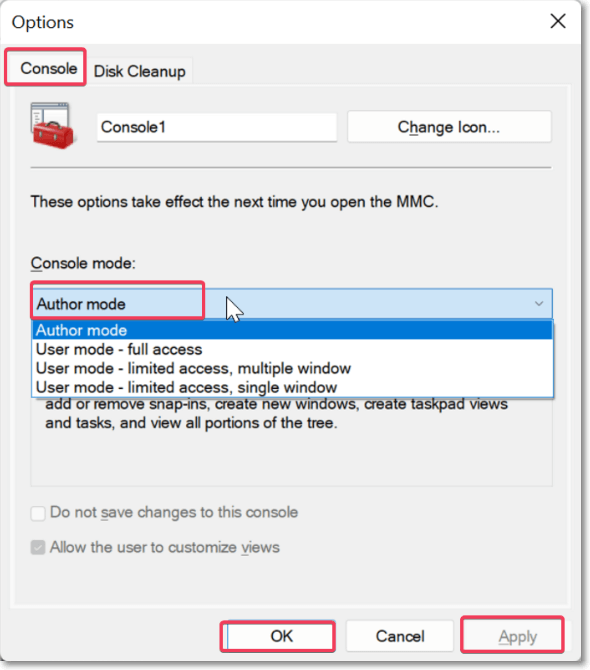
Step 4. Click on "Apply" and then click on "OK" to save the changes.
Final Verdict
The Microsoft Management Console (MMC) is a useful tool for managing specific programs on Windows computers, simplifying their use by eliminating the need to switch between windows. It can be launched in various ways, and with some guidance, users can start utilizing its features on their Windows PC, even if they struggle with the program's usage.
Microsoft Management Console FAQs
I'd be happy to help you with that. What kind of problems do you want to get solved?
1. How do I open Microsoft Management Console in Windows 10?
To access the Microsoft Management Console (MMC) in Windows 10, simply press the Windows key + R to open the Run Command Box, type "MMC" in the box, and press Enter. This will launch the MMC interface, allowing you to manage various aspects of your system.
2. How do I install Microsoft Management Console on Windows 10?
If you need to install the Microsoft Management Console on your PC, you can do so by copying the mmm.exe file from another PC with the same Windows version and pasting it into your computer's File Explorer. This process allows you to install the program even if it's not preinstalled on your computer.
- Open File Explorer on the PC you want to copy mmm.exe from and navigate to This PC.
- Double-To access the Windows installation directory, click on the drive where Windows is installed, which is usually the Local Disk C for most computers.
- Navigate to the Windows folder and open it.
- To fix the issue, open the Run dialog box by pressing the Windows key + R, type "cmd" and press Enter. Then, open the System32 folder and look for the mmc.exe file.
- Select the file and copy it to an external drive.
- Connect the external drive to your computer, open File Explorer, and copy the mmm.exe file from the drive to your computer.
- Navigate to the System32 directory and paste the mmm.exe file there.
- Launch the setup to open Microsoft Management Console on your computer.
3. How to fix Microsoft Management Console unable to create new documents?
Some Windows users have encountered issues with creating new documents on the Microsoft Management Console. If you're experiencing this problem, there are alternative approaches you can try to resolve it.
- Run System File Checker
- Update Windows
- Uninstall and reinstall MMC
- Reset your PC without deleting files
Related Articles
- How to Install DirectPlay in Windows 11/10 [Full Guide]
- [NEW] Fix USB Accessories Disabled on macOS 13 Ventura Effectively in Seven Ways
- Python Delete File: How to Delete a File in Python [Recovery Is Available]
- [Fixed] Office 365/2016/2013 Won't Open with 'Stopped Working' Error in Windows 10