How to Restore Mac to a Previous Date with Time Machine/Migration Assistant/Recovery Software
Restore your Mac to a previous Date can help you solve some Mac issues, and you may want to restore your Mac to a previous date in the following situations:
- You accidentally deleted some files on your Mac.
- Attacked by a computer virus, and you want to remove it.
- Your Mac is running slowly with too many redundant files.
- Your macOS base system is performing weirdly because of the loss of essential data.
- Changed some macOS settings and don't know how to reset them.
- After the macOS Ventura installation failed, you want to get back.
We have three methods to recommend in this article, and we hope you can solve your problem with the detailed tutorials. We have a chart to help you skip to one of the written tutorials:
| Workable Solutions | Step-by-step Troubleshooting |
|---|---|
| 1. Restore Mac to a Previous Date Without Time Machine | Launch Deep Data Recovery software and choose the hard drive, SSD, SD card, or USB...Full steps |
| 2. Restore Mac to a Previous Date with Time Machine | Restart your Mac, and press the power button while your Mac is turning on...Full steps |
| 3. Restore Mac to a Previous Date with Migration Assistant |
Find Migration Assistant under the "Utilities" folder. Click and launch Migration Assistant on your Mac...Full steps |
Method 1. Restore Mac to a Previous Date Without Time Machine
Is it possible to restore Mac to a previous date without a Time Machine backup? The answer is yes. If you just want to recover deleted files from Mac or lost data on Mac, applying professional data recovery software can be a wise decision. You don't have to close this window to search recovery tools from Google. You can click the button below to download a reliable recovery program called Deep Data Recovery for Mac.
Deep Data Recovery for Mac
- Recover deleted files Mac quickly and safely without any Time Machine backups.
- Support various file systems to recover: NTFS, APFS, HFS +, FAT 16, FAT 32, and so on.
- Retrieve lost data because of deleting, formatting, unmounted drives, operation errors, and other situations.
Step 1. Select file types
Launch Deep Data Recovery software. Select file types and click "Next" to start

Step 2. Select the location to scan
Choose the hard drive, SSD, SD card, USB flash drive, or TF card where you lost data. Click "Scan" to start scanning.

Step 3. Filter lost Mac data
The software will automatically scan for lost data on MacBook/iMac. When the scan completes, filter wanted data through the "Type" and "Path" buttons.

Step 4. Recover lost data or files
Double-click a file to preview it. Then, click the "Recover" button to restore the lost data to another place.
Method 2. Restore Mac to a Previous Date with Time Machine
There is a condition to restore Mac to a previous date with Mac Time Machine backup – you have already configured Time Capsule with Time Machine and have regular Mac backup. You cannot restore your Mac to a previous date with Time Machine if you don't have any backups.
How to Create a Mac Backup with Time Machine
Let us learn how to activate Time Machine and create a Mac backup with it first.
Step 1. Find the System Preferences under the Apple menu.
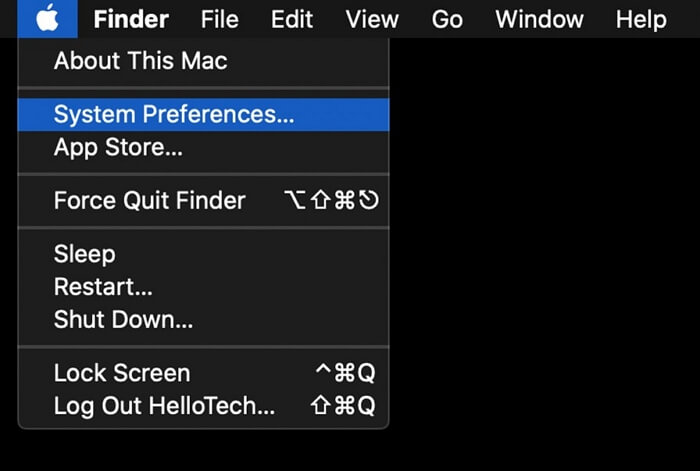
Step 2. Click "Time Machine".

Step 3. After the Time Machine window appears, you can click "Select Disk" to change the disk you want to back up. Remember to check the "Back Up Automatically" box.

How to Restore Mac to a Previous Date from Time Machine Backup
After learning how to back up your Mac with Time Machine, we can start to restore your Mac to an earlier date from the backup. You need to boot into macOS Recovery Mode and restore your Mac, and here is a video that may help you learn this method faster:
- 01:32 Boot Mac into Recovery Mode
- 04:06 Restore Mac from Time Machine
- 06:35 Select a Mac backup to restore
Here is the written tutorial:
Step 1. Restart your Mac, and press the power button while your Mac is turning on. (Press Command and R keys for Intel-based Macs.)
Step 2. Release the button until you see the recovery tool on the screen.
Step 3. Click "Restore from Time Machine".

Step 4. Follow the instructions and choose a backup to restore Mac to a previous date.
Method 3. Restore Mac to a Previous Date with Migration Assistant
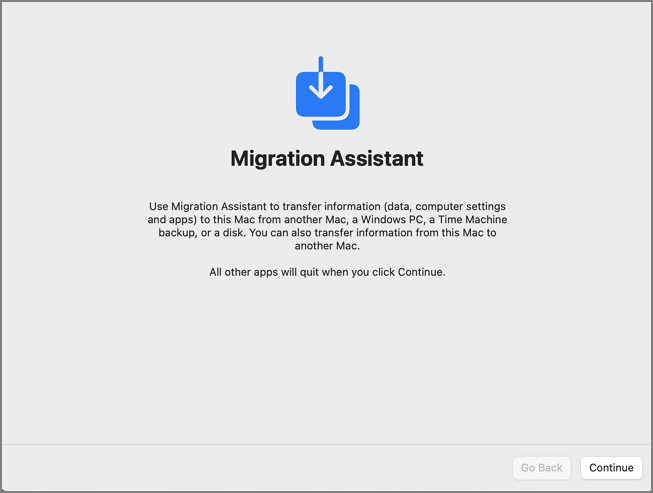
If you don't want to restart your Mac or your Mac Recovery Mode not working, macOS Migration Assistant can help a lot. Let us check how to use the Mac Migration Assistant:
Step 1. Find Migration Assistant under the "Utilities" folder.
Step 2. Click and launch Migration Assistant on your Mac, and click "Continue".
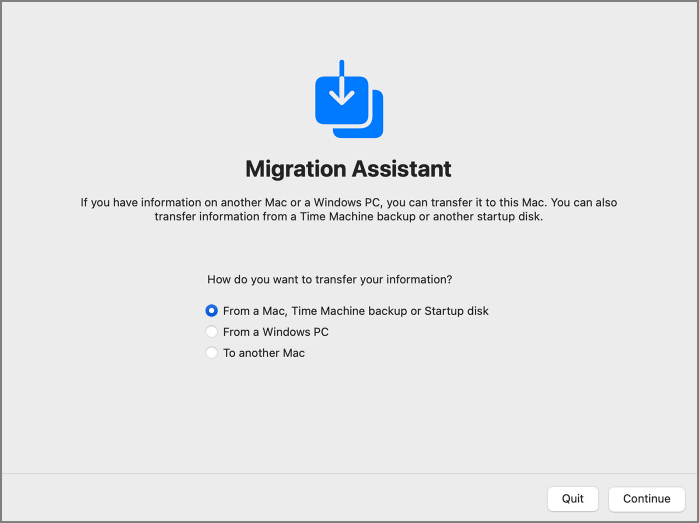
Step 3. Select the first option, "From a Mac, Time Machine Backup or Startup disk", and choose "Continue".
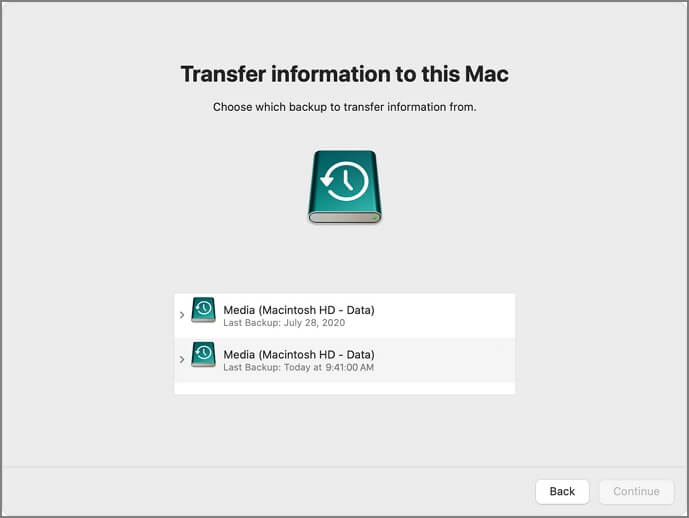
Step 4. Select a backup and click "Continue". Follow the prompts to restore the information you need.
Restore Mac to a Previous Date FAQs
We sorted out some questions and answers to help you get more information about restoring your Mac to a previous date. Keep reading, and you will learn more.
How do I restore my Mac to an earlier time?
There are three ways to restore your Mac to an earlier date. If you have a habit of backing up your Mac regularly, you can restore your Mac to an earlier date from Time Machine or restore with Mac Migration Assistant. If you don't have any backups, you can still recover data and files with professional data recovery software – Deep Data Recovery for Mac.
Is there a system restore option on Mac?
No, there is no system restore option on Mac. Users can system restore Mac with two methods:
- 1. Boot Mac into Disk Utility to erase the disk and reinstall macOS.
- 2. Applying macOS Erase Assistant, you can follow the prompts to system restore your Mac easily.
Can I restore Mac files without Time Machine?
Yes, it is possible to restore Mac files without Time Machine backup. Deep Data Recovery for Mac can help you recover lost files on Mac in three simple steps:
- 1. Launch the software and scan your Mac.
- 2. Filter the files, and find the files you want to recover.
- 3. Preview the files to confirm and recover them.
How to back up and restore Mac with Time Machine?
You can follow the steps to back up and restore your Mac with Time Machine:
- 1. Find the System Preferences under the Apple menu.
- 2. Click "Time Machine".
- 3. After the Time Machine window appears, you can click "Select Disk" to change the disk you want to back up. Remember to check the "Back Up Automatically" box.
- 4. Restart your Mac, and press the power button while your Mac is turning on. (Press Command and R keys for Intel-based Macs.)
- 5. Release the button until you see the recovery tool on the screen.
- 6. Click "Restore from Time Machine".
- 7. Follow the instructions and choose a backup to restore Mac to a previous date.
Related Articles
- How to Fix Printer Driver is Unavailable Error on Windows 10/11 [Fixed Lately]
- How to Install Windows 10 on New PC [Step-by-Step Guide]
- How to Erase All Content and Settings on Mac [macOS Ventura/Monterey]
- Solved: Getting Files Ready for Installation Stuck at 0%, 1%, 10%, 100%