How to Open External Hard Drive on Mac
External hard drives can be connected to a Mac to transfer data and files safely. Once connected, data can be easily transferred from the Mac to the hard drive or vice versa.
To open your drive on a Mac, you can simply click on the "Finder" icon on your dock or press Command + Shift + C to access the Disk Utility. If you encounter issues with your hard drive, such as a spinning beach ball, freezing, or a "not responding" message, try restarting your Mac or running a disk repair using the Disk Utility tool.
How to Open and Use An External Hard Drive on Mac?
External hard drives can be connected to your Mac using various methods, including Bluetooth for wireless connectivity, or wired options like Firewire, USB, or Thunderbolt cables. If your external drive comes with a cable, you can follow these steps to connect it to your Mac.
- Attach your external drive to your Mac using the provided cable.
- Now from your desktop, click on "finder".
- In the Finder menu, you can view your connected devices.
- Attach the storage device to your computer, select the files you want to transfer and drag them to the storage device.
*To grant access to the storage device:
If you're having trouble accessing your storage device, you can resolve the issue by adjusting the sharing and permission settings. From your device, navigate to the settings menu and look for the storage or file sharing section.
How to Open An Unrecognized External Hard Drive On Mac?
Your device may struggle to open a device even when it's correctly connected, due to various reasons such as incorrect settings, outdated software, or hardware malfunctions.
- A virus attack
- The access is denied
- The file on your hard drive is corrupted or unreadable
- Maybe the device is damaged
- Hardware issues
Besides prompt issues, other problems can also cause your external hard drive to become corrupted or damaged. Examine the issue and try these different approaches to get your external drive working on a Mac.
Method 1. Mount and Repair SSD in Disk Utility
If Mac does not recognize your external hard drive, follow these steps to mount your drive:
Step 1. Click on system preferences and then select "disk utility."
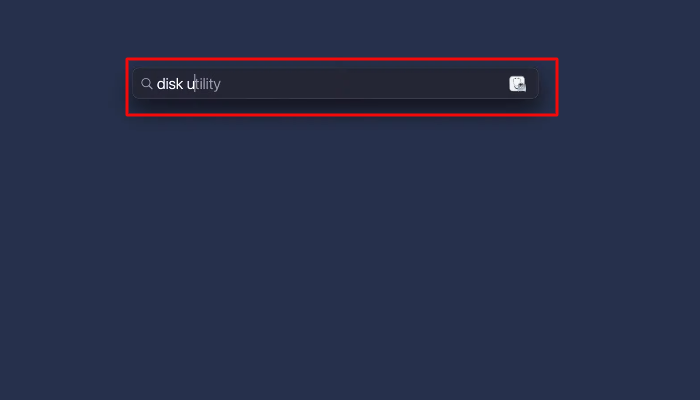
Step 2. On the left sidebar, click on your external hard drive.

Step 3. To mount or unmount a hard drive, click on the "mount" option from the menu, or click "Unmount" to disconnect it.
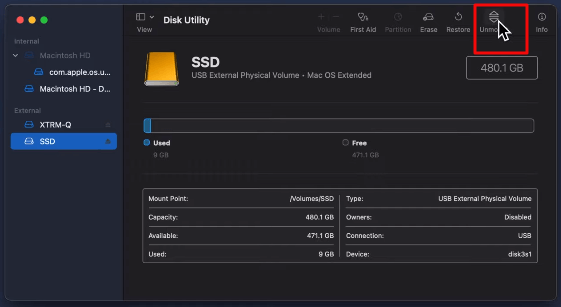
By following these simple steps, your Mac will now recognize your external drive, making it easy to use your device.
Method 2. Repair External Hard Drives Error with First Aid
Mac has designed a built-If your external drive is displaying but you can't open it, you can use the First Aid tool to access your drive. To do this, follow these steps: [insert steps here]. This tool can help repair corrupted apps, files, and external drives problems, allowing you to regain access to your drive.
Step 1. From the system preferences, select disk utility.

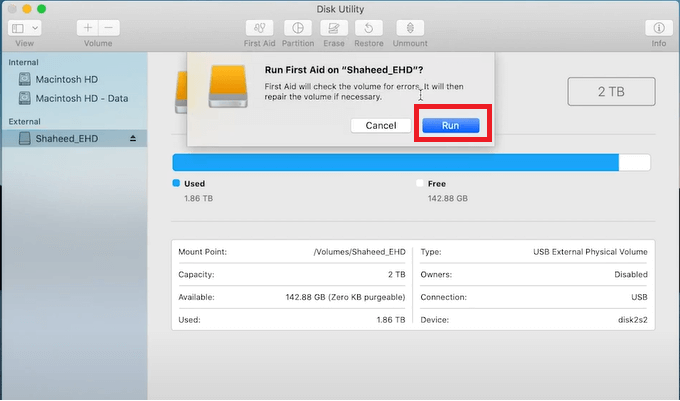
Step 2. Select your hard drive and click on First Aid.

Step 3. To start running the diagnosis and prompt Mac to fix your issue, click on the "Run" button.
To repair your drive, you can try using a data recovery software like EaseUS Data Recovery Wizard. This software can scan your drive and recover any lost data. If the drive is still not accessible, you can try using a third-party tool like MiniTool Partition Wizard to repair the drive's partition table.
Method 3. Advanced Repair Drive by Using Terminal
If your external hard drive is recognized by Mac but you're unable to open it, you can use Terminal to troubleshoot the issue.
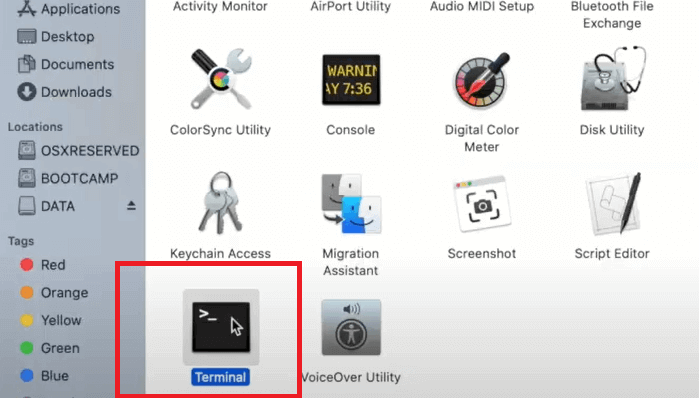
Step 1. Open terminal by clicking on Applications > Utility > Terminal.
Step 2. I ran the command "diskutil list" in the Terminal and a list of information about disks and volumes appeared on the screen.

Step 3. The line mentioned after the disk is the partition number, which is usually denoted by a number (e.g.

Step 4. To confirm that Mac recognizes your external drive, type "diskutil info disk" followed by the number of digits assigned to your disk, and it will display detailed information about your drive.
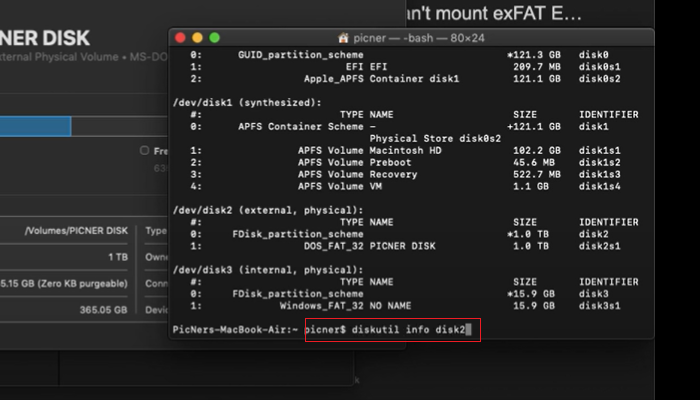
Step 5. Run the command "diskutil eject disk" followed by the numbers assigned to your disk, as seen in the output of the command "diskutil list" to safely eject the disk. For example, if the output shows "disk1s1" as the disk, you would run "diskutil eject disk1s1".

Remove your disk and plug it back in to allow Mac to recognize it.
Method 4. Format Unrecognized External Hard Drive on Mac
1. Use Disk Utility to retrieve data from your hard disk. 2.
If your external drive is not recognized, you can still retrieve your data by formatting it using the Command Prompt (cmd), Disk Management, or third-party software. To format your unrecognized drive, follow the steps outlined.
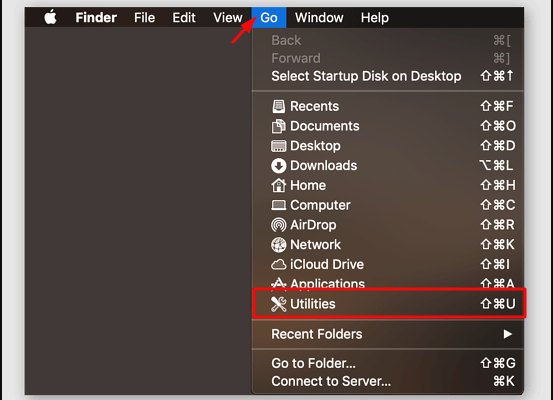
Step 1. Connect your drive to your Mac. Next, go to Finder and select Utilities.
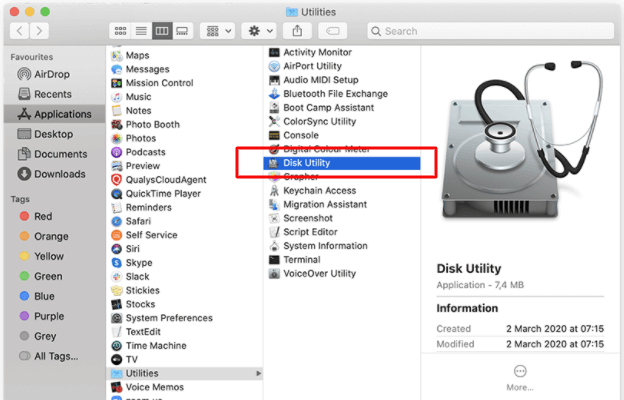
Step 2. Open Disk Utility.
Step 3. To format a drive, select the drive you want to format and click on the "Erase" button.
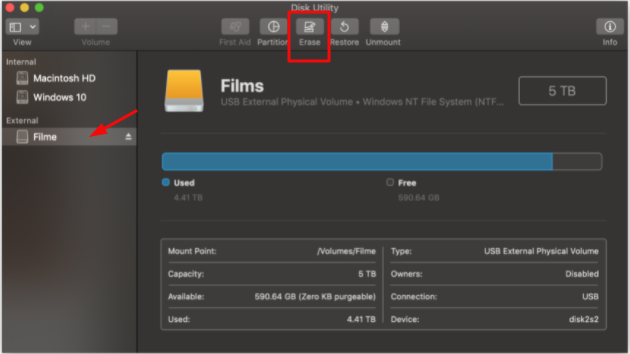
Formatting an unrecognized drive on a Mac can be done in simple steps, but if you want to recover lost data from the drive, you'll need to install professional third-party software.
How to Recover Data from a Formatted External Drive?
Formatting an external hard drive will erase all data on it, but software like Deep Data Recovery for Mac can help recover lost data with its user-friendly interface and professional data recovery options.
If you've accidentally formatted your Mac drive and lost your data, there's a handy tool that can help you recover it. This software offers some exceptional features, including the ability to recover data from a formatted drive, making it a lifesaver in such situations.
- It can recover deleted files from formatted hard drives, emptied recycle bins, memory cards, and flash drives.
- It's easy to install with simple recovery steps
- Free trial available
- Preview before recovery
- Supports multiple file formats
Download Deep Data Recovery for Mac from the button below and start recovering your data with just three steps: choose your drive, scan files, and recover the data.
Step 1. Connect your external hard drive to your Mac, then launch Deep Data Recovery for Mac. Choose the file types you want to recover and click "Next" to begin the process.

Step 2. Select the external disk and click "Scan" to let the software search lost files on it.

Step 3. After scanning, all files will be displayed in the left panel in the scan results, whether it's a quick scan or a deep scan.

Step 4. Select the files you want to recover and click the "Recover" button. Do not save the recoverable files to the external hard drive to avoid data overwriting.
Conclusion
Hopefully, we have covered both the topics on how to open your external drive on Mac and resolve unrecognized issues on your external drive. With these methods, you can quickly recover your drive, regardless of what caused the damage.
Related Articles
- Top 5 Completely Free Data Recovery Software for macOS/Mac OS X
- Seagate Hard Drive Not Showing Up on Mac? Fix It!
- Lost Partition Recovery with Deep Data Recovery for Mac
- How Do I Fix Permission Denied on Mac