How to See Blocked Messages on iPhone
Summary
Don't worry if you can't see blocked messages on your iPhone. Here you can find some workable solutions to see blocked messages on your iPhone.
"Is it possible to see blocked messages on your iPhone?"
The answer is NO. That's because if you have blocked someone's phone number, you will no longer receive calls or text messages from him/her. If you want to see the blocked messages, your only option is to unlock his/her phone number and then ask him/her to resend the messageto you. Though there is no direct way to retrieve blocked messages, you can retrieve other deleted text messages fromsomeone before they are blocked.
Whether you want to see blocked messages or retrieve text messages on your iPhone, below are the detailed instructions to do it.
How to Unblock Messages on Your iPhone
It is easy to unblock messages on your iPhone. After unblocking, you can receive and see messages again. If you want to know how to do it, here are the steps.
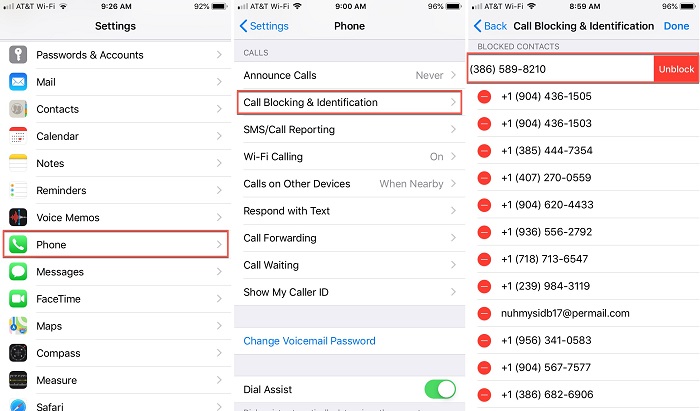
Step 1. On your iPhone, go to the Settings app.
Step 2. Tap "Phone," then tap "Call Blocking & Identification."
Step 3. Then, you will see a list of all the phone numbers you've blocked on your iPhone.
Step 4.Swipe a number you want to unblock to the left and then tap "Unblock."
Step 5. Then, this number will be unblocked for FaceTime, messages, and voice.

How to Filter Messages BetweenKnown and Unknown Senders
Starting from iOS 14, Apple adds some new features to its native Messages app, including filtering incoming messages. With this feature, you can sort messages from people who are not in your contacts into a separate list. This makes it easier to separate messages between strangers and your friends. If you want to use this function, follow these steps.
Step 1. Open your iPhone and go to the Settings app.
Step 2. Scroll down and tap "Messages."
Step 3. From the Messages page, enable the "Filter Unknown Senders" tab.
How to Retrieve Deleted Messages on iPhone with/without Backup
Sometimes, you may delete some important messages by accident. If that happens, you have to spend a lot of time and energy to get these deleted messages back. Generally, you can restore your device from iCloud or iTunes backup if you've made one. But both iTunes and iCloud only allow you to restore the whole backup to your device, which will erase your current data. Given that, we suggest you use some professional iPhone data recovery tools like Qiling MobiSaver for iOS. With this program installed on your computer, you can selectively recover deleted photos, contacts, messages, or other data from iTunes/iCloud backup or directly from your device without backup.
Tips for a successful recoveryon the iPhone:
- Stop using your deviceafter deleting the messages asthe newly added data overwrites the deleted messages.
- Do not be fooled by some fake data recovery software, especially the cracked one from untrustworthy sources, in case your devices are very likely to be infected by malware or viruses.
Now,download Qiling MobiSaver, and learn how to retrieve messages deleted on the iPhone with only three steps.
Step 1. Choose the Recovery Mode
Connect iPhone to your PC and launch Qiling MobiSaver. Click "Recover from iOS Device" on the left, and click "Start".
Step 2.Scan iPhone for Lost Messages
Qiling MobiSaver will automatically scan iPhone 13/12/11/X/XR/XS/8/7/6/5/4, and find lost messages and message attachments for you.
Step 3.Preview and Restore Lost Messages
Tick "Messages" and "Message Attachments". Choose the messages and attachments that you want to recover. Click "Recover to PC" or "Recover to Device" to decide where you'd like to restore them.
In Conclusion
Through reading this guide, we hope you have checked blocked messages on your iPhone. As you can see, there is no direct way to recover blocked messages on your iPhone unless unlocking messages. Though you can't recover blocked messages, you still have the chance to recover deleted messages from your iPhone with the help of Qiling MobiSaver for iOS. That's all about this guide.If you have any other questions related to our post, don't hesitate to contact us.
Related Articles
- Fixed: iPhone Stuck in Recovery Mode after Failed Update
- How to Recover Deleted Text Messages from iPhone SE
- Where Do Deleted Text Messages Go on iPhone [Text Message Recovery Tips]
- IMO Delete Message Recovery: How to Recover IMO Chat History