7 Days to Die Save File Location [Every Detail You Want to Know]
7 Days to Die is a highly-rated survival horror game on Steam, maintaining a large user base despite being almost 9 years old, due to its engaging gameplay and distinctive setting.
Finding the game's save file location can be a challenge for many players. The save file is where the game stores its data, and knowing its location is crucial for creating a backup, which is essential for preserving progress in case of a crash or other issues. In this article, we'll guide you through the process of locating the save file and creating a backup, so you can continue playing without worrying about losing your progress.
7 Days to Die is a survival horror game from 2013 with a saved file issue that's often overlooked due to various installation methods, particularly when installed through Steam.
The location of the save file for a game can vary depending on the game type, installation method, and even the game provider. This can lead to confusion when trying to find the save file, especially when it's not stored in the usual location. This article aims to help users locate the save file on their Mac, Linux, and Windows PC, making it easier to access and manage their game saves.
Where to Find 7 Days to Die Save File Location
If you've downloaded 7 Days to Die from Steam, finding the save file location is a straightforward process. On a Windows PC, the save files are typically located in a specific directory, and since most updates follow the same path, you can easily find it.
7 Days to Die save file location varies across different platforms. On Windows, it's usually located in the "7 Days To Die" folder in the AppData/Roaming directory. On Linux, it's in the ".
Windows:
To change your Windows PC's settings, simply follow these steps: go to the control panel, click on the "System and Security" option, then select "System" from the drop-down menu, and finally, click on the "Advanced system settings" link. From there, you can make any necessary changes to your system settings.
Step 1. Press "Windows + R" on your keyboard.
Step 2. Type %AppData% and press the "enter" key.
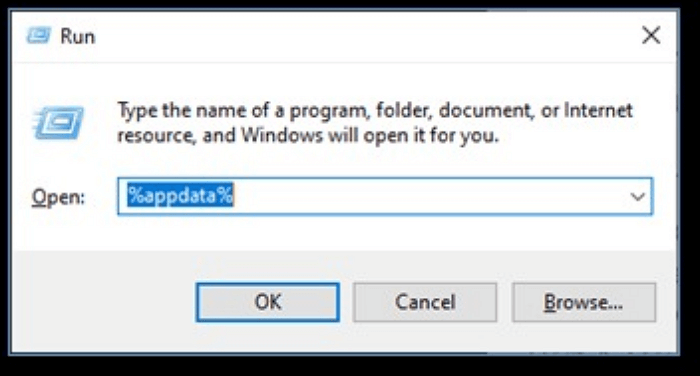
Step 3. Locate 7daystodiesaves in the Roaming folder.
Step 4. Then head into the folder 7DaysToDie > SavePREGEN01.
Step 5. In the PREGEN01 folder, you'll find all the saved files.
This is where you can find the save files for this game on Windows computers.
macOS:
To quickly access the Library folder in macOS, you can hold down the Option (⌥) key while navigating to the Go menu in the Finder, then select Library from the drop-down list. This will take you directly to the Library folder, bypassing the need to dig through the Finder's menus.
Step 1. Press "Command + Shift + G" on your keyboard.
Step 2. Then copy and paste the following address: ~/Library/Application Support/7DaysToDie.
Step 3. Press the "return" key.

Step 4. Go into the folder and move the files to where you want them to be.
To copy files from the macOS system folder, you can use the Finder to select the files you want to copy, and then drag and drop them into a location of your choosing, such as an external hard drive or a cloud storage service. This will allow you to create a backup of your important files and keep them separate from the system folder.
Linux:
To find the location of a file in Linux, you can use the `which` command followed by the name of the file. For example, to find the location of the `ls` command, you would type `which ls` and press Enter. This will display the path to the `ls` command, which is typically located in the `/usr/bin` directory.
Step 1. Open a File Manager on your Linux
Step 2. 1. Go to the library's website and search for the book you're interested in.
~/.local/share/7DaysToDie.
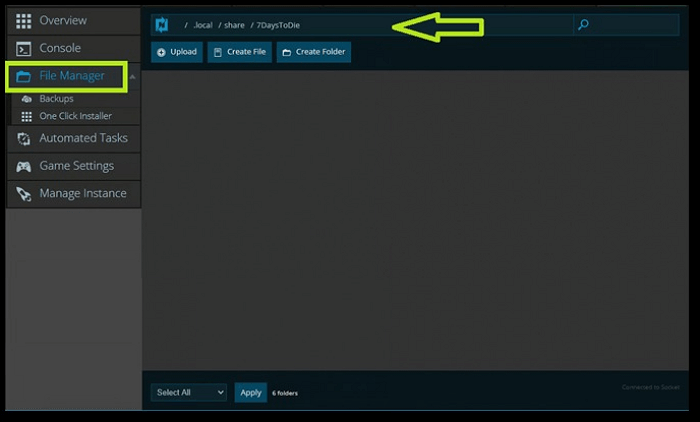
Step 3. To transfer your saved files, navigate to the "Saves" folder, copy all the contents, and then paste them into a desired location.
How to Backup and Restore 7 Days to Die Save File
To avoid this, you can back up your save file by copying it to a different location on your computer or external hard drive. This way, even if the game crashes or you need to reinstall it, you can easily restore your save file and continue playing from where you left off.
You must back up your saved game files through various methods to ensure they don't get lost. For 7 Days to Die, we recommend two primary methods: backing up your save files. These methods will help you prevent losing your progress and allow you to continue playing without worrying about your game data being deleted.
To secure your file to a location where it's easy to access and use, you can either save it to your computer's desktop or cloud storage, such as Google Drive or Dropbox. This way, you can easily find and use the file whenever you need it.
Steam Backup
Let's talk about the steps first:
Step 1. Click on "Steam" in the top-left corner.
Step 2. Navigate down and click on "Backup and Restore Games."

Step 3. Click "Backup currently installed programs."
Step 4. 7 Days to Die is a survival video game developed by The Fun Pimps. It was first released in 2013 and has since become a popular game in the survival genre. The game allows players to build and manage their own base, gather resources, craft items, and fend off hordes of zombies.
Step 5. Pick the backup destination.
Step 6. Wait for the backup to finish.
To ensure your save remains safe, the game will automatically back up your files. This means that even if something goes wrong, your progress will still be preserved.
Advantages:
- Easy for those who already have Steam
- Doesn't require a lot of steps
- Easy to restore
Disadvantages:
- Not exactly safe
- Takes a lot of time
- Difficult for slow internet users
Backup with Qiling Disk Master
Qiling Disk Master is a remarkable backup tool that enables you to create outstanding backups in no time. You should definitely use this amazing tool to back up your 7 Days to Die Save files.
This option is a quick and easy solution that can directly copy your files, making it ideal for creating save game files backup. It's also a more convenient option compared to others, and you can even schedule automatic backups to save your files. This makes it a great tool for keeping your game saves safe and secure.
Advantages:
- Very quick
- Easier to use
- Quick restoration
- System backup
- Free cloud storage
Disadvantages:
- None so far
Here are the steps to use it:
Step 1. To start the backup process, click the "Select backup contents" button.

Step 2. There are four main categories of data backup: File, Disk, OS, and Mail. Each category represents a different type of data that needs to be backed up to ensure its integrity and availability in case of data loss or system failure.

Step 3. On the left-hand side of the screen, lists of both local and network files are displayed, allowing you to expand the directory and select the files to back up.

Step 4. Follow the on-screen guidance to select the location where you'd like to store your backup.

To set up a backup, ensure it's encrypted and schedule it by clicking on "Options" in "Backup Options." You can also specify a start time in "Backup Scheme" by clicking on "Options." Additionally, explore other customizable options available.

Step 5. You can save the backup file to your computer, Qiling's cloud service, or a NAS.
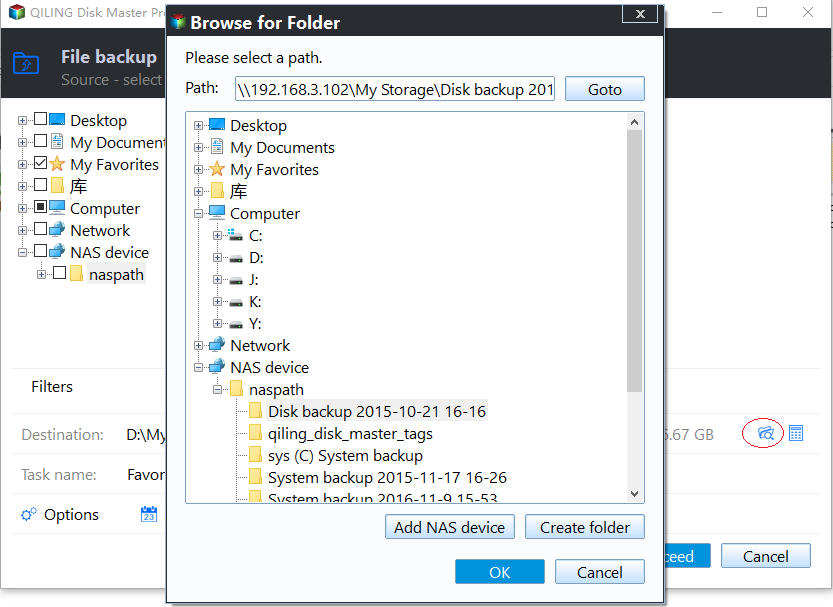
Step 6. Qiling Disk Master allows customers to store backup copies of their files on a third-party cloud drive or the company's own cloud storage.
To back up your data on a third-party cloud drive, select Local Drive and scroll down to add Cloud Device, then fill in your account information.
Step 7. To start a backup, click on the "Proceed" button. Once the backup process is complete, the backup job will be displayed as a card on the left side of the screen, and you can access more information about it by right-clicking on it.

How to Change 7 Days to Die Save File Location
To change the save file location in 7 Days To Die, navigate to the game's primary folder, then locate and edit the "sv_savegame" file to specify a new save location. This will allow you to store your saves in a different directory.
Step 1. Open the game 7 Days to Die's main folder.
Step 2. Locate Serverconfig.xml.
Step 3. Right-click on the file and open it with Notepad.
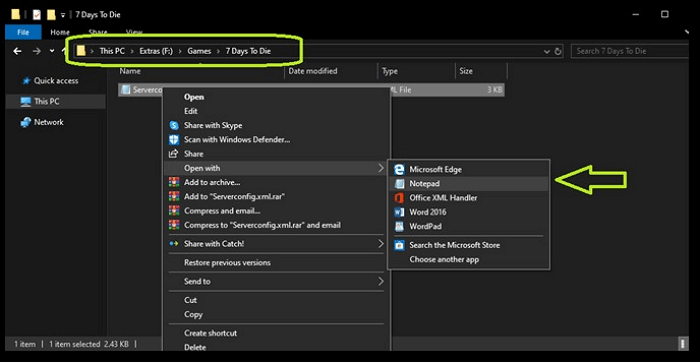
Step 4. The instructions were not provided, could you please provide the context or the steps you are referring to so I can assist you better?
Step 5. Change the address in the following setting.
Step 6. Change the save game location to D:\Saves\My Games.
Step 7. Save the file.
Once you've saved the file, start your game and it will automatically save the savegame files in that location. To access the new savegame, simply copy and paste the file's location into the new address before launching the game.
Concluding Thoughts
The 7 Days to Die savegame file location is crucial to know, as it allows you to back up your data and avoid potential losses. Once you find it, make sure to create a backup, either through Steam's built-in feature or a third-party tool like Qiling Disk Master, which is recommended for its quality and reliability. This simple step can save you from the frustration of losing your progress.
FAQ on 7 Days to Die Save File Location
If you have any questions, you'll find their answers here:
1. Where are my 7 Days to Die saves located?
7 Days to Die saves its game data in the Roaming folder within the User's App Data. To access it, open the Run command, type %AppData%, and press enter. Then, navigate to the 7 Days to Die folder to find your saved game files.
2. How do I transfer a saved file in 7 Days to Die?
To copy or replace your save game, you can select the save game file and right-click on it, then choose the option to copy or replace it. This will allow you to transfer your save game to a different location or overwrite the existing save files.
3. Does 7 Days to Die have a cloud save?
To cloud save your 7 Days to Die save files, you'll need to change the game's save file location to an external drive or folder. Once the saves are in this new location, you can use Qiling Disk Master to schedule automatic backups to your cloud storage, ensuring your game progress is always up to date and easily accessible.
Related Articles
- What Is Microsoft Update Health Tools? Everything You Need to Know
- What Is The Difference between Windows 10 Pro and Windows 10 Pro N
- [Solved] What Happens If I Interrupt System Restore Windows 10?
- What Is macOS Catalina | Upgrade macOS Catalina Guide