How to Back Up iPad in Every Way
Quick Navigation:
- Part 1. How to Back Up iPad to Computer
- Method 1. How to Back Up iPad to iTunes
- Method 2. How to Back Up iPad to PC with iPhone Transfer Software
- Part 2. How to Back Up iPad to iCloud
- The Bottom Line
Generally speaking, there are two directions for you to back up an iPad: You can either back up your iPad to computer or back up your iPad to cloud storage.
Acturally, Apple has provided two ways for you to make an iPad backup, including iTunes and iCloud. With iTunes, you are able to back up your iPad to computer, while with iCloud, you can wirelessly back up your iPad to cloud storage. Besides, there are third-party programs that also allow you to back up your iPad to PC or Mac.
No matter which way you prefer, you will know the steps to do it from the guide below. (You can also apply the tips to back up iPhone.)
Part 1. How to Back Up iPad to Computer
If you prefer to back up your iPad to a computer, be it a PC or Mac, you can either use iTunes or a third-party tool to get things done.
Method 1. How to Back Up iPad to iTunes
You can back up almost all data and settings on your iPad to the computer using iTunes. With the iTunes backup, you can restore a new iDevice or restore lost data on your iPad.
However, you can't read the files in the backup, even it is stored on your computer. The only way for you to regain access to the backup content is to perform a restore on your iPhone or iPad.
By the way, if you want to back up iPad to a PC or a Mac running macOS Catalina and later, iTunes is your choice. While if you are using a Mac running macOS Catalina, iTunes is no longer available and you should use Finder instead, which serves a similar function to iTunes.
To back up iPad to iTunes:
Step 1. Connect your iPad to your PC with a USB cable.
Step 2. Wait for iTunes to launch automatically.
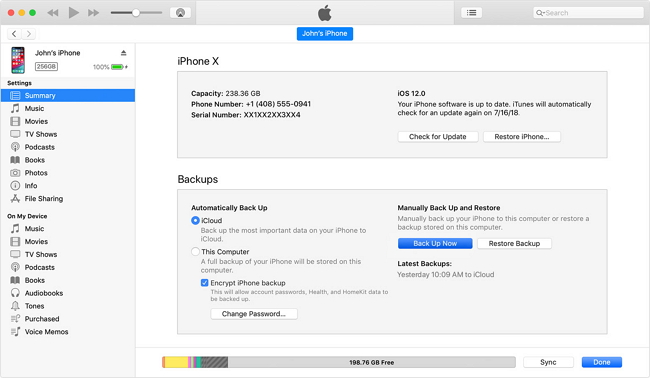
Step 3. Make sure your iPhone is detected by iTunes and click the "Device" button in the iTunes window.
Step 4. Go to "Summary" and click "Back Up Now" to start backing up your iPad to PC.

To back up iPad to Finder:
Step 1. Connect your iPad to Mac using a USB cable and open Finder.
Step 2. Trust the computer on your iPad and choose your iPad under "Locations".
Step 3. Make sure you choose the "General" tab and click "Back Up Now" to start backing up your iPad to Mac.

When it has done, you can click "Manage Storage" to check your backup.
Method 2. How to Back Up iPad to PC with iPhone Transfer Software
With the help of an iPhone transfer software like Qiling MobiMover, you can back up most of your iPhone files, including photos, videos, music, contacts, messages, and more, to your computer. And with the backup you made, it will be quite convenient for you to switch to a new iPad and retrieve lost data when data loss occurs on the source device.
To back up your iPad to PC:
Step 1. Connect your iPhone/iPad to your PC with a USB cable and click "Trust" on your device. Then launch Qiling MobiMover and click "Backup Manager" > "Back up".
Step 2. Check the types of files you need to backup. Afterward, click the backup button to start backing up your iPhone or iPad.
Step 3. Depending on the size of the content, the time the backup will spend varies. Wait patiently for the backup to complete.
Part 2. How to Back Up iPad to iCloud
If you don't have a computer or USB cable available, backing up your iPad wirelessly is best suited for you. iCloud enables you to automatically back up your iPad over Wi-Fi. As long as you have enough iCloud storage to store your iPhone data and settings, you can easily back up your iPad.
To back up iPad to iCloud:
Step 1. Go to "Settings" on your iPad and tap [your name] > "iCloud".
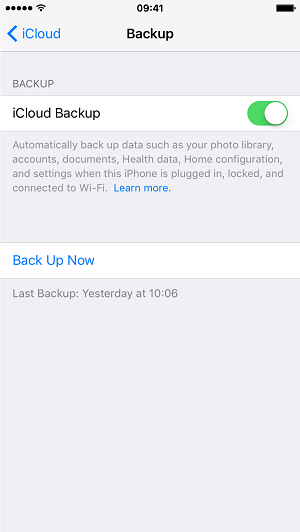
Step 2. Choose "iCloud Backup".
Step 3. Toggle on the "iCloud Backup" option to enable automatic backup. If you want to manually back up your iPad to iCloud, click "Back Up Now" to initiate the backup.

Similar to an iTunes backup, you can only restore an iDevice from the iCloud backup to reaccess the content in the backup.
In addition to iCloud, there are also iOS apps that will help you to back up your device to cloud storage wirelessly. You can search for such an app from the Internet or the App Store and apply it to create an iPad backup.
The Bottom Line
Now you know how to back up an iPad in all possible ways. Of course, you can also apply these tips to back up an iPhone or iPod Touch. Conclusively, if you want to back up your iPad to computer, using iTunes or a third-party tool will help. While if you prefer to create a backup wirelessly, using iCloud is your optimal choice.
Related Articles
- How to Transfer Files from PC to Hard Drive Faster in Windows 11/10/8/7
You can read this article to learn how to transfer files from PC to hard drive faster in Windows 11/10/8/7. - How to Transfer OS from HDD to SSD without Reinstalling
The easiest way to transfer OS from HDD to SSD is system cloning. It ensures booting from the target SSD, and eliminates the need of reinstalling Windows. - How to Wipe a Hard Drive for Reuse in Windows 10, 8, 7?
How to wipe a hard drive for reuse or selling. This post will give the answer. - Best Way to Increase C Drive Space in Windows 7/8/10
Increasing C drive space without hard drive formatting and OS reinstallation is a common issue. A utility gives good schemes to extend C partition securely.