How to Burn Windows 7 ISO to USB [Step-by-Step Tutorial]
Overview of how to Windows 7 ISO to USB:
| ⚙️Complex Level | Low, Beginners |
| ⏱️Duration | 5-10 minutes |
| 💻Applies to | Burn Windows 7/8/8.1/10/11 ISO to USB |
| ✏️Stages |
Burning a Windows 7 ISO image is a complicated process. However, things will become a lot easier when you turn to a professional ISO or USB-burning tool or software.
Follow this page from Qiling, and you will learn how to successfully burn a Windows 7 ISO image to a USB flash drive in a few simple clicks. Please click the buttons below and let more users know how.
How to Burn Windows 7 ISO to USB [2 Stages]
In this part, we will take Windows 7 ISO image burning as an example to show you a complete guide on how to burn Windows ISO images to a USB flash drive on your computer.
We divide the program into three parts as follows:
In order to successfully complete these three stages, you need to do the following preparations:
- Prepare a reliable USB
- Download the Windows ISO image on your PC (Click the link to download the correct Windows 7 ISO file)
- Download a reliable Windows ISO file-burning software
Because Windows 7 doesn't come with an easy-to-use tool to burn ISO files, we need to choose reliable third-party software. After many tests, we decided to recommend Qiling Disk Master to you.
It never had any errors during our testing, and in just three steps, you can complete the entire burning process. So, download it to your computer ahead of time, and follow the tutorials that follow to get started.
Stage 1. Prepare the USB Drive for ISO Image Burning
Burning the Windows 7 ISO image to a USB flash drive has specific file system format requirements; that is, the USB flash drive needs to be set to FAT32 first. If your USB is in the format of FAT32, skip to Stage 2. Here are the quick steps to prepare a FAT32-formatted USB drive:
Step 1. Connect a USB drive with a storage capacity of 32GB or more to your PC. (Back up your important documents in advance to avoid data loss.)
Step 2. Press Windows + I keys to open File Explorer, then right-click on your USB drive.
Step 3. Select format, select FAT32 in the file format, and click "Start."
Stage 2. Burn Windows 7 ISO to USB
After downloading Qiling Disk Master, we can start burning. The interface of this tool is very clear, which makes the whole burning process smoother and smoother. Besides burning Windows ISO, it also helps to do the following:
Qiling Disk Master
- Format 64/128GB USB as FAT32
- Fix USB cannot be formatted as FAT32 error
- Burn ISO to USB on Windows 10
- Burn ISO to DVD/CD
- Test USB speed and check USB file system errors, etc.
Now, let's start to burn Windows 7 ISO file to the target USB.
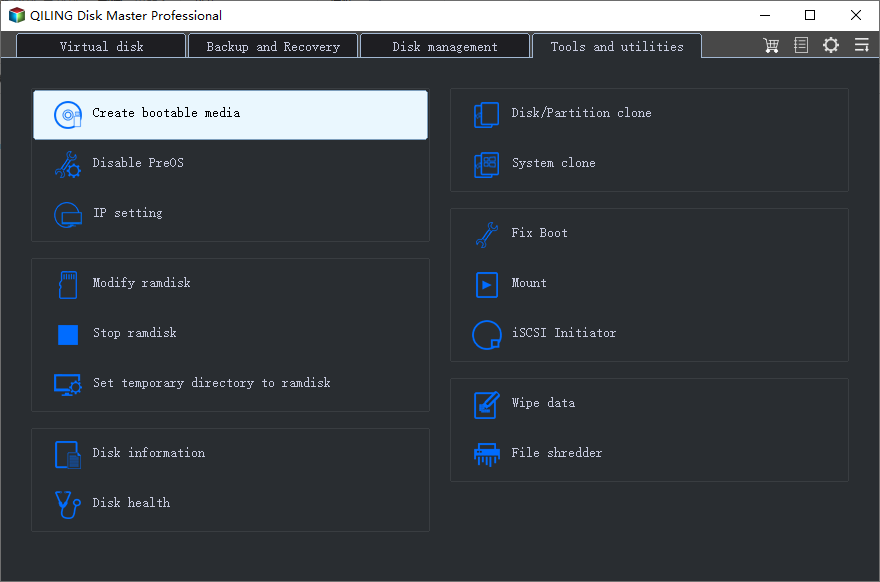
Step 1. Launch Qiling Disk Master and go to the Tools section. Click "Burn ISO" and click "Next".
Step 2. Select the ISO image that you have creat on your PC.
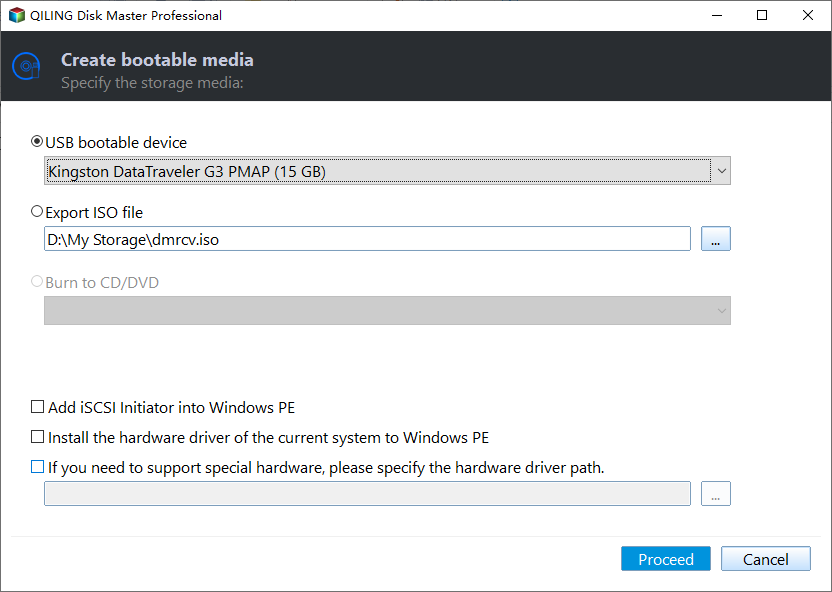
Step 3. Click "Proceed" to execute the operation.
Why Burn Windows 7 ISO to USB
The most widespread way to get an ISO image to work is to burn the ISO image to a USB drive. So why burn the Windows 7 ISO file to a USB drive? The answer is here. Here is a list of benefits of burning the desired ISO image to a USB drive that you can dig into:
- ✅USB is portable and versatile.
- ✅A bootable Windows USB drive is available.
- ✅A PC can be repaired using a Windows ISO image burned on a USB.
- ✅A Windows ISO image can be made bootable on USB for Windows transfer or system installation/reinstallation.
You may also like:
However, how do you burn the Windows 7 ISO image to a USB? What should I prepare? Following the next section, you will walk through the complete process with detailed guided steps. Now click the link to learn the top five ISO burners for Windows 10/11/8/7 in 2023.
Conclusion
Burning an ISO to USB is easy with the right method, and you can do it on your own. Both of the above stages are easy. Many experienced users choose to create bootable USB from ISO by Media Creation Tool; this method also works but is too difficult for ordinary users. So, for Windows beginners, it is recommended that you follow the above guides one by one. With the help of reliable ISO image burning software Qiling Disk Master, the whole process will be easier. Besides, Qiling Disk Master is also a great Windows 7 bootable USB tool. Click the button below to download it.
Burn Windows 7 ISO to a USB FAQ
As you see, Qiling provides a step-by-step guide on how to burn Windows 7 ISO to a USB. If you have other related questions, read this part.
1. How to create a bootable Windows 7 USB to install Windows 7 from it?
First, you need to prepare a USB and remember to back up the data on the USB in advance. Then, follow the steps below:
- 1. Download Windows 7 USB/DVD tool and install it on your PC.
- 2. Run this program and browse the Windows 7 ISO image by clicking the Browse button.
- 3. Click on the USB device button when selecting the Media type. (Check for the drive letter via Windows File Explorer)
- 4. Choose your USB flash drive from the dropdown menu and click the "Begin Copying" button.
- 5. Wait patiently. This process will take a few minutes. When it's done, reboot your PC and install Windows 7.
2. What is the Windows 7 USB/DVD download tool?
Windows USB/DVD Download Tool is a simple and free tool for creating Windows DVDs or USB flash drives. It can help to create a copy of Windows 7, Vista, or XP ISO files on a USB flash drive or DVD.
3. How can I make a bootable USB on Windows 7 Rufus?
Get your Windows ISO file, USB, and the latest version of Rufus ready to get started.
Step 1. Download Rufus and connect the USB to your PC.
Step 2. Download the ISO image on your PC. the
Step 3. Launch Rufus on your PC and, select the ISO image, click Open.
Step 4. Click Start.
4. How to burn ISO to USB on Windows 10?
To burn ISO to USB on Windows 10, you should follow the steps below:
Step 1. Format the USB to FAT32 and download the Windows 10 ISO file on your PC.
Step 2. Download Qiling Disk Master and launch it.
Step 3. Go to the Bootable Media section and choose "Burn ISO."
Step 4. Choose the Windows 10 ISO file and select your USB as the destination. Click "Burn" to start.