Your Best Guide to Clone Windows to M.2 SSD [2024 Tutorial]
Key Takeaways of Cloning Windows to M.2:
If you get your hands on reliable and suitable software, the cloning Windows to M.2 process can be seamless and easier for you with simple steps. In this write-up, you can use the best OS Cloning software for cloning Windows to M.2 for a successful boot.
Stay connected with us until the end of this write-up and follow the guidelines for getting the best O.S. cloning software to clone Windows to M.2. It will help make it bootable successfully.
If you have recently got a new M.2 SSD drive, consider data transfer and OS migration from the old one to this one. You must know how to clone Windows to M.2. Let us learn about the complete process listed here:
| Procedure | Tools | Duration |
|---|---|---|
| 🚩 #1. Preparation |
|
3-5 minutes |
|
15-30 minutes | |
| 💽 #3. Set Windows to Boot from M.2 |
|
5-8 minutes |
How to Clone Windows to M.2? Best OS Cloning Software Free Download
- 🎯 Target: Clone Windows to M.2 SSD
- 👩💻 Target Users: Windows beginners and professionals
- 🖥 Supported OS: Windows 11/10/8.1/8/7, Windows Vista/XP, and Windows Servers
- ✅ Presiquisitions: Install and initialize M.2 SSD, backup valuable Windows system volume data.
If you plan to clone Windows to M.2, it cannot be done without using any third-party OS cloning software. Not only it easese the job, but it also helps you with speedy action. We have a top-notch recommendation for you that is reliable and easy to operate. Qiling Disk Master helps in providing support for cloning O.S., disk, and partition as well. It works lightning-fast to offer effective results under a few taps.
🎗️Extend Reading: Clone M.2 SSD with Only One Slot
Tutorial Guide to Clone Windows to M.2 2023
If you are looking to clone Windows to M.2 in a straightforward way, then follow the required steps below:
Note that you need to repeat the process twice if your OS partition and boot partition are separated in two volumes. First, select to clone your system partition. Second, select to clone your boot partition.
Step 1. Select "Clone" from the left menu. Click "Clone Partition" and "Next".
Step 2. Select the source partition and click "Next".
Step 3. Choose your the target partition and click "Next "to continue.
- If you clone partition to the existing partition, you should transfer or back up data before cloning to prevent it being overwritten.
- Check warning message and confirm "Yes".
Step 4. Click Start and wait for the clone to complete.
You can check how to clone partition or system reserved partition on this video tutorial.
BONUS Tip: Make Windows Bootable on M.2
Once you are done cloning Windows to M.2, we must inform you your job is still ongoing. Further, you must set M.2 as the boot drive to ensure Windows can be booted on a new disk. You can do this by using the BIOS settings. To carry out this process, here are a few steps that you need to follow.
Step 1: Make Motherboard Recognizes M.2 SSD
Firstly, start by turning off your P.C. and pressing the 'F2' or 'Delete' key as soon as you receive a prompt for entering into BIOS. After that, go for confirmation or make settings of making M.2 SSD the first boot option.
If you cannot see your M.2 SSD on the list, you must set it to manual mode. Then, it will be putting your Motherboard in M.2 mode.
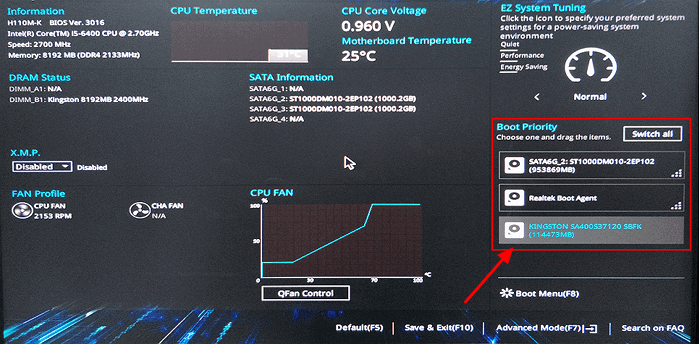
Step 2: Set M.2 as Boot Drive
Now, go to the Boot menu, and change the Boot Priority by setting Windows to boot from the M.2 SSD.
Step 3: Saving the Settings and Making an Exit
Then, navigate through the BIOS menu and find the 'Save and Exit' tab. Then, choose the 'Save Changes and Exit' option. Finally, you will see the P.C. automatically rebooting.
Can I Clone Windows to M.2? When Should I Do So?
Yes, you can clone Windows to M.2. M.2 SSD is a solid-state drive of the new generation, which accounts for a faster speed than you get on a standard SSD. In support of NVMe, an M.2 SSD connects directly with the Motherboard, providing a blazing speed like 3500 MBPS for data transfer. Typically, this speed for transfer ranges from 200-500 MBPS. Additionally, M.2 SSDs are very small compared to SATA SSDs, so they easily fit in a P.C. case.
Compare HDD to M.2 SSD, it's sure that Windows can boot and run even faster on the M.2 SSD. There are a few situations when you may also want to require this process of cloning Windows to M.2 SSD. These are:
- While upgrading your OS disk from HDD to M.2 SSD.
- When your computer slows down while you are using an older HDD.
- When you are looking for an improved gaming experience.
- When you are looking for optimization of your PC to get faster speed for reading and writing.
- When your PC boots slowly or gets stuck while carrying out the process.
So whenever you have such a need, revert to the provided guide on this page to switch your OS to a more efficient M.2 SSD now. No OS reinstallation nor boot issue would occur.
Final Verdict
We hope we met your expectations to guide you on cloning Windows to M.2. You can trust Qiling Disk Master to produce beautiful results.
What Else Can You Do with Qiling Disk Master on M.2 SSD or Windows Computer
Besides cloning Windows to M.2, Qiling Disk Master also provides Windows users with attractive features to manage M.2 and old system disk drives. Check them out below:
- It assists with migrating O.S. to M.2 with a few clicks.
- It helps optimize SSD with the quality of 4K alignment.
- It helps speedily read and write SSD by changing its cluster size.
- It helps with checking SSD health and testing the temperature of SSD and I.O.
- It helps with cloning hard drives that have bad sectors.
- It provides professional technical support in times of need.
- It has compatibility with almost all versions of Windows.
Its impressive features use 4K alignment to optimize SSD. It can help you clean your old disk using its disk wipe feature. Additionally, the software works with a few clicks to produce lightning-fast results. So, download it as soon as possible to make the most of it for cloning and additional purposes.
FAQs about Clone Windows to M.2
We hope we were able to guide you well about cloning Windows to M.2. Now it's time to check out some popular FAQs to adhere to additional queries on your mind.
1. Can you clone Windows 10 to SSD?
Yes, if you have Windows 10 installed on a standard hard disk regularly, you can switch the Windows to SSD without going for Windows reinstallation by cloning the system drive. You can refer to this page for help: Clone Windows to SSD Free.
2. How to Clone OS from HDD to NVMe?
You can clone OS from HDD to NVMe. Most NVMe SSD utilize the M.2 factor, and to do so, you need to ensure your computer motherboard supports NVMe. So, for example, if you have a motherboard equipped with an M.2 slot with the support of NVMe and a P.C. with backing for UEFI mode, disk cloning software - Qiling Disk Master can clone O.S. from HDD to NVMe.
For this, follow the steps;
- Complete the installation of NVMe on your P.C.
- Go ahead by starting Windows 10 from the original HDD.
- Download the Qiling Disk Master software for Disk Cloning to get the cloning done for the hard drive to NVMe.
3. How do I clone Windows only to SSD?
- First, you must prepare the tools by downloading the software using a SATA cable and SSD.
- Then, initialize the SSD by plugging in the SSD to SATA to USB adapter and promote the same into your P.C.
- Make a right tap on the Start menu and tap on Disk Management.
- Install and open Qiling PartitionMaster, and from the left menu, tap on ' Disk Clone.' Then tap on 'Next.'
- Make a selection of the OS partition and boot partition and tap on 'Next.'
- Select the new SSD as the target and click 'Next". Tap on 'Yes' when you see a warning.
- Preview the target disk's layout. Then tap on 'Start' to clone the OS to SSD.
- Last, change the boot drive to a new SSD with a cloned Windows system.
Related Articles
- Top 9 Tips | How to Fix Steam Disk Write Read Error
- How to Create New Partition in Windows Server 2022/2019/2016 - Qiling
- How to Fix Hard Drive Very Slow in Windows 10/8/7
- How to Resize/Move/Clone BitLocker Partition on Windows 11/10 Without Decryption