Blue Screen While Playing Games? 2024 Fixes Here
- Fix the Blue Screen of Death When Playing Games Automatically - Recommended
- Blue Screen of Death When Playing Games - 4 Manual Tips
Blue Screen of Death is an extremely common problem, especially when playing high-definition games. This destructive issue is a real concern. There is no doubt that this problem is prevalent in the Windows operating system series: Windows 10 blue screen when playing games, Windows 11 blue screen when playing games, etc.
So why do blue screen errors appear when playing games? One of the leading causes for the PC blue screen when gaming is that it is a graphic-intensive game. When a game pushes a PC's hardware to its limits, it can expose underlying hardware weaknesses, trigger overheating, or unveil latent software conflicts. Other common reasons are as follows:
Setup issues/Dust problems/Memory and graphics card issues/Driver issues
Don't worry; we suggest you try the following quick fix first:
💡Unplug and reinsert the graphics card:
- Disconnecting and reconnecting the graphics card can help resolve loose connections or potential contact issues.
💡Restart your computer:
- A simple reboot may resolve the temporary glitch or conflict causing the blue screen issue and return your system to normal operation.
Share this article to let more users know about these reasons and quick solutions.
Blue Screen When Playing Games - Automatic Fix
Here, we'll talk about a tool that can automatically fix the blue screen error - Qiling Disk Master Professional. It has a "Boot Repair function." This feature can help you fix the blue screen with one click while playing games. Blue screens caused by software conflicts, outdated drivers, or random errors can all be fixed. You don't need to know any of the reasons behind it; this tool automatically fixes all potential bugs, so it's very beginner-friendly.
In addition, it is very compatible with Windows 11/10/8/7; you can download it and follow the tutorial below to start repairing it.
Step 1. Start Qiling Disk Master after connecting the external drive/USB to your computer, go to "Tools" and click "Create bootable media".

Step 2. Select an available USB Drive or CD/DVD and click "Proceed". You can also burn the Windows ISO file to the storage media.
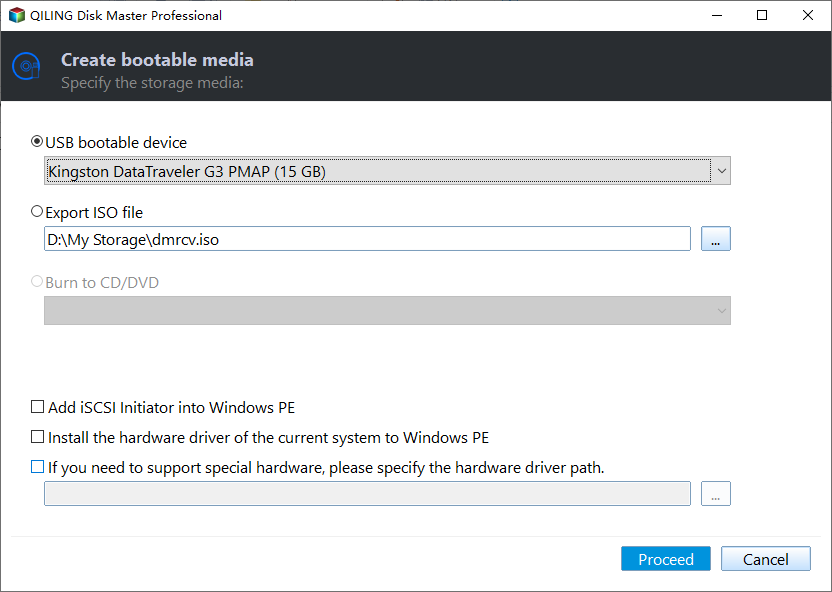
Step 3. Connect the created bootable drive to the new computer and reboot the computer by pressing and holding F2/Del to enter the BIOS. Then, set the WinPE bootable drive as the boot disk and press F10 to exit.
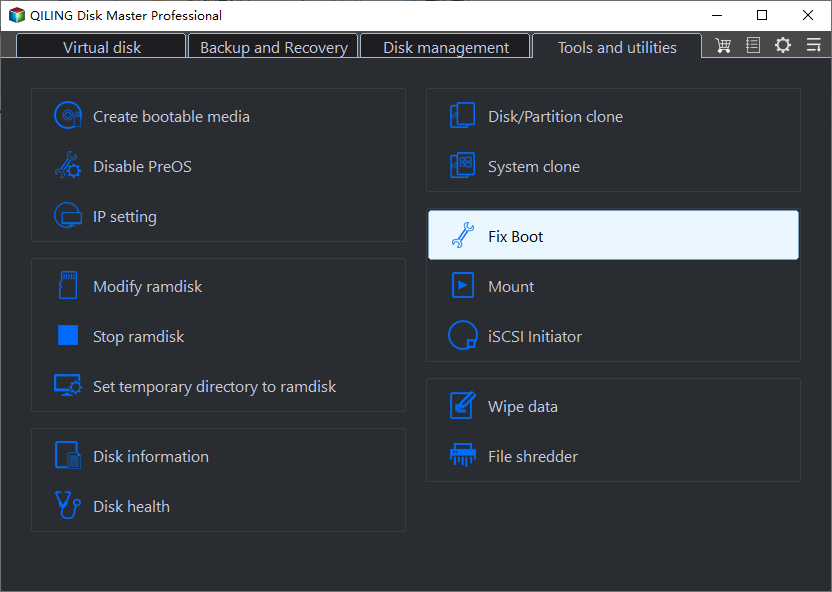
Step 4. Boot the computer again and enter the WinPE interface. Then, open Qiling Disk Master and click "Fix Boot" under the "Tools" option.
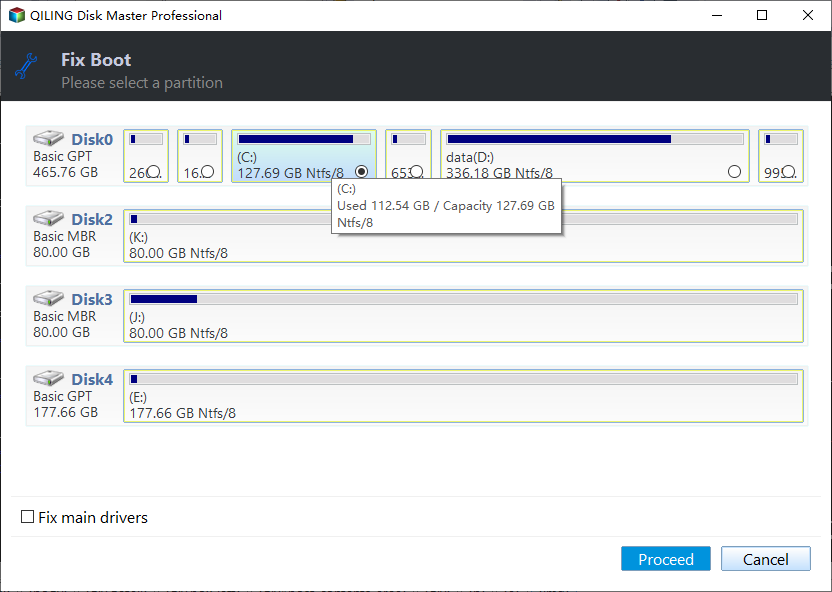
Step 5: Select the system you want to repair and click "Proceed".
Step 6. Wait a moment, and you will receive an alert that the system has been successfully repaired.
This method allows you to directly fix your blue screen error without entering safe mode and helps you get back to the game quickly.
You can learn more details about this blue screen troubleshooter at the following link.
Blue Screen While Playing Games - 4 Manual Tips
You can also try to fix the blue screen error manually. But these four manual methods require you to enter safe mode before you can operate. This link helps you enter the safe mode on Windows 10/11. Then, you can follow the methods below to fix BSOD errors when playing games.
Fix 1. Change Power Settings
More advanced ways to resolve blue screens while playing games include modifying certain power settings in the Control Panel. Here's how:
Step 1. Open the control panel on your computer.
Step 2. Access Power Options and click on the Change plan settings option.
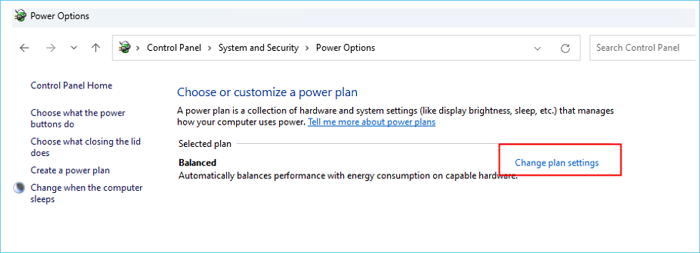
Step 3. Click Change Advanced Power Settings to proceed to the next step.
Step 4. In the subsequent window, locate and disable the "Link State Power Management" option in the "Battery Powered" and "Plug-in" sections under PCI Express.
Do not forget to share this article to help more users who are facing the BSOD error while playing games.
Fix 2. Uninstall and Reinstall the Display/Graphic Driver
Experiencing a Windows 10 blue screen while playing games usually indicates that your monitor or graphics driver may be out of date or buggy. To resolve this issue, you can uninstall and reinstall the graphics card driver. Here are the steps:
Step 1. Launch the Device Manager tool on your Windows PC. Browse the device list and find the graphics/display driver. Right-click on it and select the uninstall option. If prompted, select Remove the driver software for this device.
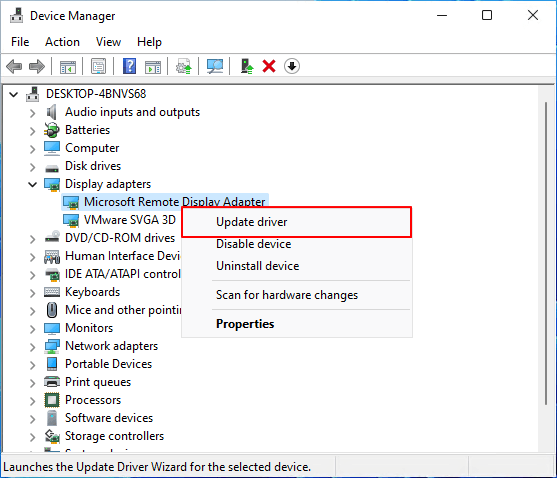
Step 2. After uninstalling the driver, restart the computer. Open Device Manager again and choose the "Scan for hardware changes" button. Windows 10/11 will automatically detect and install the necessary drivers. Please ensure your internet connection is stable.
Read Also:
Fix 3. Run Clean Boot on Windows 10/11
Clean boot diagnoses and resolves blue screen issues during gaming on Windows 7/8/10/11. Follow this step-by-step guide to perform a clean boot:
Step 1. Make sure you are logged into the computer as an administrator. Create an administrator account on the Windows PC, or log in using its credentials if you don't have one.
Step 2. Launch system configuration by entering "msconfig" in the search box on the taskbar.
When the System Configuration Window appears, navigate to the Services tab. Select the "Hide all Microsoft services" option, and then select "Disable all."
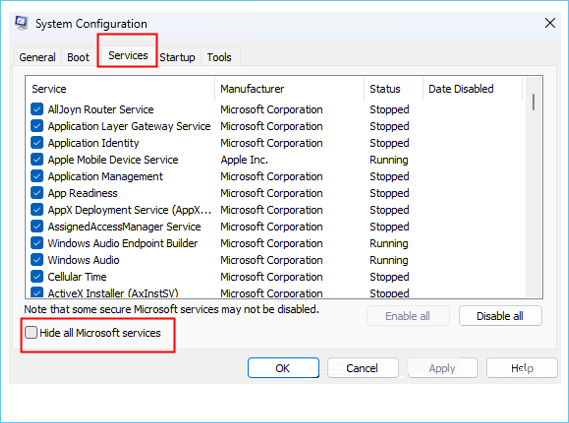
Step 3. Go to the "System Configuration Startup" tab and click "Open Task Manager".
Step 4. Once Task Manager is active, visit its startup tab. Select each startup item in turn and click Disable.
Fix 4. Enable UEFI Boot
Enabling UEFI boot on your PC may be the key to fixing blue screens while gaming. Follow this concise guide to correct the error:
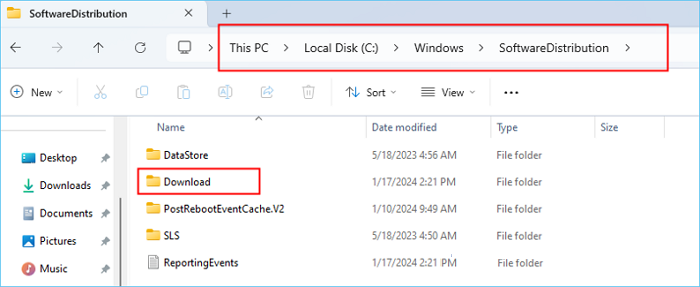
Step 1. Start your computer on a Windows 7/8/10/11 device. Navigate to C: > Windows > Software Distribution > Downloads. Clear all contents in this directory. For extra precaution, consider deleting the $Windows.~BT folder located in the root of "C:."
Step 2. Then, restart the current computer. During the reboot, select Access BIOS. Step 3. Use the Boot Menu key (usually F2/F8/Esc/Del) depending on your computer model. In the BIOS interface, find and activate UEFI Boot.
Step 4. To increase stability, reset all processor overclocking settings. Once completed, save the BIOS settings and exit.
In case you run into any roadblocks, remember that our knowledgeable support team is here to assist you at any time.
Qiling experts are available to provide you with 1-on-1 manual services (24*7) and help fix Windows boot error, BSOD or computer boot loop issues. Our experts will offer you FREE evaluation services and efficiently diagnose and resolve system boot failure, Windows stop codes and OS lagging issues using their decades of experiences.
- 1. Fix BSOD - blue/black screen of death error due to Windows update or other reasons.
- 2. Get rid of Windows boot error such as no bootable device found, or BCD file corruption.
- 3. Serve to fix 0X000_error codes on Windows system or OS boot loop issues.
Conclusion
This guide lists some effective solutions you can try to fix blue screen errors while playing games. Although it focuses on fixing the blue screen while playing games on Windows 10, you still benefit from it if you are a Windows 11/8/7 user. If you are a beginner, we recommend you use Qiling Disk Master, which is the easiest way to help you recover from the blue screen to the game.
Blue Screen While Playing Games FAQS
Why does the screen get blue when playing games? How do you fix the blue screen when playing games error? Continue to read and get more details.
1. Why does my screen go blue when playing games?
One of the leading causes for the PC blue screen while gaming is that it is a graphic-intensive game. When a game pushes a PC's hardware to its limits, it can expose underlying hardware weaknesses, trigger overheating, or unveil latent software conflicts.
2. Can RAM cause a blue screen?
Yes, Hardware issues like Faulty memory (RAM), HDDs, SSDs, motherboards, processors, or PSUs can all lead to blue screen crashes.
3. How do I fix the blue screen glitch?
Uninstalling and reinstalling the graphics/display drivers might be the key. Old or outdated displays or graphics drivers may lead to a Windows 10 blue screen when playing games. To resolve this, it's crucial to uninstall the problematic driver and then reinstall the latest iterations via Device Manager.
Related Articles
- How to Format HDD/External Hard Drive to FAT32 [Your Step-by-Step Guide Is Here]
- Partition Clone Guide | Clone EXT4/EXT3/EXT2 Partitions in Windows 10
- Partition Manager Windows 11 Free Download in 2024 🏆
- How to Securely Erase or Wipe SSD in Windows 11/10