How to Change Drive Letter [Full Tutorial]🔥
Windows usually automatically assigns the drive letters for the partitions. Letters A and B are designed for the floppy drive and tape drives. For the system partition, the letter is typically assigned as C. Other partitions on your hard drive, USB drive, optical drive, or card reader will also be assigned a drive letter by Windows.
Assigning letters to drives in alphabetical order is an easy way to keep them organized. However, in Windows, the letters allocated to your hard disks, optical drives, and USB devices are not fixed. You may want to change drive letter for certain reasons.
You can change a drive letter for better and easier recognition of your programs or personal files. Another case is when you have connected an external drive, and Windows gives it an already-assigned letter. You will need to change the letter in this situation. Now, read this article from Qiling to learn more information about changing drive letters for a PC or laptop.
How to Change Drive Letter in 5 Ways
For either convenience or to troubleshoot unique situations, you can learn how to operate in the following guide.
Method 1. Use Qiling Disk Master
To change drive letters in an easy and fast way, you can download Qiling Disk Master. It is a professional and dependable third-party tool. This tool provides you with the features you need. You are allowed to change drive letters on Windows 11/10/8/7 with the tool.
To do it without effort, download the software now and follow the steps below.
Step 1. Run Qiling Disk Master, right-click the target partition, and choose "Change Drive Letter".
Step 2. Choose a drive letter for the partition from the drop-down menu.
Step 3. Waiting for a memont, it will change the drive letter of the selected partition.
Besides changing a drive letter, it also offers more advanced features like partitioning a hard drive, cloning a disk, migrating the operating system, Windows 10 password reset, and boot repair. Download and enjoy the convenience.
Share this article on your social media to help more people!
Method 2. Use Disk Management
A built-in tool called Disk Management can also change drive letters. It is a free tool provided by Microsoft. You can use it to partition hard drives, expand space for drives, and, of course, change a drive letter. It is appropriate for you if you are new to Windows.
Step 1. Hit "Windows + R" to open the Run box.
Step 2. Type in diskmgmt.msc and hit "Enter" to open Disk Management.
Step 3. You will see a list of drives in the window. Select the drive you want to change the letter of and right-click on it, then select "Change Drive Letter and Paths."
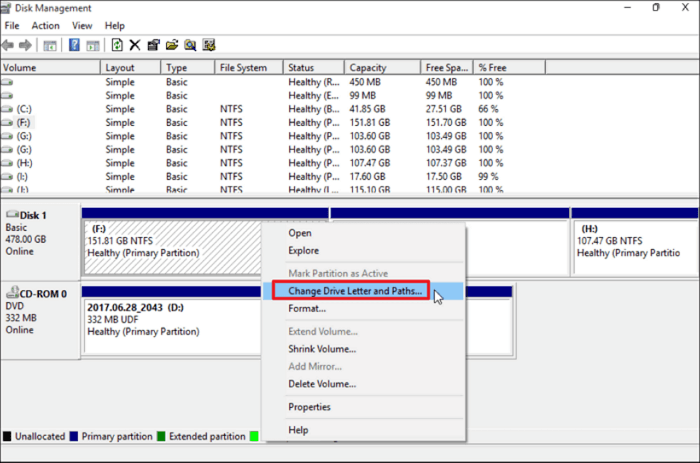
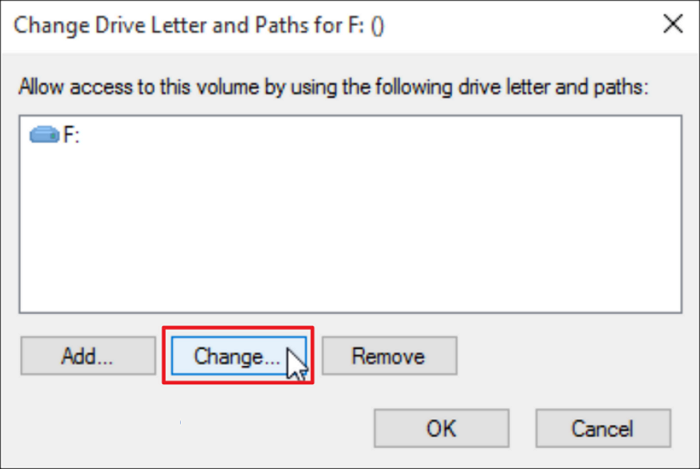
Step 4. Click "Change", and another window will appear.
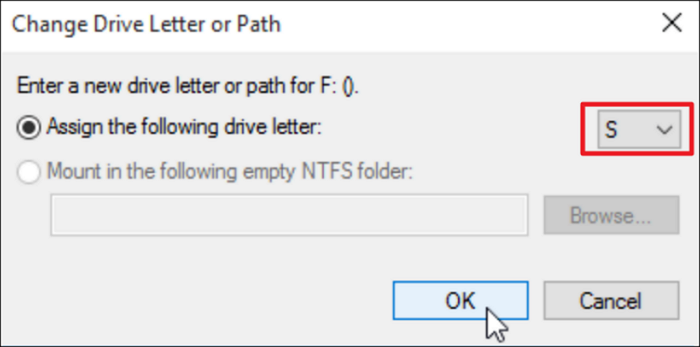
Step 5. Choose a letter for the drive from the list and click "OK".
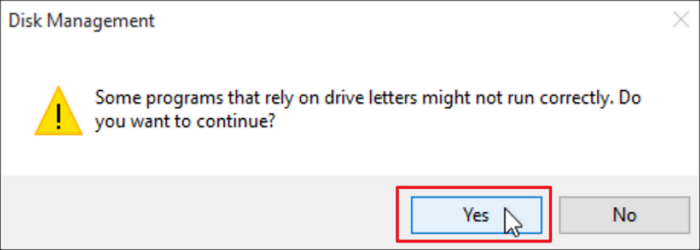
Step 6. Confirm the message and click "Yes".
Method 3. Use PowerShell
You can also use PowerShell to change a drive letter with a few steps. This tool requires only two commands. It might be a little difficult to do it with commands. However, the steps below are detailed, and you should be able to complete the process without problem.
Step 1. Open PowerShell.Press "Windows + S", and type in Windows PowerShell in the search box.
Step 2. Right-click Windows PowerShell, and click on "Run as administrator".
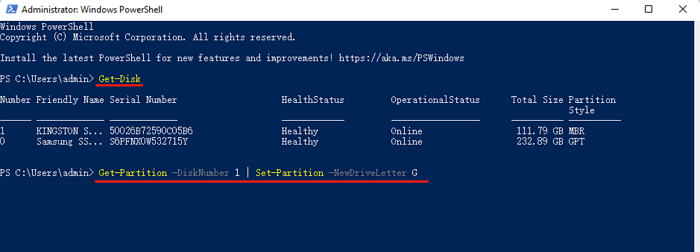
Step 3. Type Get-Disk and press "Enter".
Step 4. Select the drive, type in the command below, and hit "Enter" to assign a drive letter to the drive:
Get-Partition -DiskNumber 1 | Set-Partition -NewDriveLetter G
(Replace "1" with another number of the drive you want to format. Change the letter "G" as you prefer.)
Method 4. Use Command Prompt
The Command Prompt also has the ability to change drive letters. You can open the diskpart inside the Command Prompt and use it to execute the procedure. It is suitable for someone who likes commands. You are allowed to view partitions with all the details. Learn how to do so through the guide below.
Step 1. Press "Windows + S", and type in cmd in the search box.
Step 2. Right-click "command prompt", and then click on "Run as administrator".
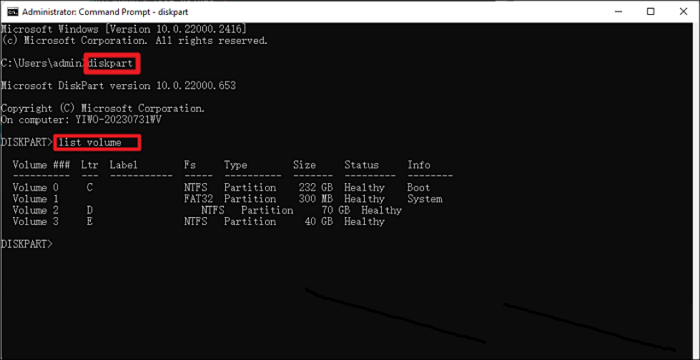
Step 3. Type in diskpart and hit "Enter". Then type list volume and hit "Enter". A list of simple volumes will show up.
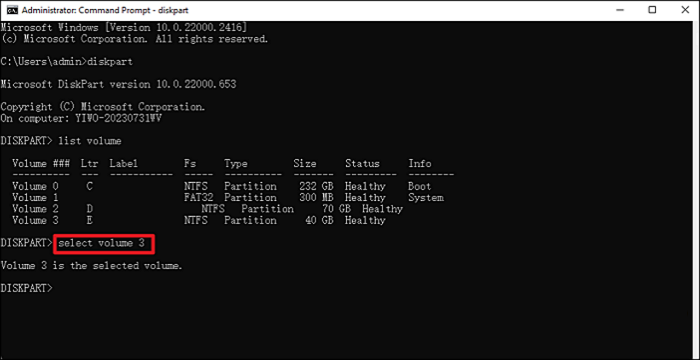
Step 4. Type select volume 3 to choose the one you want. (The number is based on your own decision.) Then, hit "Enter".
Step 5. Type assign letter=G and hit "Enter". (Choose an available letter from the alphabet yourself.)
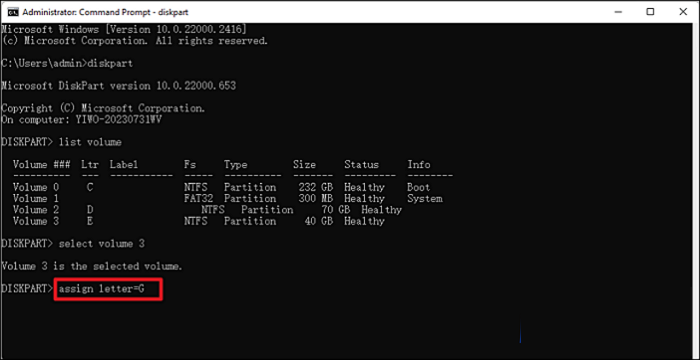
Close the Command Prompt tool and restart your computer. The new letter should be assigned to the drive now.
Method 5. Change Drive Letter in Settings
If you don't want to download third-party software or use commands to change a drive letter, you can perform this task in settings. The drive letter changing process takes only a few steps. Try this method if you find others difficult to manage.
Step 1. Click "Start" and open Windows settings.
Step 2. Select "System > Storage > Advanced storage settings > Disk & volumes". (This is how Windows 11 accesses the settings. Windows 10/8/7 might differ from it.)
Step 3. Select the drive you want to change the letter for and click "Properties".
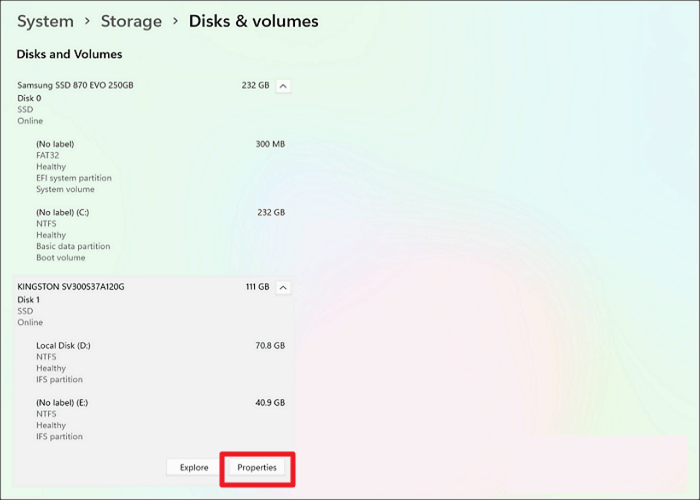
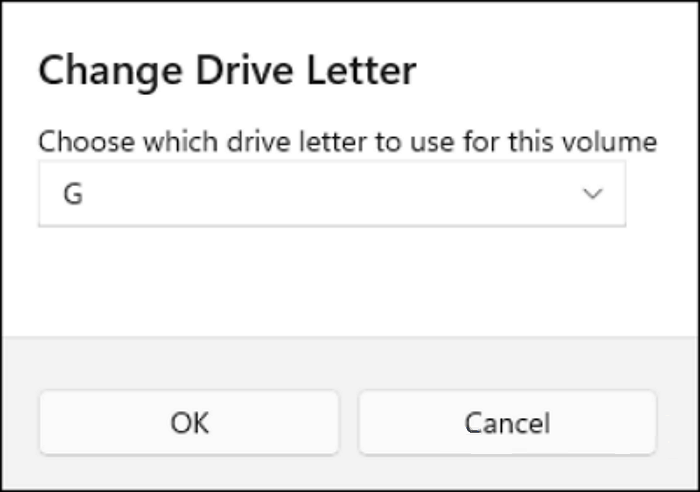
Step 4. Hit "Change drive letter" and choose a new letter for the drive. Then, click "OK".
During the drive letter changing process, you might encounter some related problems. Check the two articles below and see if they resolve your doubts.
Is It Safe to Change Drive Letter
It is safe to change a drive letter, but there are risks. Changing letters for drives is simply a way to identify different partitions by different letters. However, the incorrect operation will bring you troublesome issues. Below are two main problems that changing drive letters can cause.
- Changing the letter of a drive with installed software will cause the software to be unable to work. You might need to reinstall the software if you have done this.
- The operating system may be unable to find your files. Windows operating system might be confused about where your files are located if you change the letter.
Pro Tip: Do Not Change the OS Drive Letter
It is not recommended to change the drive letter where the Windows is installed. Doing so can cause serious consequences to your computer.
- If you change the OS drive letter, Windows will not be able to boot up because the corresponding encrypted files cannot be changed.
- If you try to change it with Disk Management, you will see a message saying, "Some programs that rely on drive letters might not run properly."
Thus, if you do need to install Windows systems on another drive with a different letter, you must first perform a fresh install of Windows. Yet still, it is not a recommended thing to operate.
Conclusion
Above all the methods mentioned in this post, using a third-party tool like Qiling Disk Master is certainly the easiest and safest way to change drive letters. Before you execute the changing process, you should always be careful with the drives you want to change letters for. An incorrect operation will cause critical results, and you might lose important data and programs.
FAQs on Change Drive Letter
Below are the questions that are frequently discussed. Read and see if they solve your doubts.
1. How many drive letters can Windows have?
Windows has only 26 letters that can be assigned to drives installed on a computer. Letters A and B are designed for floppy drives.
2. Does changing drive letter affect programs?
If you have already installed Windows or apps on that drive, changing the drive letter might cause trouble running or finding the drive. It is best not to change the drive letter of a drive that already has Windows or applications installed.
3. Can I remove a drive letter?
You can use Disk Management to remove the drive letter. However, if you do so, you will not be able to see and open the partition on the computer.
4. Can I change a drive letter without losing data?
If you only have the documents that you rarely use, changing the drive letter may result in small troubles rather than serious consequences. Thus, you can change the letter of an external drive without issues.
Related Articles
- 3 Ways: How to Increase C Drive Space in Windows 10/8/7
- How to Reset Windows 11 Password with USB - 3 Easy Tips
- How to Format External Hard Drive to FAT32 on Windows 10? [FAT32 Guide]