Partition SSD for Windows 10 Installation, Full Guide with Pictures
Segmenting the storage space for installation of Windows 10 on an SSD allows its optimal use. This procedure guarantees a trouble-free installation and improves the operation of Windows 10 on SSD. Before beginning the Windows 10 installation procedure, properly prepare and configure your SSD. Here in this guide, Qiling will provide an outline of the steps to follow in order to prepare your SSD for partitioning prior to installing Windows 10.
Reparation: Make SSD Ready for Partitioning
Here is what you need to do for partitioning SSD for Windows 10 installation:
- Install SSD correctly to a target PC
- Initialize SSD to GPT or MBR according to the computer BIOS firmware.
- Choose NTFS for the partition formation procedure for a smooth Windows 10 installation.
Before proceeding, ensure that your computer aligns with the requirements for Windows 10 installation. Make sure your hardware is compatible and that all requirements are met. Once confirmed, follow the instructions above to prepare your SSD for installation.
Part 1. Partition SSD for Windows 10 Install in 2 Ways
Making enough space for storage is necessary for the seamless installation of Windows 10. Ensuring your SSD is properly partitioned guarantees an optimized environment for the operating system.
For an instant and hassle-free partitioning experience, readers can choose between two effective methods outlined below.
Guide 1: Initialize and Partition SSD with Free Partition Manager
Qiling Disk Master Free offers a user-friendly solution for Windows beginners. Its "initialize disk" feature streamlines the process, making it accessible for users with varying levels of technical expertise.
We recommend following this guide to partition your SSD swiftly and efficiently, setting the stage for a seamless Windows 10 installation.
#1. Initialize SSD
Step 1. Open Qiling Disk Master and got to Partition Manager.
Step 2. Right-click the target disk - HDD or SSD and select "Initialize to MBR" or "Initialize to GPT".
#2. Partition New SSD for Windows 10
Step 1. Launch Qiling Disk Master to check for free space at the Partition Manager section.
- If your hard drive has unallocated space, jump to Step 3 to create partition.
- If the hard drive has no unallocated space, continue with Step 2.
Step 2. Shrink a disk partition to create unallocated space.
Right-click on the target drive partition with a lot free space and select "Resize/Move".
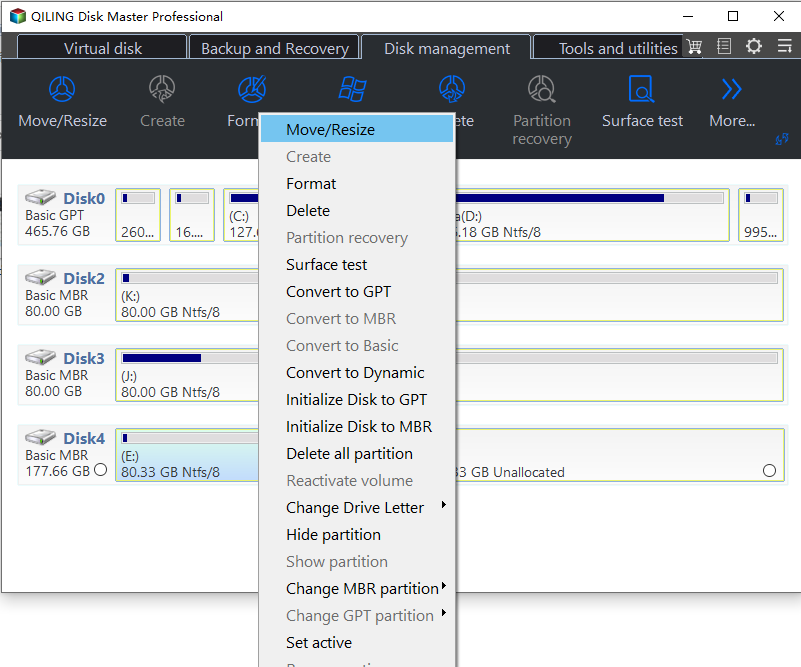
Drag either end of the partition rightwards or leftwards to shrink the partition size so as to get ample unallocated space. You can visually know how much space you've decreased in the "Partition size" area.

Click "Proceed" to save all the changes.

Go back to Partition Manager, there should be unallocated space appearing on the same disk and you can continue with the next step to create new partition on your hard drive.
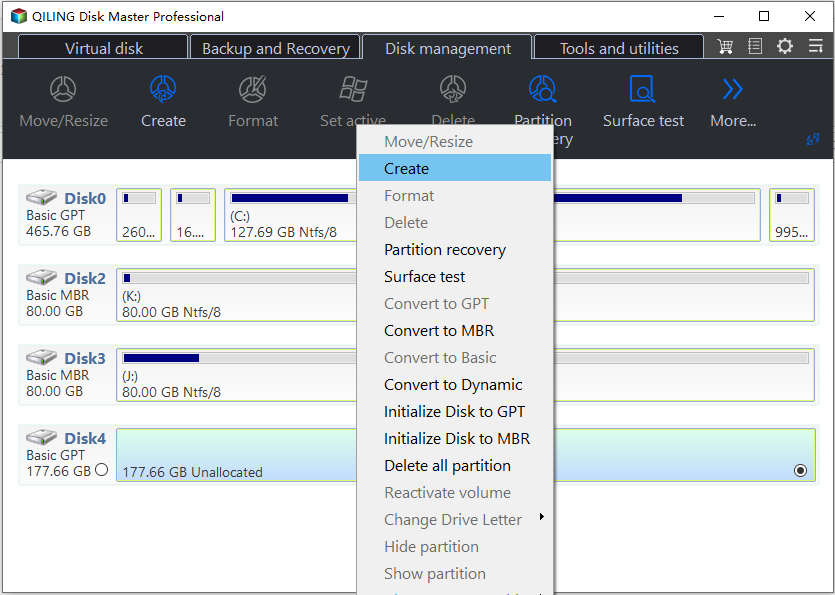
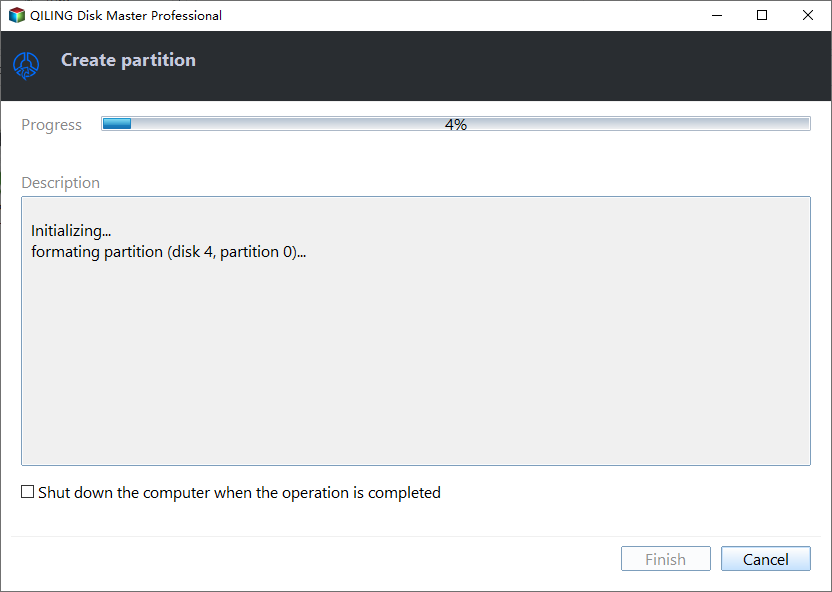
Step 3. Create a new partition with unallocated space on the target hard drive.
Right-click on the unallocated space and choose "Create".
Customize the partition size, partition drive letter, partition label, file system (NTFS, FAT32, EXT2/3/4, exFAT) and more in the Advanced Settings.
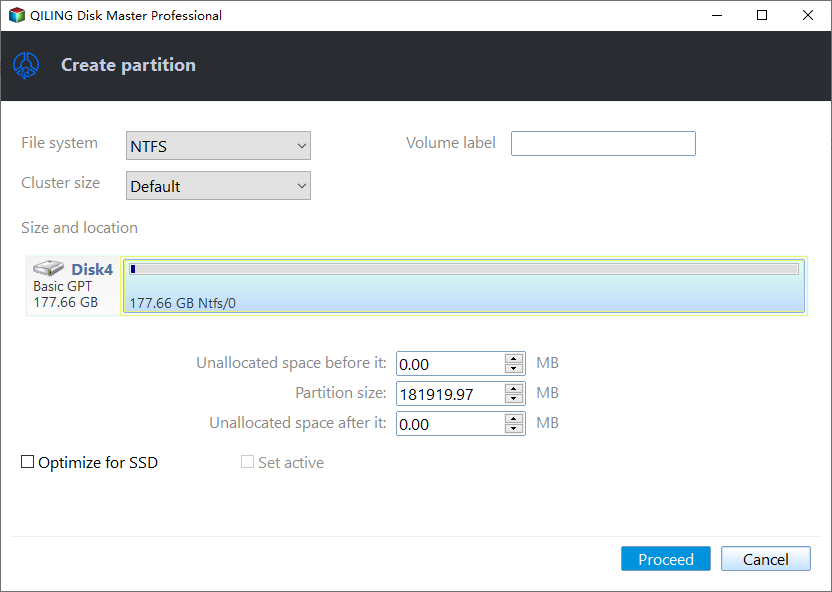
Finally, click "Proceed" to complete creating partition with the unallocated space on your disk. Repeat the steps to partition a hard drive and get many more partitions.
Guide 2: Initialize and Create Partitions on SSD Using Disk Management
For users who prefer utilizing Windows built-in tools, Disk Management provides a straightforward way to initialize and create partitions on your SSD. Follow the step-by-step guide below to manage your SSD partitions efficiently.
#1. Initialize SSD
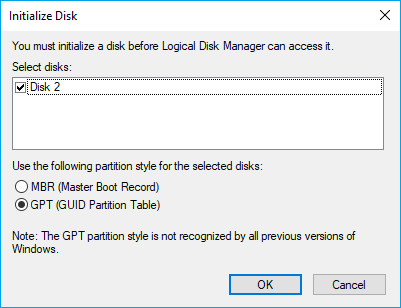
If the SSD disk is not initialized, right-click and select "Initialize Disc." After determining whether to use GPT or MBR for partitioning, confirm the initialization procedure.
- Right-click the Start button and select "Disk Management."
- Find your SSD in Windows. If the disc needs to be initialized, follow the on-screen instructions.
- If the SSD disk is not initialized, right-click and select "Initialize Disc." Confirm the procedure after determining whether to use GPT or MBR for partitioning.
#2. Create Partition on SSD
Follow the below-given steps to create a partition on the SSD
- Click right on the unallocated space of the initialized SSD and choose "New Simple Volume.
- Follow the New Simple Volume Wizard, specifying the size of the partition and assigning a drive letter.
- Choose the file system (NTFS is recommended) and perform a quick format.
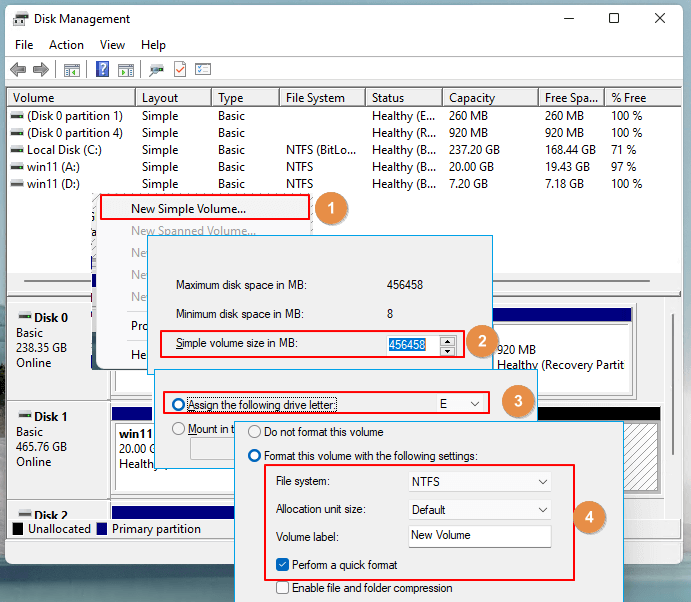
- Complete the wizard and your partition is now created and ready for use.
Following these straightforward steps, users can easily initialize and create partitions on their SSD using Disk Management, ensuring a well-prepared storage environment for a successful Windows 10 installation.
Part 2. Install Windows 10 on SSD Partition
The next important step is installing Windows 10 on your newly created partitions after your SSD has partitioned correctly. Below is a concise guide that outlines the complete procedure for a successful installation.
Complete Procedure for Installing Windows 10 on SSD Partitions:
Note: The following steps assume you have a Windows 10 installation USB or DVD ready.
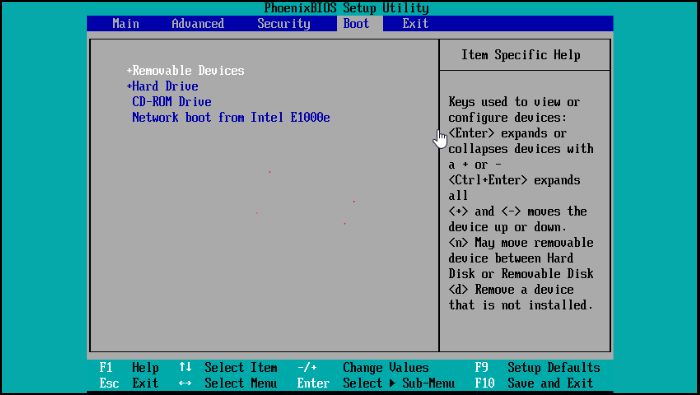
- Insert Windows 10 installation USB or DVD and restart your PC.
- Access BIOS or UEFI settings to set the installation media as the primary boot device. Save changes and exit.
- On the Windows Setup screen, select language, keyboard layout, and time. Click "Install Now" to initiate the installation.
- Enter your Windows 10 product key and read and accept the license terms.
- Pick the SSD partition for Windows 10 installation. Click "Next" to start the installation.
- Allow the process to finish; your PC will restart. Follow on-screen instructions to personalize settings.
- Sign in or create a Microsoft account.
Congratulations! You've successfully installed Windows 10 on your SSD partitions. Windows 10 is ready for use, with an SSD providing speed and efficiency.
Conclusion
In conclusion, ensuring your SSD is properly configured and partitioned is a crucial precursor to a seamless Windows 10 installation. This guide has provided two user-friendly methods catering to different preferences. Users can prepare their SSD efficiently using a free partition manager or Windows built-in disk management. The subsequent installation of Windows 10 on the well-organized partitions ensures optimal performance and speed.
FAQs - Frequently Asked Question
Here are some commonly asked questions about how to split SSDs for Windows 10.
1. How do you partition 512GB SSD Windows 10?
To partition 512GB SSD with Windows 10 follow these steps:
- Access Disk Management.
- Locate and initialize the 512GB SSD.
- Create a new partition on unallocated space.
- Specify size, assign a drive letter, and choose NTFS.
- Complete the process for an optimized Windows 10 setup.
2. Should I format my SSD when installing Windows 10?
Yes, formatting is advisable during Windows 10 installation. This prepares the SSD with the necessary file system (NFTS), ensures maximum performance and compatibility, and formats the drive, making Windows 10 installation easier.
3. How do I split SSD into two partitions?
Follow the steps below to split an SSD into two partitions.
- Open "Disk Management."
- Right-click on the existing SSD partition and choose "Shrink Volume."
- Enter the required size for the new partition and click "Shrink."
- Right-click on the empty space and choose "New Simple Volume."
- Follow the wizard to set the size, assign a letter, and choose the file system for the new partition.
- Repeat the process if you have more unallocated space and complete the wizard to create both partitions.
Following these steps, you can easily split your SSD into two partitions using Disk Management.
Related Articles
- Fix Diskpart Clean Not Working on Disk/USB/SD Card [5+ Fixes]
- Top 6: HP USB Disk Storage Format Tool Alternative Windows
- Hard Drive Failure: How to Check & What to Do
- Fix: Boot Configuration Data File Doesn't Contain Valid Information for an Operating System