How to Upgrade Xbox 360 Hard Drive to SSD [Easy Tutorial]
Is your Xbox 360 slowing down? Do you still enjoy the nostalgic games of your old Xbox? Are you looking to upgrade your Xbox 360 hard drive to SSD? If that's the case, then you're at the right place.
This article from Qiling focuses on the step-by-step guide to upgrading your Xbox 360's hard drive to a new SSD. This gives you a performance boost and improved responsiveness for your old Xbox. Moreover, it lets you upgrade to an SSD with more capacity and lower power consumption.
Here's a basic table to give you a sneak peek at the stages you'll be going through, and the time you'll need to make the changes.
| 🚩Stages | 🔎Duration | 🧩Complexity Level | 🔦Tools |
|---|---|---|---|
| 10-15 minutes, depending on your speed | Intermediate | T6 Torx Screwdriver and TR10 Torx Security Screwdriver | |
| Stage 2. Cloning the Hard Drive to the SSD | 5-10 minutes, depending on the games and file sizes on your hard drive | Beginner-friendly | Qiling Disk Master, USB to SATA cable. |
| Stage 3. Installing the SSD | 5-10 minutes to get everything back together | Beginner-friendly | T6 Torx Screwdriver and TR10 Torx Security Screwdriver |
However, you need to prepare a few things before replacing the hard drive. Here are a few things to look at:
💡Buy a certificated SSD:
Ensure you buy one from a reputed brand. This ensures you get the full capacity and zero performance issues. Not to mention, you also get a warranty for the drive. Also, check the listed speeds, capacity, performance, price, and quality before buying the drive.
💡Initialize the target SSD:
Test the drive and format it to get started. Also, ensure your drive is under 1TB, as that's the limitation of old Xbox 360 consoles.
Read Also: How to Initialize an SSD
💡Download a reliable cloning tool:
I recommend using Qiling Disk Master as it is beginner-friendly and offers easy cloning features to clone your original Xbox hard drive to your new SSD. This tool clones games and game data to the new SSD, which allows you to upgrade your Xbox 360 hard drive to SSD without losing any data. You also need a USB to SATA cable to connect the drive to your PC.
💡Prepare the tools to install the SSD:
You need a T6 and TR10 Torx screwdriver to open the hard drive casing and install the new SSD.
- Notice:
- The Xbox uses a 2.5-inch hard drive bay, meaning you can only use standard SATA SSDs that come in a 2.5-inch form factor and not the NVME SSDs.
Once you're ready with the checklist above, proceed to the stages listed below. To make the Xbox 360 hard drive update smoother, ensure you have prepared well, as mentioned above. The following link can help if you want to play Xbox games from an external hard drive.
Stage 1. Remove the Original Hard Drive From Xbox 360
In this stage, we'll learn to remove the original hard drive from an Xbox 360. So, make sure you have your tools ready and proceed with the steps below:
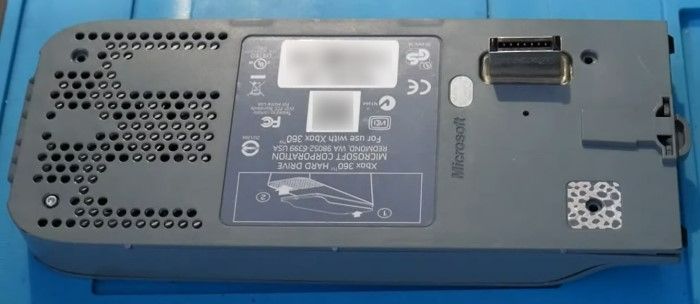
Step 1. Get the hard drive enclosure off your Xbox 360. It should look something like this.
Step 2. Now, unscrew the 4 T6 screws present in the bottom side of the enclosure. Make sure you get off the last screw under the silver Microsoft sticker.
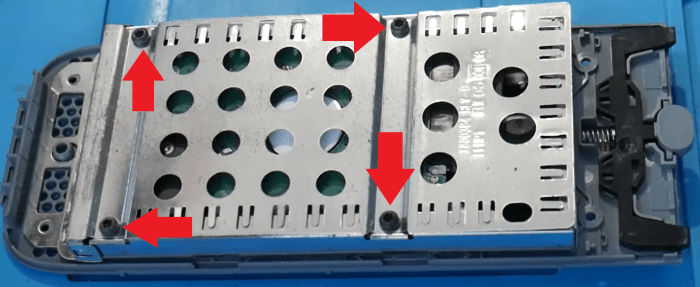
Step 3. Once that's done, flip the enclosure and take the top off. You should see 4 TR10 screws that need to be removed as well. These screws are black in color, and you should be able to take them off easily.
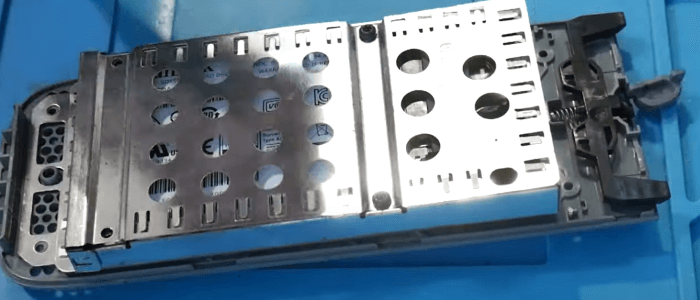
Step 4. Remove the top metal cover and disconnect the hard drive connecter. Finally, you can get the hard drive out by sliding it, as shown in the screenshot below.
Stage 2. Clone the Original Hard Drive to SSD
Once you remove the hard drive, you need to connect it to your PC with a USB to SATA cable. You can find it easily on sites. Also, make sure to connect your SSD to your PC as well. Now, download and install Qiling Disk Master and follow the steps below to clone your hard drive to your new SSD:
Step 1. Select the source disk.
- Click the "Clone" from the left menu. Select the "Clone OS Disk" or "Clone Data Disk" and click "Next".
- Choose the source disk and click "Next".
Step 2. Select the target disk.
- Choose the wanted HDD/SSD as your destination and click "Next" to continue.
Step 3. View the disk layout and edit the target disk partition size.
Then click "Continue" when the program warns it will wipe out all data on the target disk. (If you have valuable data on the target disk, back up it in advance.)
You can select "Autofit the disk", "Clone as the source" or "Edit disk layout" to customize your disk layout. (Select the last one if you want to leave more space for C drive.)
Step 4. Click "Proceed" to start the disk cloning process.
- Read Warning message and confirm "Yes" button.
After you're done cloning the hard drive, you can also take advantage of the following tools that Qiling Disk Master offers to keep your drives running smoothly without defects.
- Manage Partitions - The app lets you create, delete, resize, move, extend, merge, format, and wipe old Xbox One hard drives with just a single click.
- Test Speeds - The DiskMark feature lets you test your hard drive and SSD speeds and optimize the drive for the best performance.
- Check Drive Health - You can also check your drive's health. This makes sure you got a new SSD and that your old Xbox hard drive can still run without errors.
- 4K Alignment SSD - This feature lets you get a performance boost for your SSDs by 4K aligning the drive.
Also, make sure to keep a backup of your Xbox files, as you may need it later on if you face any issues installing the SSD.
Stage 3. Install the SSD to Xbox 360
Once you're done cloning the hard drive to your new SSD, you can proceed with the installation stage.
Just follow the steps below and install your SSD in the hard drive enclosure of your Xbox. This tutorial is from the Xbox official page; it's reliable.
Step 1. Grab your new SSD and slide it into the hard drive enclosure, as shown in the screenshot below. Make sure none of the golden connector pins are visible.
Step 2. Now, take the metal cover and place it back on with the four black screws using the TR10 screwdriver.
Step 3. Finally, put on the plastic shroud and use the 4 T6 screws to tighten everything up. Make sure all the screws are back in place.
Just put the enclosure back on the console, and you're done. You have successfully installed a new SSD in your old Xbox 360 console. Enjoy all your games with faster performance and minimal loading times. You may also like the following topics:
Conclusion
This article covers three stages that help you install a new SSD in your old Xbox 360 console. A new SSD drive ensures you get better performance and faster loading times to extend the life of your console.
Just follow the step-by-step instructions, and you'll be able to play games or even run homebrew apps on your Xbox. That said, ensure you have all the tools listed above ready, and use Qiling Disk Master for the most effortless cloning process. Also, share this article with anyone who wants to give their old Xbox 360 consoles a performance boost. We have tried to keep the steps as easy as possible and ensure you can replace the drive without much difficulty.
Upgrade Xbox 360 Hard Drive to SSD FAQs
You can install an SSD in your Xbox 360 without much difficulty using the guide above. However, if you still have some questions left, then check the FAQs listed below.
1. Can you replace Xbox 360 hard drive with an SSD?
Yes, you can replace the Xbox 360 hard drive with an SSD. Just make sure you're using an SSD that has a capacity of less than 1 TB and is in the 2.5-inch form factor. Also, ensure you have a T6 and TR10 screwdriver ready for removing and installing the drives.
Note: You must also clone your hard drive beforehand, so use Qiling Disk Master and a USB to SATA cable.
2. Is SSD better than HDD for Xbox 360?
Yes, an SSD is better than HDD for an Xbox 360. An SSD offers better performance and lower loading times and also improves the overall gaming experience. Not to mention, the new SSD will also extend the lifespan of your console.
3. How much space is enough for Xbox 360 SSD?
Anything below 1 TB is enough for Xbox 360 SSD. If your console is modded, then you can even use SSDs up to 2 TB. However, the regular old console only supports drive up to 1 TB capacity.
Related Articles
- How to Wipe Hard Drive in Windows 10 - 3 Safe Ways 🔥
- How to Transfer OEM Windows 10 to A New PC [Easy & Quick]
- How Do I Install a Second Hard Drive? Here Is the Complete Guide
- M.2 vs. SSD, What's the Difference [New Details]