How to Upgrade Xbox One Hard Drive [Guide with Pictures]
Upgrading the storage capacity of your Xbox One console can enhance your gaming experience by allowing you to store more games, apps, and media, making it a good option if you're running out of space on your current hard drive.
Qiling will guide you through the process of upgrading the hard drive on your Xbox One, covering necessary preparations, steps involved, and tools needed.
| 🚩Stages | 🔦Tools | 🔎Duration | 🔨Complex |
|---|---|---|---|
| Stage 1. Preparations |
|
4-6 Minutes | Moderate |
| Stage 2. Hard Drive Cloning | Qiling Disk Master | 3-5 Minutes | Easy |
| Stage 3. Installation | Blank USB flash drive 6GB | 5-8 Minutes | Complex |
Before upgrading your Xbox One hard drive, ensure you have a compatible external drive, have backed up your data, and are aware of the potential risks and limitations of the process, such as data loss and potential issues with Xbox Live.
💡Buy a certificated SSD or larger HDD: When choosing an external hard drive for your Xbox One, it's essential to select a certified solid-state drive (SSD) or a larger hard disk drive (HDD) that meets the system's requirements. This involves considering factors such as performance, speed, price, capacity, and quality to ensure compatibility and a seamless gaming experience.
💡Initialize the target hard drive or SSD for use: To prepare your new hard drive or SSD for use in your Xbox One, you need to initialize it first. This process makes the console recognize the new storage device, allowing it to be properly utilized.
💡Prepare the tools to install the new hard drive or SSD: To install a new hard drive or SSD in your Xbox One, you'll need a few tools: plastic opening tools, a spudger, and T9 and T10 TORX screwdrivers to open the console. You'll also need a USB flash drive with at least 6GB of space to complete the installation.
💡Download a reliable cloning tool - Qiling Disk Master: To transfer data from your current Xbox One hard drive to a new SSD or HDD, use a cloning tool like Qiling Disk Master, which offers a clone feature specifically designed for this purpose, allowing you to upgrade your Xbox One hard drive without losing any data or custom settings.
To prepare for upgrading your Xbox One hard drive, gather the necessary tools and follow some preparations beforehand. This includes downloading the Qiling Disk Master in advance to clone the original Xbox One hard drive.
Stage 1: Remove the Original Hard Drive From Xbox One
Upgrading the internal hard drive of your Xbox One is a process that involves removing the original drive to make way for a new, larger one. However, it's essential to note that doing so will void the warranty on your console if it's still under warranty. Therefore, it's crucial to weigh the benefits of upgrading the hard drive against the potential loss of warranty protection before proceeding.
To ensure a smooth and efficient experience, please arrange the following essential tools in advance:
- Plastic Opening Tools
- Spudger
- T9 TORX Screwdriver
- T10 TORX Screwdriver
To remove the original hard drive from your Xbox One, start by unplugging the console from the power source and any other cables. Next, locate the hard drive, which is usually found on the right side of the console, and gently pry it loose from its clips.
Step 1. Carefully remove the tamper-evident tape to open the Xbox, then detach the plastic vent and remove the plastic tab.
Step 2. To access the top case, start by using a spudger to pry open the rear side vent. From there, work your way around the device, using the spudger to gently pry open the clips along the remaining sides. This should allow you to remove the top case.
Step 3. Safely disconnect the front panel button cable using tweezers, then remove the Wi-Fi board and the upper metal case.
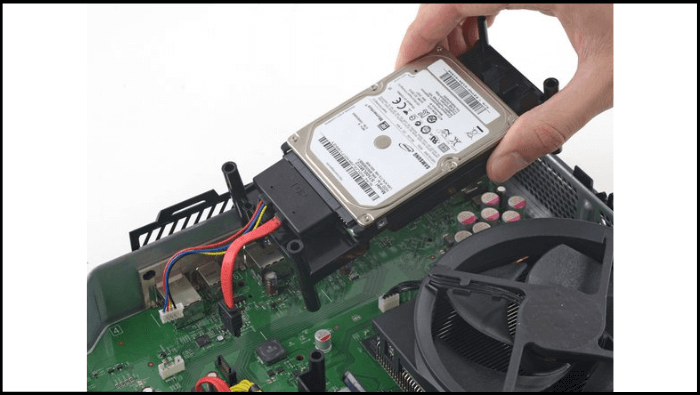
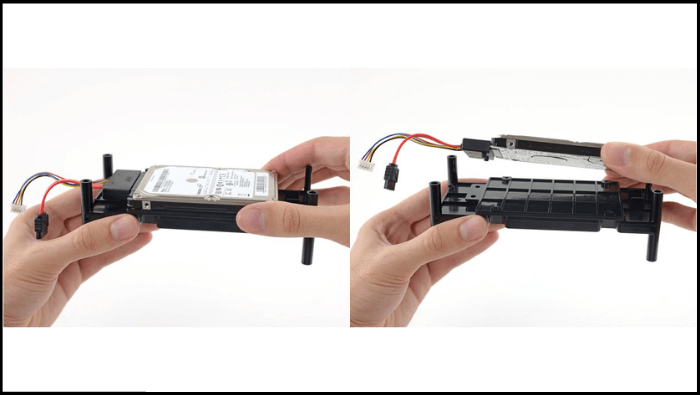
Step 4. Remove the hard drive assembly from the tray, then detach the SATA power and data cables from the hard drive.

Step 5. 8.5 mm T10 Torx screws secure the hard drive assembly to the tray, and the SATA connector block needs to be disconnected from the hard drive.

To reassemble your device, start by attaching the back panel and any other parts that were removed during disassembly. Make sure all screws and clips are securely in place.
Stage 2. Clone the Original Xbox One Hard Drive
We'll use the clone feature of Qiling Disk Master to preserve the data of the original Xbox One hard drive. This software offers various disk management features, including disk cloning, allowing us to create an exact replica of the original drive, ensuring all games, data, and settings are transferred seamlessly to the new drive.
Now, let's delve into the step-To clone the Xbox One hard drive using Qiling Disk Master, follow these steps: First, download and install Qiling Disk Master on your computer. Next, connect the Xbox One hard drive to your computer using a USB adapter or a SATA-to-USB cable.
Step 1. Select the source disk.
- To clone a disk, click the "Clone" button from the left menu, select the desired option (either "Clone OS Disk" or "Clone Data Disk"), and then click "Next".
- Choose the source disk and click "Next".
Step 2. Select the target disk.
- Select the desired hard drive or solid-state drive as the destination and click "Next" to proceed.
Step 3. View the disk layout and edit the target disk partition size.
Before proceeding, be aware that the program will erase all data on the target disk. To proceed, click "Continue" after the program warns you of this. If you have valuable data on the target disk, it's essential to back it up beforehand to avoid losing it.
To customize your disk layout, select "Autofit the disk", "Clone as the source", or "Edit disk layout", with the last option being recommended if you want to leave more space for the C drive.
Step 4. Click "Proceed" to start the disk cloning process.
- Read Warning message and confirm "Yes" button.
Key features of Qiling Disk Master:
- Efficient disk cloning functionality
- Format SSD for Xbox One
- Intuitive and user-friendly interface
- Support for various disk types and file systems
- Ability to resize and manage partitions easily
- Format external hard drive for Xbox One
Download Qiling Disk Master to easily clone your original Xbox One hard drive, preserving all games, data, and settings.
Stage 3. Install the New Hard Drive or SSD to Xbox One
To upgrade your Xbox One's storage, remove the original internal hard drive, insert the new internal hard drive, and follow the steps from Stage 1, then install the new larger hard drive or SSD.
Follow these steps:
Step 1. Download the offline system update files from http://www.xbox.com/xboxone/osu1
Step 2. To prepare a blank USB flash drive with a minimum of 6GB storage capacity, simply insert the drive into a computer's USB port, and format it to NTFS. This will erase any existing data on the drive and prepare it for use as a portable storage device.
Step 3. To complete the download, extract the files to your computer and then safely remove the USB drive from your system.
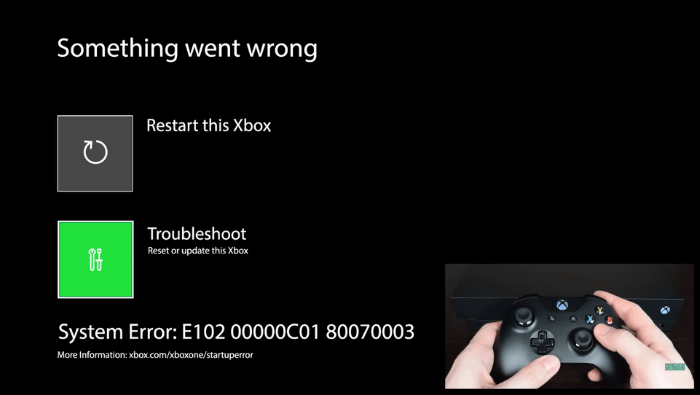
Step 4. To troubleshoot your Xbox One, open the console and use your controller to navigate to the Troubleshoot option. This will allow you to run a series of tests to identify and potentially fix any issues with your console.

Step 5. Connect the USB flash drive to the console's B port, then select the Offline system update option when it becomes active.
Step 6. Wait for approximately ten minutes until the on-screen ends. Then, follow the prompts shown on the screen to finalize the console setup.
Upgrading the Xbox One hard drive to a larger one is a straightforward process that can be completed in a few simple steps. By following the provided instructions, users can successfully transfer their games, data, and settings to the new hard drive, effectively expanding their storage capacity. This upgrade allows users to continue enjoying their Xbox One experience without the limitations of a smaller hard drive, and can be shared with others who may also need to perform this upgrade.
Finally, we'll discuss the reasons why you should upgrade your Xbox One hard drive and conclude the article, highlighting the benefits of making this upgrade.
Why Do We Need to Upgrade Xbox One Hard Drive
The original Xbox One's internal hard drive has several drawbacks, including limited storage space, slow loading times, excessive noise, and performance issues, which can negatively affect the gaming experience and storage capacity.

Upgrading your old Xbox One hard drive is a popular trend, allowing users to overcome storage limitations and enjoy a better gaming experience. By switching to a larger capacity and faster hard drive, you can fit more games, experience faster loading times, and enjoy overall improved performance. This tutorial will guide you through the step-by-step process, making it easy to understand and achieve this upgrade.
Read Also:
Conclusion
To upgrade the Xbox One hard drive, users can install a new SSD or hard drive, which can range from 1 TB to 2 TB, to address low disk space and slow performance issues, and the process involves buying a new drive, removing the original, inserting the new one, cloning the existing drive, and completing the setup.
Upgrade Xbox One Hard Drive FAQs
Upgrading your Xbox One hard drive can be a bit confusing, but we've got some answers to common questions. What's the best way to upgrade my Xbox One hard drive? Can I use any external hard drive or do I need a specific one?
1. Can I upgrade my Xbox One HDD to SSD?
Upgrading your Xbox One's hard drive to a solid state drive (SSD) is a relatively simple process that can significantly improve your gaming experience. You can purchase an Xbox One compatible SSD and follow the manufacturer's instructions to install it, or you can purchase an Xbox One with an SSD pre-installed.
Follow these steps:
Step 1. To upgrade your Xbox One's storage, start by opening your console and replacing the existing hard drive with a new one. This will give you more space to store your games, apps, and other content.
Step 2. To replace the old hard drive with the new SSD, you will need to connect the SSD to the appropriate port on the motherboard. Typically, this is the M.
Step 3. Reassemble the console and proceed with the necessary system setup.
2. Can you add more GB to Xbox One?
You can add more storage capacity to your Xbox One by purchasing an external hard drive, which you can connect to your Xbox One via a USB port, expanding your storage space.
3. Will an SSD make my Xbox One faster?
Upgrading to an SSD can make your Xbox One faster by reducing loading times for games and applications due to faster data access times, but it's best to research specific user experiences and benchmarks for accurate performance gains.
Related Articles
- Format EXT4 on Windows 10,8,7 with Best EXT4 Format Freeware
- Resolve 100% Disk Usage in Windows 11
- How Do I Completely Wipe C Drive [Full Guide]
- How to Clone Windows to New SSD [Most Efficient Way]