Format SanDisk SD Card|How to Format SanDisk SD Card on Windows 10 and Mac
Why Do You Need to Format Sandisk SD Card
- You want to delete everything on the SD card
- SD card is damaged or corrupted and needs to be formatted.
- The improper use of SD cards, such as hot swapping, causes the problem and the need to format the SD card.
- SanDisk SD card gets infected with a virus.
It's easy to format SanDisk SD card for cameras or mobile devices. On this page, you will learn the full guide to format SanDisk SD card on Windows 10, Mac, or in the camera.
- Tip
- 1. Formatting SanDisk SD card will delete everything on it. If your SD card gets corrupted or can't open with errors, you can first recover files on an SD card with the best SD card data recovery software before format it.
- 2. SanDisk SD card formatting doesn't completely delete the files but only removes the reference to the files. As said above, you can restore data from an SD card with professional data recovery software. If you want to permanently delete files on your SD card and cannot be recovered, you should wipe the SD card.
How to Format SanDisk SD Card on Windows 10 in 4 Simple Ways
You have several ways to format SanDisk SD card on Windows 10:
- 1. Use SD card format tool - Qiling Partition Master
- 2. Use Windows File Explorer
- 3. Use Disk Management
- 4. Use Command Prompt
1. How to Format SanDisk SD Card to FAT32 with Qiling SD Card Format Tool
Qiling Partition Master provides full-around disk partition solutions for both beginners and experts. You can use it to create, resize/move, merge, wipe, and format partitions. In addition to these basic hard drive management features, Qiling Partition Master still has many advanced functions, such as:
- Clone disk: clone an entire disk to another in the same disk layout without any data loss. You can even clone a larger HDD to a smaller SSD.
- Disk/Partition converter: Convert a logical partition to primary or primary partition to logical, FAT to NTFS partition, MBR disk to GPT, or GPT disk to MBR.
- Migrate OS: Transfer OS from HDD to SSD without reinstalling Windows
- The overall requirements of 3DS
Now, download this partition management program and follow the step-by-step guides to format SanDisk SD card with a simple click.
Step 1. Find your SD card and right-click the partition you want to format and choose "Format".
Step 2. Set a new partition label, file system (NTFS/FAT32/EXT2/EXT3/EXT4/exFAT), and cluster size to the selected partition, then click "Proceed".
Step 3. Click "OK" on the pop-up window to start formatting your SD card.
2. Use Windows File Explorer to Format SanDisk SD Card
Step 1. Connect the SanDisk SD card to your computer with the SD card reader.
Step 2. Go to "This PC" and open Windows Explorer, right-click your SD card, and then choose "Format".
Step 3. Specify the file system and set a new label for your SD card. Click "Start" and "OK" to confirm the formatting.
Note: FAT32 for SD card within 64GB, exFAT for SD card over 64GB.

Related reading: Fix SanDisk SD Card Unable to Format
3. Use Disk Management to Format SanDisk Micro SD Card
Step 1. Insert your SanDisk SD card into a card reader and connect it to your computer.
Step 2. Right-click "This PC", choose "Manage", enter "Disk Management".
Step 3. Locate and right-click on your SanDisk SD card, choose "Format".
Step 4. Click "Yes" to continue, set a new label, file system - exFAT or FAT32 to the card. Then click "OK" to format your SanDisk SD card.

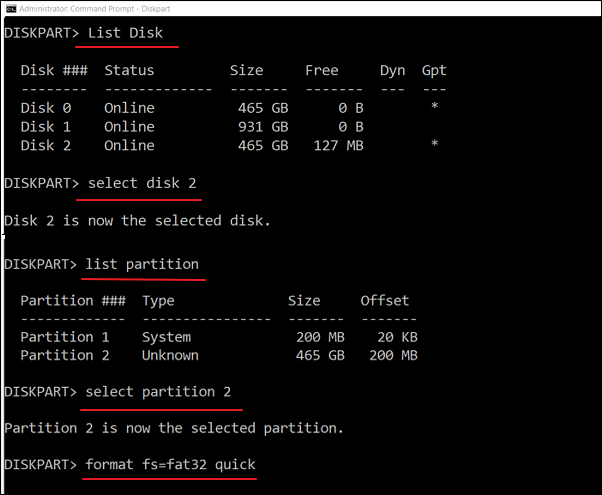
4. Use Diskpart in CMD to Format SanDisk SD Card
Step 1. Type cmd in the search box in Windows 10. Right-click on it and choose "Run as administrator".
Step 2. In the command prompt, type diskpart and press "Enter".
Step 3. Type list disk to list all the available drives and press "Enter".
Step 4. Type select disk + disk number ( for example, select disk 2) to select the SanDisk SD card you want to format and press "Enter".
Step 5. Type list partition and press "Enter".
Step 6. Type select partition + volume number (or example, select partition 2) and press "Enter".
Step 7. Type format fs=fat32 (or format fs=exfat) and press "Enter" to format the drive with FAT32 or exFAT.

Related reading: How to remove SanDisk write protection
How to Format SanDisk SD card on Mac with Disk Utility
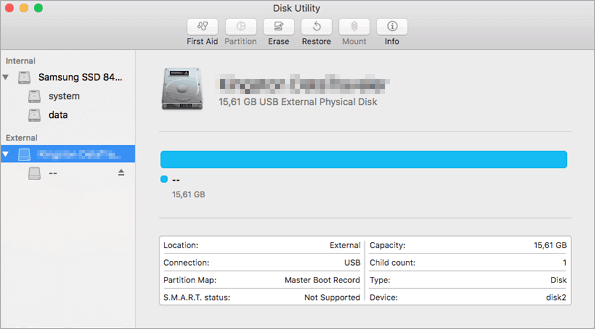
Mac has an inbuilt-in tool to help you format SanDisk Micro SD card. Here are the detailed steps.
Step 1. Connect your SanDisk SD card to your Mac using a card reader.
Step 2. Open "Disk Utility".

Step 3. Select your SanDisk SD card. Choose "Erase" and select "Format".
Step 4. Enter SanDisk SD card name (optional). Choose a file system format. If your SanDisk SD card is 64GB or larger, choose exFAT. If it's 32GB or smaller, choose FAT32.
Step 5. You'll see a confirmation message: "Are you sure you want to erase the partition [your card name]?" Click "Erase".

How to Format SanDisk SD Card on Camera
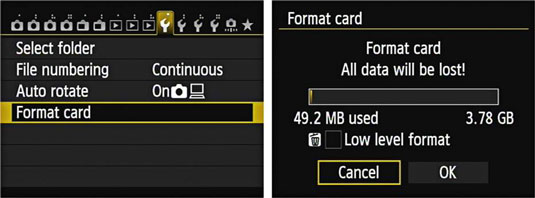
Follow the steps below to format SanDisk SD card on the camera.
Step 1. Turn off the camera and insert the SD card into the proper slot.
Step 2. Turn on the camera. Press the camera Menu button.
Step 3. Select the Setup menu and choose Format, Format Memory Card, or something similar.
Step 4. Select "OK" to start the format.

To Sum Up
We have demonstrated all the ways to format a SanDisk Micro SD card. You can format SanDisk SD card to FAT32 or exFAT on Windows 10 in 4 ways via Qiling SD card format tool, File Explorer, Windows Disk Management, and Diskpart command lines.
On Mac, simply apply the Disk Utility to format and erase the SanDisk SD card. You can also directly format SanDisk SD card on the camera. Now, it's your turn to do it yourself.
Related Articles
- What is Disk Defragmenter Windows 10
- Top 7 Best Partition Recovery Software for Windows 11/10/8/7 in 2022
- Full Guide: Convert/Change File System to NTFS, FAT32, EXT2, or EXT3 Without Losing Data
- Free Download HDD Regenerator Crack + Serial Key (Safe Alternative)