How to Format SSD for Windows & Mac Installation
| Workable Solutions | Step-by-step Troubleshooting |
|---|---|
| Part 1. Format SSD in Windows 11/10/8/7 (3 Ways) |
To format an SSD in Windows 11/10/8/7, the easiest method is to use Qiling Partition software, which can be done through a straightforward process outlined in the "Full steps" link provided. Method 2. Format SSD with Disk Management...Full steps Method 3. Format SSD Using CMD in Windows 11/10...Full steps |
| Part 2. Format SSD on a Mac Device | Step 1. Verify the SSD or connect your SSD to the Mac with a USB cable; Step 2. Open...Full steps |
Why Do You Need to Format an SSD
SSD (Solid-SSDs (Solid State Drives) offer faster load times for games, apps, and movies, making them a popular choice. They're also lighter, more durable, and use less energy than traditional HDDs, allowing computers to run cooler. As a result, many people replace their old HDDs with new SSDs, or even migrate their operating system to an SSD to boost performance. With SSDs becoming increasingly common, formatting or reformatting them is also becoming a necessary step.
1. You have bought a new SSD
When you get a new SSD, you usually need to format it, which allows it to be used on various platforms with different file systems. This process involves partitioning and formatting the drive so it can be mounted as a usable storage volume on your system.
2. You want to install Windows 11/10/8/7 on the SSD
To clean install an OS on an SSD, you'll need to format the SSD, which will erase all data. Alternatively, you can use third-party software to migrate your original OS, programs, and data to the SSD without losing any information. This way, you can keep your existing setup intact.
3. You want to sell your SSD
To sell or donate an SSD, erase personal data and format it, or permanently erase data if you're sure you don't want to keep it.
What to Do Before You Format SSD for Windows 11/10/8/7
Formatting a drive, such as a hard drive, solid-state drive, or USB flash drive, involves preparing the chosen partition to be used by an operating system by deleting all data and setting up a file system. Before formatting an SSD, it's recommended to first perform certain tasks, including.
1. Back up wanted data
Formatting an SSD only clears data on the address tables, and data is lost once new data is written to the marked space. However, if the data is not overwritten, recovery software can be used to recover it. A more straightforward approach is to regularly back up important files from the drive before formatting.
2. Enable TRIM to maintain SSD performance
The TRIM command in an Advanced Technology Attachment (ATA) protocol allows the operating system to inform the Solid-State Drive (SSD) to erase data blocks that are no longer in use, ensuring proper data management when saved to the SSD.
Also read: How to Enable/Disable TRIM on SSD in Windows 11/10
Part 1. How to Format SSD in Windows 11/10/8/7 (3 Ways)
Formatting an SSD is a straightforward process. If your SSD is new, you'll need to initialize it and create a new partition before you can format it. There are three effective methods to do this: initializing the SSD, creating a new partition, and then formatting it, which can be achieved through various methods such as using the built-in disk management tool, a third-party software, or the command line.
Method 1. Format SSD in Windows 11/10/8/7 with Qiling Partition software (Easiest)
Users may need to partition their SSD drive in Windows 11/10 for various reasons, and the process can be either straightforward or challenging depending on the reliability of the partition software used. A trustworthy partitioning tool can make the task easier. Qiling Partition Master is a recommended software for this purpose.
The program is a professional SSD format tool that allows users to format, resize, copy, and convert disk partitions. It enables quick and safe formatting of SSDs into various formats, including NTFS, making it suitable for installing Windows 11/10 on the formatted drive. A video is also available to guide users through the easy and quick formatting process.
If you want to format your SSD with Windows on it, you can follow the detailed guide to learn how to do it properly. The process involves various steps such as checking the SSD's compatibility, creating a backup of your data, disabling any security software, booting from a Windows installation media, selecting the correct drive to format, and finally, formatting the SSD.
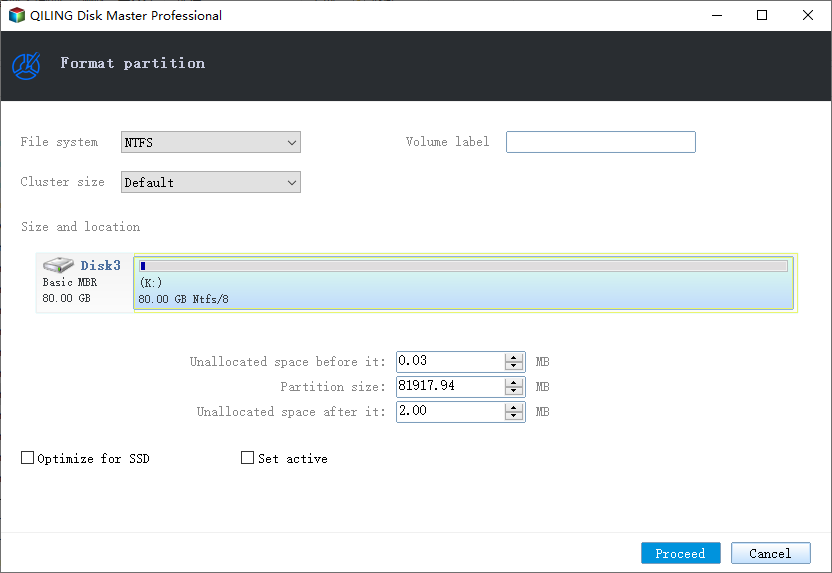
Step 1. Run Qiling Partition Master, click the hard drive partition you intend to format and choose "Format".

Step 2. Set the partition label, file system, and cluster size in the new window, then click "Proceed" to format the partition.

Step 3. To start formatting the partition on your hard drive, click "OK" in the warning window that appears after you select the partition to format. This will initiate the formatting process.
Method 2. Format SSD with Disk Management
To format a partition in Windows using the Disk Management tool, follow these steps: Open Disk Management by searching for it in the Start menu, select the partition you want to format, right-click on it, and choose the "Format" option. In the Format dialog box that appears, you can choose the file system you want to use (such as NTFS or FAT32), assign a drive letter, and optionally check the box to perform a quick format. Click "OK" to start the formatting process. This will erase all data on the partition.
Step 1. At the start, search for "Disk Management" and press "Enter".
Step 2. To format an SSD partition, select the desired partition, right-click on it, and choose the "Format" option from the context menu. This will erase all data on the partition and prepare it for new data to be written.

Step 3. Select the file system and set the cluster size. Place a checkmark next to "Perform a quick format". Click "OK" to format the drive.

- Notice:
- Quick Format VS Full Format: When you choose to format an SSD, you can select either a Full Format or a Quick Format. A Full Format will delete all files on the volume and scan the bad sectors, while a Quick Format will only remove the files without scanning the bad sectors.
When formatting an SSD, it's essential to select the "Quick Format" option to avoid a full read/write cycle, which can reduce the lifespan of the SSD. This is because SSDs use different technology than traditional hard disk drives (HDDs), and their formatting process should be handled accordingly. By choosing Quick Format, you ensure a faster and more efficient formatting process that preserves the SSD's performance and longevity.
Method 3. Format SSD Using CMD in Windows 11/10
If you prefer using the command line to format a drive, Command Prompt is a great option. It's a powerful tool that allows you to manage disks by typing specific command lines, enabling you to solve various Windows issues, such as creating, deleting, or formatting a partition. You can also use it to perform a CHKDSK to check and repair hard drive issues. To format an SSD using CMD, follow the steps below. (Note: I removed the "step by step" part as it's not a command, and also added a brief summary of what the text is about)
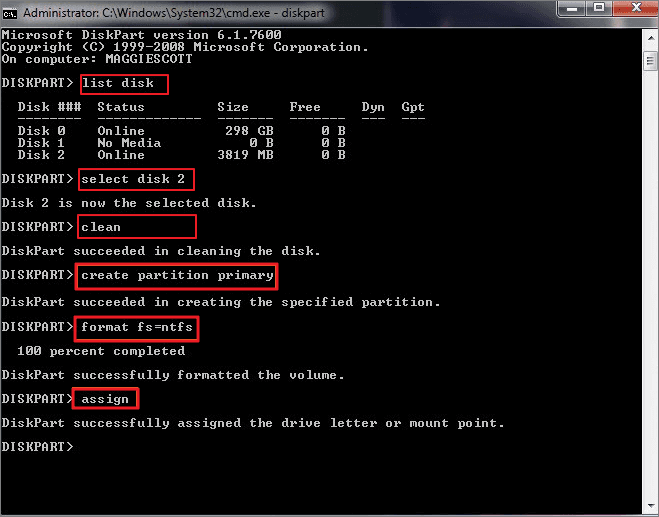
Step 1. To open Command Prompt as an administrator, type "cmd" in the search box, right-click on Command Prompt, and select "Run as administrator".
Step 2. On the Command Prompt black window, type diskpart and press "Enter". Then, type the following command lines in order. Press "enter" every time you enter the command:
list disk
select disk X
clean
create partition primary
format fs=ntfs quick
assign
- X is the partition number of your SSD drive
- Typing assign to assign a drive letter to the newly created partition.

Further reading: How to format SSD from BIOS
You can't format an SSD directly from the BIOS, but you can use a third-party tool like Qiling Partition Master to create a bootable USB drive, change your BIOS settings, and then run an SSD format tool if you're unable to format it in Windows.
Here is a depth guide to create winpe bootable disk.
Part 2. How to Format SSD on a Mac Device
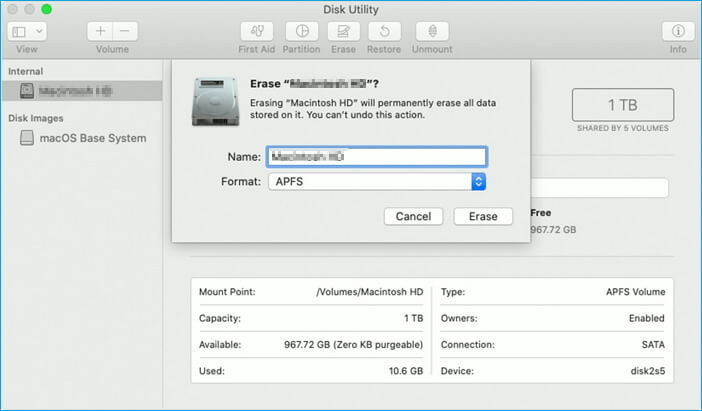
To format an SSD on a Mac, start by backing up any important files to an external drive or USB flash drive. Then, open the Disk Utility app, select the SSD from the list on the left, click the "Erase" button, and choose the APFS file system. This will erase the drive and format it with the correct file system for Macs, ensuring compatibility and functionality.
Step 1. To verify the SSD or connect your SSD to the Mac with a USB cable, you can follow these steps: First, ensure that your SSD is properly connected to the Mac using a USB cable. Next, open the Disk Utility app on your Mac.
Step 2. To erase your SSD, go to "Go" > "Utilities" > "Applications" > "Utilities" and open Disk Utility. Locate your SSD in the Disk Utility window and click on it. Then, click on the "Erase" button and select "Mac OS Extended (Journaled)" from the "Volume Format" drop-down menu.
Step 3. Reset the drive name and click "Erase", confirm the operation on the next pop-up window.

Wait for the process to complete and then you'll get a compatible file system.
Conclusion
If you're a Windows user, you can format your SSD in Part 1 with easy steps, while Mac users can follow Part 2 for detailed steps. If you have other questions about formatting your SSD, feel free to ask.
Related Articles
- Why Is Windows Server Slow and Tips to Speed Up Windows Server in 2022
- Download Free Toshiba Format Tool and Format Toshiba Device with Ease
- How to Format to FAT32 in Windows 11 (4 Useful Methods)
- Extend System Drive but Recovery Partition is in the Way Windows 11/10/8/7