Effective Fixes for Hard Drive Not Detected in Windows 10 Installation
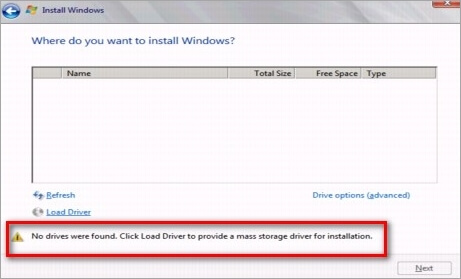
Errors: No Drives Were Found. Click Load Driver to Provide a Mass Storage Driver for Installation
During the process of installing Windows OS on a specified HDD or SSD, you may surprisingly find that the hard disk is not detected during the Windows installation, with either of the following error messages coming along.
"We couldn't find any drives. To get a storage driver, click Load driver." "No drives were found. Click Load Driver to provide a mass storage driver for installation."

However, clicking "Load Driver" doesn't solve the problem at all. What's the next move then? Have you found viable solutions to troubleshoot hard disk not detected in Windows 10 or Windows 7 installation even it's normally connected to the computer?
| Workable Solutions | Step-by-step Troubleshooting |
|---|---|
| 6 Solutions to Fix Hard Drive Not Detected | Method 1. Use a Different SATA Port...Full steps Method 2. Load RAID Driver for RAID Disk...Full steps Method 3. Check the Hard Drive in BIOS...Full steps More ways... |
| Bonus Tip: Free Partition Manager to Enhance System Performance | Launch Qiling Partition Master on your PC > Free up space...Full steps |
How to Fix Hard Disk Not Detected in Windows 10 Installation
Even though Windows 10 or Windows 7 installations include almost all disk drivers, the "No drives were found. Click load driver to provide a mass storage driver for installation" issue occurs from time to time and you find no way to out. When you encounter Windows 10 install not detecting hard drive or Windows 7 couldn't find any drivers to get storage driver problems, try the practical six ways below.
Method 1. Use a Different SATA Port
If you are using a desktop computer, try using a different SATA port and see if that helps at all. Sometimes they come with two different controllers.
Method 2. Load RAID Driver for RAID Disk
Windows 10 install not detecting hard drive mostly occurs on RAID disk. In this case, you need to load RAID drivers manually to fix the issue.
Step 1. On the Windows Setup windows, you will see Where do you want to install Windows? And there is no hard drive detected. Click "Load Drivers" at the bottom left of the screen, then click "Browse" to choose the device driver.

Step 2. Go to your computer or storage device to find and load an available RAID driver.

Step 3. After the device diver has been loaded, Windows 10 installing will successfully detect the hard disk. Then, follow the onscreen instructions to install Windows.

Method 3. Check the Hard Drive in BIOS
Otherwise, take some time to check if hard drive shows up in BIOS, especially you're installing an operating system from a bootable USB or CD/DVD disc.
By holding and pressing F2, you'll enter BIOS settings. See if the hard drive showing up there. Click solution to repair hard drive not showing in BIOS.
If not, check your BIOS settings for the following parameters:
* SATA configuration -> Enhanced
* Configure SATA -> AHCI
Method 4. Check the Status of Your Hard Drive
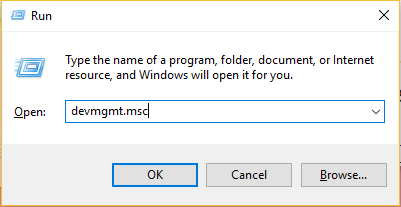
Step 1. Press Windows + R and the window will pop up.
Step 2. Input devmgmt.msc and press Enter.

Step 3. Choose Disk Drives and right-click the hard drive.

Step 4. Click Properties and check the status of your hard drive. If it is Ok, showing "This device is working properly".
Method 5. Boot from Windows 10 Install Media
Microsoft also provides a method about boot from the Window 10 Install Media. You can take these steps to fix the issues "drive not showing up when Windows 10 install".
Step 1. Choose Install Now > Accept License Agreement > Choose the installation type and click "Custom Advanced".
Step 2. Press Shift + F10.
Input each command and press Enter: DISKPART > list volume > select disk* > clean > convert mbr > create partition primary > active > format quick fs=ntfs >exit
Then you can install Windows again.
Method 6. Ask Help from the Manufacturer
Since the manner of installing or reinstalling Windows OS happens so frequently that most personal PC or desktop manufacturers have built-in checking tools for quick troubleshooting and repair. For example, Dell Online Diagnostic Tool, Lenovo Diagnostic Software for Hard Drive Quick Test, etc. So if you're their customers, feel no hesitate to ask help from the manufacturer and learn how to use tools to fix hard drive not detected issues alright.
Bonus Tip: Free Partition Master to Enhance System Performance
You can enjoy the exciting features of the latest system after successful Windows 10 installing. Furthermore, to enhance system performance and let software and hardware cooperate to achieve an optimal operating state, it's necessary for you to have free partition management software, which enables you to organize and optimize your hard drive to extend your computer's life and capableness.
Qiling Partition Master Free is a versatile partition management program that provides one-stop partition and disk management solutions, for instances:
- Resize/move partitions by sliding the partition left and right or enter the exact partition size you want, such as increase C drive to speed up your computer
- Create, format and delete partitions
- Completely wipe out all the data on the hard disk permanently
Now, download this ultimate Windows 10/8/7 disk management tool and follow the simple steps below to resize and move your partitions.
Step 1. Shrink partition to free up space to extend partition.
If the hard drive has enough unallocated space to extend the target partition, jump to Step 2, and continue. If not, free up space first:
- Right-click on a partition next to the target partition and select "Resize/Move".
- Drag the partition ends to free up space, leaving enough unallocated space behind the target partition, click "Proceed".

Step 2. Extend target partition.
Click on the target partition and select "Resize/Move".

Drag the target partition handle into the unallocated space to extend partition.
Step 3. Keep all changes.
Click the "Proceed" to keep all changes.
Windows 10 Install Not Detecting Hard Drive FAQs
1. How do I fix no device drivers found?
Fixes for No Device Drivers Were Found:
Solution 1. Switch to a USB 2.0 Port
Solution 2. Set the partition where you want to install Windows to as Activeewe
Solution 3. Create a New Disc
Solution 4. Enable the xHCI hand-off Option in BIOS
Solution 5. Change everything to legacy and set the boot device to your DVD or USB
2. Where do you want to install Windows 10 no drives were found?
To fix "No drives were found. Click load driver to provide a mass storage driver for installation", do it in the following way:
Step 1. Click "Load Drivers" at the bottom left of the screen, then click "Browse" to choose the device driver.
Step 2. Choose and load an available RAID driver.
Step 3. After Windows 10 installing successfully detects the hard disk, follow the onscreen instructions to install Windows.
3. Where do you want to install Windows 7 no drives were found?
Fix: No Hard Drives Found in Windows 7 Installer:
Solution 1. Format the hard drive using diskpart in command prompt.
Solution 2. Load the hard drive storage controller drivers from a USB into the Windows setup.
Solution 3. Change the boot controller mode in BIOS.
Solution 4. Reset BIOS.
Solution 5. Use a different SATA port.
4. How do I install drivers for my hard drive?
The basic steps to install drivers for a hard drive are:
Step 1. Configure the drive as a master or slave device (PATA only).
Step 2. Mount the drive in the chassis.
Step 3. Connect the data cable to the drive and to the PATA or SATA interface.
Step 4. Connect a power cable to the drive.
Step 5. Restart the system and run the BIOS Setup.
Step 6. If you are also installing a PATA or SATA interface card or RAID adapter, configure that card per the maker's instructions and attach the cables to it.
Related Articles
- How to Format WD Passport for Mac and PC (3 Ways)
- [Fixed] Boot Device Not Found Error in Windows 10/8/7
- How to Merge Partitions in Windows 11/10/8/7
- Patriot Formatter | The Best USB Format Tool for Patriot Flash Drive