How to Rebuild and Repair Partition Table
What Is a Partition Table
A partition table is a table on a disk that describes the partitions on that disk, maintained by the operating system. It is typically associated with the Master Boot Record (MBR) and other formats like GUID Partition Table (GPT), Apple Partition Map (APM), and BSD disklabel. - From Wikipedia
Corrupted Partition Table
The partition table allows a computer to detect and manage existing hard drives, enabling users to create, resize, and delete partitions on the disk. This process is typically initiated during the installation of an operating system, such as Windows or macOS.
When a disk's partition table becomes corrupted, it can no longer be accessed, rendering the saved data on the partition unusable. However, most users are unaware of how to identify whether the table has been damaged or corrupted, making the process of checking complicated.
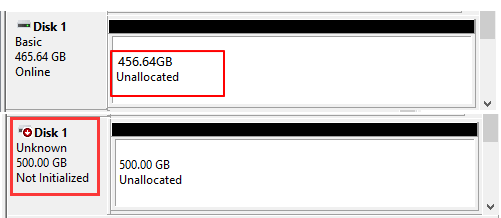
When the partition table becomes corrupted or damaged, the disk may appear as "Unallocated" or "Not Initialized" in the Disk Management. This can occur due to various reasons such as power failures, disk errors, or software malfunctions.

The solutions to two disk issues are distinct, and you can find step-by-step guides on this page to repair or rebuild a corrupted partition table without losing any data.
Solution 1. Recover Partition Table - Restore Partition from Unallocated Space
When a disk becomes unallocated, you can recover the corrupted partition table using professional partition recovery software like Qiling Partition Recovery, which can effectively restore missing partitions with saved data, including NTFS and FAT partitions on Windows 11/10/8/7/XP/Vista.
After the scanning process is complete, you can preview the saved data on your disk by double-clicking on the found partitions, and you don't need to pay for the software until you're sure it can recover your lost partition and data.
Step 1. Run Qiling Partition Recovery on your PC.
The instructions are to select the disk or device where the lost partition(s) are located and then click "Proceed" to continue with the recovery process.

Step 2. Wait for the scanning process to complete.
Let the program scan the selected disk and find the lost partition(s).
Step 3. Preview and restore the lost partition(s).
Double-click on the partition which is marked as "Lost" with "Good" recoverability.
Preview the content of the lost partition, click "OK", and click "Proceed" to start restoring the lost partition.

Step 4. Click "Recover" to finish the partition recovery process.
If the program warns you of a conflict, back up the listed partition with essential data to an external hard drive first, then execute the final operation to restore your lost partition.
Reboot the computer when the process is finished and you will find everything is just what it was. If this software fails, stay calm. You can follow the steps in Solution 2 for help.
Solution 2. Restore Partition Table - Initialize Disk, Restore Data and Recreate Partitions
If the whole disk shows as "Not Initialized" in disk management, the partition table is corrupted. To repair the corrupted partition table and restore all saved data on the disk, you'll need to use a third-party software to recover the data and then use the built-in disk management tool to recreate the partition table. This process can be done in three phrases: first, download and install a data recovery software, such as EaseUS Data Recovery Wizard, to scan the disk and recover all saved data; second, use the built-in disk management tool to delete the corrupted partition table; and third, recreate the partition table and format the disk to make it usable again.
Phrase 1 - Initialize Disk in Disk Management
Step 1. To access Disk Management, right-click on "This PC/My Computer" and select "Manage". Then, click on "Disk Management".
Step 2. Right-click on the disk that is showing as "Not Initialized" and select "Initialize Disk" from the menu.

Step 3. To select the desired partition style for the selected disk, you need to choose between MBR (Master Boot Record) and GPT (GUID Partition Table) and click "OK" to confirm. This step is crucial in preparing the disk for the installation of an operating system.

Phrase 2 - Recover Restore Data from Unallocated Space
Before creating new partitions on the disk, prioritize recovering and restoring saved data from the unallocated disk, especially if important files are stored on it. This ensures that you don't overwrite or lose crucial information. Once the recovery process is complete, you can then consider re-partitioning the disk.
ALL-Deep Data Recovery software supports recovering files from lost partitions on unallocated disk under Windows 10/8.1/8/7/Vista/XP, etc. in just three steps.
Step 1. Select file types and click "Next" to start
Launch Deep Data Recovery software, select the file types you want to recover, and click "Next" to begin the recovery process.

Step 2. Select and scan the lost partition
To recover lost data, select "Lost Partition" and click "Scan" to search for all the lost data. If there are multiple lost partitions, you can identify them through their partition size.
Since Windows doesn't support the Linux file system, an Ext2 or Ext3 partition will be recognized as a lost partition with no drive letter. If you need to recover data from an Ext2/Ext3 partition, follow these steps.

Step 3. Filter the scanned results
You can quickly filter scanned files by category, such as Pictures, Videos, Documents, Audio, and Others, or search for a specific file by name in the search box.

Step 4. Preview and recover data from the lost partition
Before recovering the files, you can preview them to ensure they're the ones you need. Select all the files you want to recover and click "Recover" to restore them.
Save the recovered data to another secure disk or external hard drive before making the disk work again. To do this, you can use a different computer or a USB drive to transfer the recovered data to a secure location, then safely remove the recovered disk from the computer. This will ensure that the recovered data is preserved and protected.
Phrase 3 - Create or Recreate Partitions on the Unallocated Disk
To repair the partition table, you'll create new partitions on the unallocated disk, which will rebuild the partition table.
Step 1. To access Open Disk Management, you can press the Windows key + R to open the Run dialog box, type "diskmgmt.msc" and press Enter.
Step 2. Select "New Simple Volume".

Step 3.To create a new simple volume, enter the New Simple Volume Wizard interface and click "Next". Assign a drive letter or path, and set the file system to NTFS. Finally, click "Finish" to complete the process.

To create a partition on a disk, first, ensure the disk is not in use by other applications. Open the Disk Management tool, which can be accessed by right-clicking on 'This PC' or 'Computer' and selecting 'Manage' or by searching for 'Disk Management' in the Start menu. In the Disk Management tool, right-click on the unallocated space on the disk and select 'New Simple Volume.
To rewrite data to the disk partition, you can follow these steps: Use the `dd` command to write the data back to the disk partition, specifying the original partition and the new data. For example, if the original partition was `/dev/sda1` and the new data is stored in the file `data.
How to Recover Partition Table When Computer Can't Boot
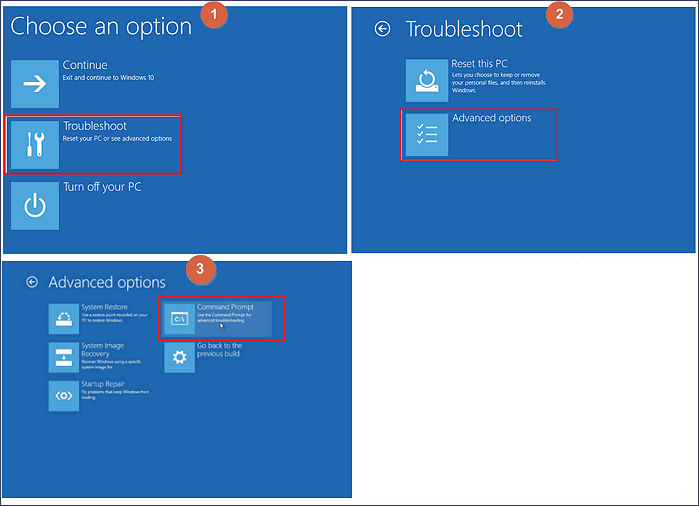
If the partition table on the boot disk is damaged, you will likely encounter a blue or black screen when trying to boot the computer. To repair the partition table, you can use the Command Prompt with a Windows installation DVD/CD. This allows you to fix the partition table in Windows 10 with a bootable device.
Step 1. To fix the issue, boot your computer from the original installation DVD (or the recovery USB) to restore the system to its original state. This will allow you to troubleshoot and resolve the problem.
Step 2. To start the repair process, click on "Repair your computer" in the lower-left corner of the start screen.
Step 3. Choose "Troubleshoot > Advanced Options > Command Prompt".

Step 4. When the Command Prompt loads, type the following commands and press Enter after each:
- Bootrec.exe/fixmbr
- Bootrec.exe/fixboot
- Bootrec.exe/rebuildbcd
Step 5. When the process is complete, close the Command Prompt, remove the DVD, and restart the computer to verify if the partition table has been successfully recovered.
Bonus Tip: Protect Hard Disk Data with Regular Backup
If your disk shows unallocated, initialized, or unbootable, you can try three reliable solutions to repair or recover the partition table. A partition recovery software can help you recover lost partitions, while manual methods like checking the disk for errors, running a disk check, and using a command-line tool to rebuild the partition table can also be effective.
To protect your hard disk data, create regular backups of valuable data or use a free backup software like Qiling Backup to automatically back up your data.

Related Articles
- Qiling Partition Recovery Software Free Download Full Version Windows 10/11
- How to Recover and Repair USB Drive/SD Card Partition in 2022
- Accidentally Formatted/Deleted HP Recovery Partition, How to Recover
- How to Restore Lost or Deleted Hard Disk Partition